crwdns2933423:0crwdne2933423:0

Shark Clean Sense HP102PET Shell Replacement

crwdns2942213:0crwdne2942213:0

  1. Shark Clean Sense HP102PET Shell Replacement, Outer White Shell: crwdns2935265:01crwdnd2935265:01crwdnd2935265:03crwdne2935265:0 Shark Clean Sense HP102PET Shell Replacement, Outer White Shell: crwdns2935265:01crwdnd2935265:02crwdnd2935265:03crwdne2935265:0 Shark Clean Sense HP102PET Shell Replacement, Outer White Shell: crwdns2935265:01crwdnd2935265:03crwdnd2935265:03crwdne2935265:0
    • Turn off and unplug the air purifier before beginning.

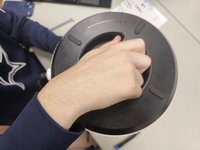
    • Unscrew the one 1.2 cm screw holding the grate at the top with a TR10 Torx screwdriver.

    • Use a prying tool to carefully pry along the outer edges to disengage the inner retaining clips.

    • These retaining clips can be difficult to disengage, but releasing two clips on the same side should allow you to easily remove the grate.

    • Remove the grate.

  2. Shark Clean Sense HP102PET Shell Replacement: crwdns2935265:02crwdnd2935265:01crwdnd2935265:01crwdne2935265:0
    • Remove the two 1.2 cm screws with a TR10 Torx screwdriver.

    • Almost all screws are the same length (around 1 cm). The main difference is the bit that's used to remove them.

  3. Shark Clean Sense HP102PET Shell Replacement: crwdns2935265:03crwdnd2935265:01crwdnd2935265:01crwdne2935265:0
    • Use a Phillips #1 screwdriver to remove the four 1 cm screws.

    • This will make the fan holder slightly loose, but this will not be a problem until you open the case completely.

  4. Shark Clean Sense HP102PET Shell Replacement: crwdns2935265:04crwdnd2935265:01crwdnd2935265:03crwdne2935265:0 Shark Clean Sense HP102PET Shell Replacement: crwdns2935265:04crwdnd2935265:02crwdnd2935265:03crwdne2935265:0 Shark Clean Sense HP102PET Shell Replacement: crwdns2935265:04crwdnd2935265:03crwdnd2935265:03crwdne2935265:0
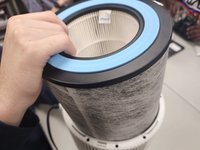
    • Flip the device over and unscrew the bottom by turning it clockwise.
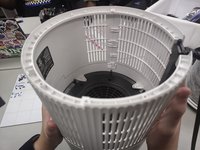
    • Remove the filter.

  5. Shark Clean Sense HP102PET Shell Replacement: crwdns2935265:05crwdnd2935265:01crwdnd2935265:02crwdne2935265:0 Shark Clean Sense HP102PET Shell Replacement: crwdns2935265:05crwdnd2935265:02crwdnd2935265:02crwdne2935265:0
    • Remove the five 1 cm a Phillips screwdriver.

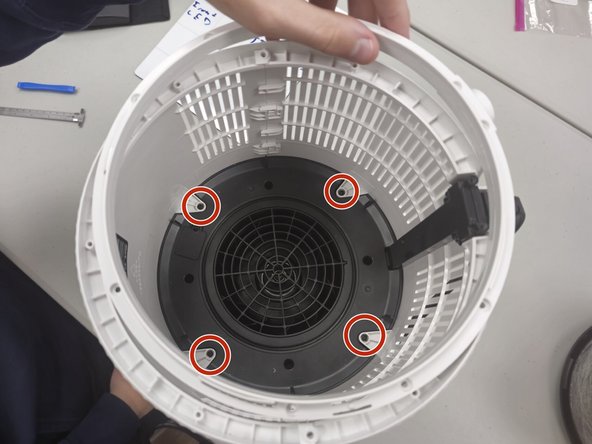
    • Unscrew the four 1.2 cm screws with a TR10 Torx screwdriver.

    • The ring will not be hard to remove, but be careful on reassembly. Make sure that the power connector is properly seated when putting the ring back on.

    I just took my model apart (purchased in 2023) and for this step mine only had T10 1.2cm screws on the shell seams (I have 5 total — 4 for the seams and 1 that holds down the top grate). The rest of mine are Phillips 1cm screws. Just in case anyone with my model follows these steps to put everything back together!

    Maddie D - crwdns2934203:0crwdne2934203:0

  6. Shark Clean Sense HP102PET Shell Replacement: crwdns2935265:06crwdnd2935265:01crwdnd2935265:02crwdne2935265:0 Shark Clean Sense HP102PET Shell Replacement: crwdns2935265:06crwdnd2935265:02crwdnd2935265:02crwdne2935265:0
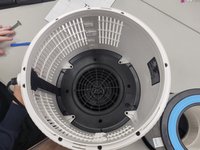
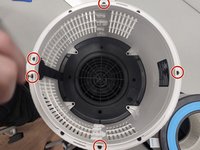
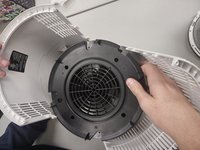
    • Remove the four 1 cm screws that secure the fan housing.

  7. Shark Clean Sense HP102PET Shell Replacement: crwdns2935265:07crwdnd2935265:01crwdnd2935265:03crwdne2935265:0 Shark Clean Sense HP102PET Shell Replacement: crwdns2935265:07crwdnd2935265:02crwdnd2935265:03crwdne2935265:0 Shark Clean Sense HP102PET Shell Replacement: crwdns2935265:07crwdnd2935265:03crwdnd2935265:03crwdne2935265:0
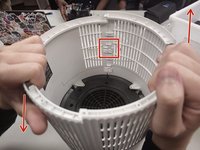
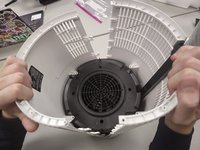
    • Make sure that you are pulling up on the side that allows, as pictured in the red box.

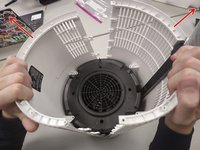
    • Gently slide the cases up and down, or hold one and gently pull up on the opposite side (Down on the left, up on the right for this picture).

    • The whole case will start to separate and the black disc will come loose. This is normal.

  8. Shark Clean Sense HP102PET Shell Replacement: crwdns2935265:08crwdnd2935265:01crwdnd2935265:03crwdne2935265:0 Shark Clean Sense HP102PET Shell Replacement: crwdns2935265:08crwdnd2935265:02crwdnd2935265:03crwdne2935265:0 Shark Clean Sense HP102PET Shell Replacement: crwdns2935265:08crwdnd2935265:03crwdnd2935265:03crwdne2935265:0
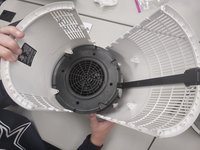
    • Gently open the case outwards as there are fragile electronics inside.

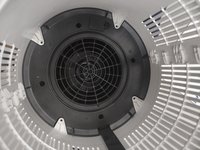
    • Remove the fan housing.

crwdns2915888:0crwdne2915888:0

To reassemble your device, follow these instructions in reverse order.

crwdns2935227:0crwdne2935227:0

KyreseAguilar

crwdns2935283:008/28/24crwdne2935283:0

727 crwdns2915208:0crwdne2915208:0

crwdns2935297:05crwdne2935297:0

crwdns2915084:0crwdne2915084:0

University of North Texas, Team 7-14, Kilpatrick Fall 2024 crwdns2935289:0University of North Texas, Team 7-14, Kilpatrick Fall 2024crwdne2935289:0

UNT-KILPATRICK-F24S7G14

crwdns2931471:04crwdne2931471:0

crwdns2935297:05crwdne2935297:0

crwdns2947410:01crwdne2947410:0

Thank you for this! My air purifier was making noise and I couldn’t find any guides to take it apart. This helped me clean it out and get rid of the noise! :-)

Maddie D - crwdns2934203:0crwdne2934203:0

crwdns2917038:0crwdne2917038:0

crwdns2936625:0crwdne2936625:0:

crwdns2936751:024crwdne2936751:0 0

crwdns2936753:07crwdne2936753:0 2

crwdns2936753:030crwdne2936753:0 28

crwdns2942667:0crwdne2942667:0 122