crwdns2933423:0crwdne2933423:0

Service door disassembly

crwdns2942213:0crwdne2942213:0

  1. Service door disassembly, Remove the battery: crwdns2935265:01crwdnd2935265:01crwdnd2935265:03crwdne2935265:0 Service door disassembly, Remove the battery: crwdns2935265:01crwdnd2935265:02crwdnd2935265:03crwdne2935265:0 Service door disassembly, Remove the battery: crwdns2935265:01crwdnd2935265:03crwdnd2935265:03crwdne2935265:0
    • Turn the laptop upside down and gently lay it down on a flat surface.

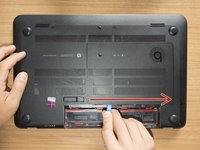
    • Slide the battery release latch to the right and the battery will pop up slightly.

    • While keeping the latch slid with one hand, grab the battery with the other hand and remove it by pivoting it upward.

    • At this point some users would turn the laptop upside down once again and press the power button a couple of times. They say that this should help dissipating all of the remaining electricity around the device. Up to you :)

  2. Service door disassembly, Remove the captive screw of the service door: crwdns2935265:02crwdnd2935265:01crwdnd2935265:01crwdne2935265:0
    • Remove the Phillips PM2.0×4.0 screw using a PH#00 screwdriver.

  3. Service door disassembly, Remove the service door: crwdns2935265:03crwdnd2935265:01crwdnd2935265:03crwdne2935265:0 Service door disassembly, Remove the service door: crwdns2935265:03crwdnd2935265:02crwdnd2935265:03crwdne2935265:0 Service door disassembly, Remove the service door: crwdns2935265:03crwdnd2935265:03crwdnd2935265:03crwdne2935265:0
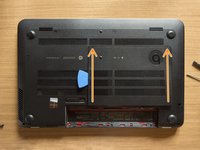
    • With an opening tool pry off the tabs that secure the service door to the base enclosure. Start with the long edge.

    • Continue along the short edges.

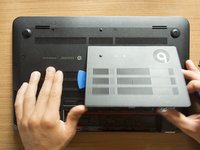
    • Once you have pried the service door off as it is in pic#3, it will come out of the rear edge very easily.

  4. Service door disassembly, Identify the components: crwdns2935265:04crwdnd2935265:01crwdnd2935265:01crwdne2935265:0
    • RAM memory modules

    • HDD (Hard Disk Drive)

    • mSATA SSD slot

    • Wifi & BT module (Wireless card)

crwdns2915888:0crwdne2915888:0

To reassemble your device, follow these instructions in reverse order.

Roberto Bartolacci

crwdns2935283:002/10/18crwdne2935283:0

1,518 crwdns2915208:0crwdne2915208:0

crwdns2935297:09crwdne2935297:0

crwdns2947412:00crwdne2947412:0

crwdns2917038:0crwdne2917038:0

crwdns2936625:0crwdne2936625:0:

crwdns2936751:024crwdne2936751:0 0

crwdns2936753:07crwdne2936753:0 2

crwdns2936753:030crwdne2936753:0 9

crwdns2942667:0crwdne2942667:0 271