crwdns2915892:0crwdne2915892:0
How to open the Sega Game Gear case.
crwdns2942213:0crwdne2942213:0
-
-
Place your device upside down and locate the two battery compartments.
-
-
-
Press on the tabs at the bottom of the battery covers then lift up to remove.
-
Remove batteries if they are present.
-
-
-
-
Remove the following screws:
-
Six Phillips screws
-
One 4.5 mm Gamebit screw
It says remove 7 Philips screws, the picture shows 6 but one is incorrect.
The thread below the label has no screw, but there is another one in the other battery compartment.
The hole below the label is for a security bolt when stores put them on display.
The screw hole in the bottom center is for the PowerBack. Also there are not 7 screws there are only 6
-
-
crwdns2935267:0crwdne2935267:0Tweezers$4.99
-
Use tweezers to take all other screws out.
-
-
-
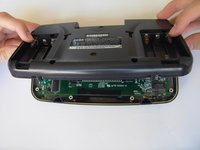
Gently open the case by unfolding it over the top of the Sega Game Gear.
-
-
-
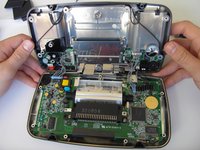
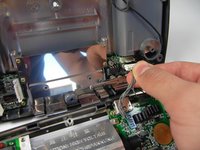
Carefully unplug the 2 white-tipped connectors on the top cover.
Il faut aussi débrancher le connecteur du haut parleur (2 broches, en haut à droite).
There is a third cable on the right side of the top half in this picture which is the speaker. Unplug that too.
-


To reassemble your device, follow these instructions in reverse order.
To reassemble your device, follow these instructions in reverse order.
crwdns2935221:0crwdne2935221:0
crwdns2935229:09crwdne2935229:0
crwdns2915084:0crwdne2915084:0

Cal Poly, Team 28-33, Regan Spring 2010 crwdns2935289:0Cal Poly, Team 28-33, Regan Spring 2010crwdne2935289:0
CPSU-REGAN-S10S28G33
crwdns2931471:05crwdne2931471:0
crwdns2935297:019crwdne2935297:0
crwdns2947410:01crwdne2947410:0
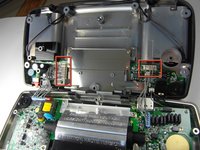
Is this guide made to help replacing the Game Gear shell? Almost doesn't seem like a thorough guide, I'm still seeing screws on the motherboard in the last photo, I assume those get taken out too?