crwdns2915892:0crwdne2915892:0
After 20+ years, the capacitors in the Sega Game Gear will begin to leak and fail. If you have an old Sega Game Gear that powers on and then right back off, has low/no sound or a dim screen replacing these capacitors with new ones can potentially breathe new life into your classic console.
crwdns2942213:0crwdne2942213:0
-
-
After 20+ years, the capacitors in the Sega Game Gear will begin to leak and fail. Replacing these capacitors with new ones can potentially breathe new life into your classic console.
-
-
-
Pop open the two battery compartment covers on the back of your Game Gear and remove the batteries.
-
-
-
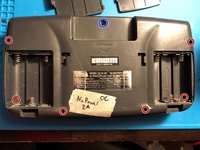
Remove 6 #1 Phillips Head screws. (Red)
-
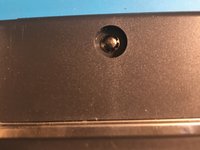
There is a 7th security screw (Blue), designed to prevent you from opening the device without special tools. The bit you'll need to remove this screw is called a "4.5mm Game Bit." (Also known as the 4.5mm Nutsetter)
-
-
-
Carefully lift up the back half of the case. There are cables connected to the back case that will need to be unplugged before the back can be fully removed.
-
-
-
-
To determine the correct number of capacitors, capacitance values, and board layout, you need to identify which board version your Game Gear has. **If your Game Gear does not match the variants listed here, you can simply read the values on the capacitors and compile a list of what values and quantities you will need**
-
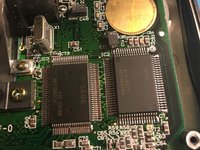
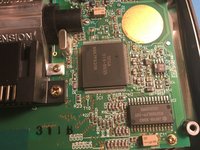
To determine what version you have, look on the right side of the board. You will either have one or two of these ASIC chips.
-
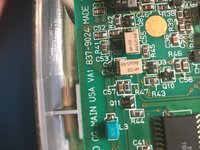
If your Game Gear has two ASIC chips (Fig. 1) there will be two IC's on the right side of the board, and it should be a VA1. If your Game Gear has one ASIC (Fig. 2), it will likely be a VA4, however, there are further possible variations.
-
Look on the left edge of the main board for the VA number (Fig. 3). There are two options, VA1 and VA4, as well as a 7 digit board number.
-
-
-
Use the board number to determine which capacitor list (see attached PDF) you need for that board: 837-XXXX
-
For Main Boards marked VA1 with 2 ASIC chips, and board numbers 837-7398, 837-7719, & 837-7996: Capacitor List 1
-
For Main Boards marked VA1 with 1 ASIC chip and board numbers 837-8560 & 837-9024: Capacitor List 2
-
For Main Boards marked VA4, 837-9537: Capacitor List 3
-
For Main Boards marked VA4, 837-9537-01: Capacitor List 4
-
For Main Boards marked VA5, 837-10766 or marked 1.71-7923A from the Majeseco Game Gears: Capacitor List 5
-
-
-
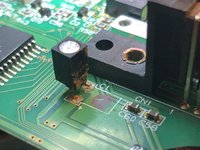
One of the two daughter boards is the power supply. Use the info below to determine which capacitors you need:
-
For Power Board from systems with main boards marked 837-9025 & 837-7720-01: C5 22uF 35v, C11 100uF 25v, C13 820uF 6.3v
-
For Power Boards with main boards marked VA4 837-9538, you need the same capacitors as the list above and an additional C9 10uF 16v
-
-
-
The second daughter board is the audio board. These should all have the same capacitors: C1 100uF 6.3V, C2 100uF 6.3V, C3 100uF 6.3V, C5 47uF 4V, C7 47uF 4V
-
-
-
Remove 8 Phillips screws and lift the main circuit board out of the case. Be gentle with the screen!
-
-
-
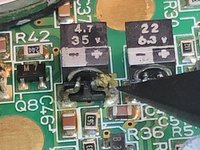
The old capacitors are these rectangle shaped components shown here.
-
The factory capacitors are glued down. Using a small pair of needle nose pliers, gently pull up on the capacitor to break it free.
-
The capacitors are surface-mount, so simply melt the solder on each leg and pull it free.
-
Only replace ONE capacitor at a time. This minimizes the chances of you forgetting which ones went where.
-
-
-
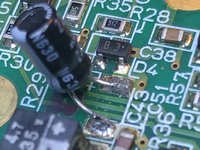
Electrolytic Capacitors such as these are polarized, meaning they have a positive lead and a negative lead. Pay close attention to which leg is where on the old capacitor and be sure to correctly orient the new one
-
Clean up the space where the old capacitor was glued down and tin the pads with fresh solder. Be sure to clean up any leaked substances and corrosion with 99% Isopropyl Alcohol.
-
Bend and clip the leads to a manageable length on your new capacitor and solder it in place. Be sure that when you lay the capacitor down it doesn't extend over any gold circles on the circuit board as these are places that the upper case makes contact with when the Game Gear is assembled
-


To reassemble your device, follow the disassembly instructions in reverse order.
crwdns2935221:0crwdne2935221:0
crwdns2935229:029crwdne2935229:0
crwdns2935103:0crwdne2935103:0

crwdns2935287:0crwdne2935287:0

Mad Motors LLC crwdns2935289:0Mad Motors LLCcrwdne2935289:0
Business
crwdns2934841:01crwdne2934841:0
crwdns2935297:06crwdne2935297:0
crwdns2947412:010crwdne2947412:0
Thank you, this made the process extreamly easy
I ma not able to open the pdf file I just take me to another page but everything else it works
I just tried it on my computer and it still works for me. Do you have Adobe downloaded on the computer you’re using? If you still can’t get it to work let me know and I’ll try to email you the word document.
Travis -
Hi Travis,
Thanks for putting this guide together. I am having the same issue as Henry—if I click the View button next to “See Attached PDF” and then click on “Sega Game Gear Capacitor Replacement”, the website returns me to this guide instead of opening the PDF. Tried it in Edge and Chrome. Do you still have another copy of the guide available?
It turns out that the link to the PDF that is listed under the Parts section is broken. If you scroll down to the link below the Conclusion section you can download or open the PDF just fine. I’ll leave my question and answer up here in case anyone else has the issue.