crwdns2933423:0crwdne2933423:0

Sega Dreamcast Power Supply Replacement

crwdns2942213:0crwdne2942213:0

  1. Sega Dreamcast Power Supply Replacement, Expansion Bay: crwdns2935265:01crwdnd2935265:01crwdnd2935265:02crwdne2935265:0 Sega Dreamcast Power Supply Replacement, Expansion Bay: crwdns2935265:01crwdnd2935265:02crwdnd2935265:02crwdne2935265:0
    • Verify that the console is disconnected from the AC outlet before you begin.

    • Flip the console over on its back.

    • Take note of your model number, in case replacement parts are needed.

  2. Sega Dreamcast Power Supply Replacement: crwdns2935265:02crwdnd2935265:01crwdnd2935265:03crwdne2935265:0 Sega Dreamcast Power Supply Replacement: crwdns2935265:02crwdnd2935265:02crwdnd2935265:03crwdne2935265:0 Sega Dreamcast Power Supply Replacement: crwdns2935265:02crwdnd2935265:03crwdnd2935265:03crwdne2935265:0
    • Remove the expansion bay by applying pressure to the small clip on the expansion bay while prying it away from the console.

  3. Sega Dreamcast Power Supply Replacement, Top Cover: crwdns2935265:03crwdnd2935265:01crwdnd2935265:01crwdne2935265:0
    • Locate and remove all four black 12mm Phillips #02 screws from the underside of the console.

    • Note: Remove the expansion bay to locate the fourth screw

  4. Sega Dreamcast Power Supply Replacement: crwdns2935265:04crwdnd2935265:01crwdnd2935265:01crwdne2935265:0
    • Internal components can be loose. Be careful that they do not fall out when removing the cover.

    • Turn the console right side up.

    • Remove the top cover by gently lifting the upper portion of the console.

  5. Sega Dreamcast Power Supply Replacement, Power Supply: crwdns2935265:05crwdnd2935265:01crwdnd2935265:02crwdne2935265:0 Sega Dreamcast Power Supply Replacement, Power Supply: crwdns2935265:05crwdnd2935265:02crwdnd2935265:02crwdne2935265:0
    • Unplug the device from the outlet. If you have just powered off the system, allow a few minutes for the capacitors to discharge before you begin working.

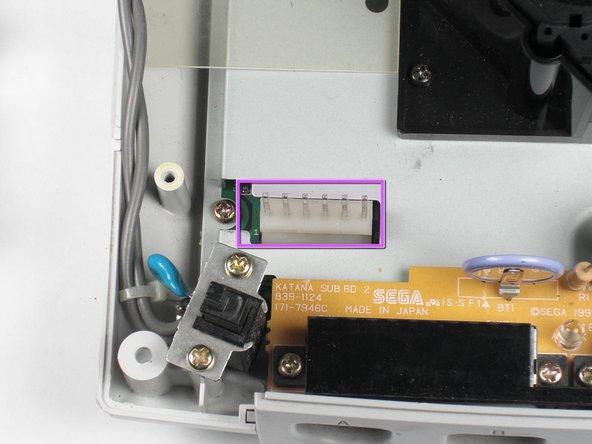
    • Remove the white female pin head by pinching and lifting directly up on the harness.

    • Remove the two Philips #02 screws from the board.

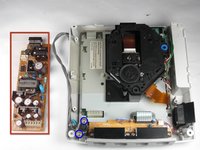
    • Remove the power board. Using both hands, gently lift the power board away from the console without damaging the male pin head

  6. Sega Dreamcast Power Supply Replacement: crwdns2935265:06crwdnd2935265:01crwdnd2935265:02crwdne2935265:0 Sega Dreamcast Power Supply Replacement: crwdns2935265:06crwdnd2935265:02crwdnd2935265:02crwdne2935265:0
    • Remove the unit. Carefully remove the power board from the console by lightly grasping the board by the edge and lifting directly upward.

    • Remove the two 10mm #02 Philips screws to detach the switch module from the console.

    • Purchase a replacement power board.

crwdns2915888:0crwdne2915888:0

To reassemble your device, follow these instructions in reverse order.

crwdns2935229:06crwdne2935229:0

Jacks216

crwdns2935283:011/25/09crwdne2935283:0

103 crwdns2915208:0crwdne2915208:0

crwdns2935295:0crwdne2935295:0

crwdns2915084:0crwdne2915084:0

Cal Poly, Team 5-1, Regan Fall 2009 crwdns2935289:0Cal Poly, Team 5-1, Regan Fall 2009crwdne2935289:0

CPSU-REGAN-F09S5G1

crwdns2931471:05crwdne2931471:0

crwdns2935297:021crwdne2935297:0

crwdns2944067:00crwdne2944067:0

crwdns2917038:0crwdne2917038:0

crwdns2936625:0crwdne2936625:0:

crwdns2936751:024crwdne2936751:0 3

crwdns2936753:07crwdne2936753:0 16

crwdns2936753:030crwdne2936753:0 68

crwdns2942667:0crwdne2942667:0 17,158