crwdns2933423:0crwdne2933423:0

Sanyo-PM 8200 Motherboard Replacement

crwdns2942213:0crwdne2942213:0

  1. Sanyo-PM 8200 Motherboard Replacement, Power Off Phone: crwdns2935265:01crwdnd2935265:01crwdnd2935265:01crwdne2935265:0
    • Power down the phone by holding down the red "end" button.

  2. Sanyo-PM 8200 Motherboard Replacement, Remove Old Battery: crwdns2935265:02crwdnd2935265:01crwdnd2935265:01crwdne2935265:0
    • Push and hold the button on the back toward the direction of the arrow to unlock the battery.

    • Lift and remove the battery from the back of the phone.

  3. Sanyo-PM 8200 Motherboard Replacement, Back Casing: crwdns2935265:03crwdnd2935265:01crwdnd2935265:01crwdne2935265:0
    • Use a push pin or tweezers to remove the neoprene screw-cover located on the upper, left corner of the back casing.

  4. Sanyo-PM 8200 Motherboard Replacement: crwdns2935265:04crwdnd2935265:01crwdnd2935265:01crwdne2935265:0
    • Unscrew all four, 5mm Tri-Wing screws.

  5. Sanyo-PM 8200 Motherboard Replacement: crwdns2935265:05crwdnd2935265:01crwdnd2935265:02crwdne2935265:0 Sanyo-PM 8200 Motherboard Replacement: crwdns2935265:05crwdnd2935265:02crwdnd2935265:02crwdne2935265:0
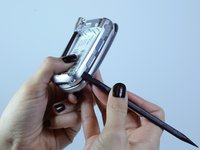
    • Pry the back casing off the device using a spudger. Work your way along the edges to completely separate the back casing from the device.

    • This step may require extra force. But too much force could break the back casing.

    • Remove the headphone jack cover when separating the back casing. The headphone jack is located on the opposite side of the antenna.

  6. Sanyo-PM 8200 Motherboard Replacement, Lift the Motherboard: crwdns2935265:06crwdnd2935265:01crwdnd2935265:01crwdne2935265:0
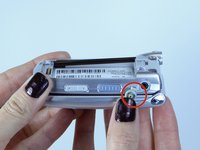
    • Gently lift up the motherboard. The keypad should now be exposed.

  7. Sanyo-PM 8200 Motherboard Replacement, Disconnect the Flex Ribbon: crwdns2935265:07crwdnd2935265:01crwdnd2935265:01crwdne2935265:0
    • Using tweezers, pull on the silver flex ribbon to disconnect it from the motherboard.

  8. Sanyo-PM 8200 Motherboard Replacement, Remove the Motherboard: crwdns2935265:08crwdnd2935265:01crwdnd2935265:01crwdne2935265:0
    • Remove the motherboard from the back of the phone.

crwdns2915888:0crwdne2915888:0

To reassemble your device, follow these instructions in reverse order.

Michaella

crwdns2935283:010/07/14crwdne2935283:0

101 crwdns2915208:0crwdne2915208:0

crwdns2935295:0crwdne2935295:0

crwdns2915084:0crwdne2915084:0

USF Tampa, Team 1-6, Leahy Fall 2014 crwdns2935289:0USF Tampa, Team 1-6, Leahy Fall 2014crwdne2935289:0

USFT-LEAHY-F14S1G6

crwdns2931471:06crwdne2931471:0

crwdns2935297:010crwdne2935297:0

crwdns2944067:00crwdne2944067:0

crwdns2917038:0crwdne2917038:0

crwdns2936625:0crwdne2936625:0:

crwdns2936751:024crwdne2936751:0 1

crwdns2936753:07crwdne2936753:0 6

crwdns2936753:030crwdne2936753:0 9

crwdns2942667:0crwdne2942667:0 366