crwdns2933423:0crwdne2933423:0

Samsung Stratosphere Display Replacement

crwdns2942213:0crwdne2942213:0

  1. Samsung Stratosphere Display Replacement, Battery: crwdns2935265:01crwdnd2935265:01crwdnd2935265:01crwdne2935265:0
    • Using your fingers, pry along the groove at the top of the phone.

    • Pull back on the rear casing until it comes free from the device.

    • The casing will make a cracking sound as it is removed.

  2. Samsung Stratosphere Display Replacement: crwdns2935265:02crwdnd2935265:01crwdnd2935265:01crwdne2935265:0
    • With your fingers, pry from the bottom of the battery to loosen it.

    • Lift away to remove the battery from the phone.

  3. Samsung Stratosphere Display Replacement, Motherboard: crwdns2935265:03crwdnd2935265:01crwdnd2935265:01crwdne2935265:0
    • Locate the red and white sim card located above the battery housing.

    • Remove the sim card by sliding it downwards from its slot with your fingers.

  4. Samsung Stratosphere Display Replacement: crwdns2935265:04crwdnd2935265:01crwdnd2935265:01crwdne2935265:0
    • Remove the seven silver 3mm screws securing the rear panel using the Phillips #000 screwdriver.

    • Once loosened, some screws may get stuck in the casing. Use tweezers to remove them.

  5. Samsung Stratosphere Display Replacement: crwdns2935265:05crwdnd2935265:01crwdnd2935265:01crwdne2935265:0
    • Pry around the rear panel with a plastic opening tool to loosen it.

    • Prying too deeply may damage delicate components inside the phone.

    • Remove the rear panel from the phone with your fingers.

  6. Samsung Stratosphere Display Replacement: crwdns2935265:06crwdnd2935265:01crwdnd2935265:01crwdne2935265:0
    • Remove the four black 3mm screws securing the motherboard with the Phillips #000 screwdriver.

  7. Samsung Stratosphere Display Replacement: crwdns2935265:07crwdnd2935265:01crwdnd2935265:02crwdne2935265:0 Samsung Stratosphere Display Replacement: crwdns2935265:07crwdnd2935265:02crwdnd2935265:02crwdne2935265:0
    • Locate the flex cable attachment at the tab with a green arrow printed on top.

    • Pry from the side the arrow is pointing with your fingers.

    • The cable will audibly snap as it is removed from its attachment.

    • Let the cable hang loosely to the side of the phone.

  8. Samsung Stratosphere Display Replacement: crwdns2935265:08crwdnd2935265:01crwdnd2935265:01crwdne2935265:0
    • Pull the motherboard up from the side opposite the loose flex cable.

    • If necessary, use a plastic opening tool to separate the motherboard from the key pad underneath.

    • Lift to remove the motherboard from the device.

  9. Samsung Stratosphere Display Replacement, Front Camera: crwdns2935265:09crwdnd2935265:01crwdnd2935265:01crwdne2935265:0
    • Insert a plastic opening tool into any side of the phone case to separate the keyboard from the rear panel.

    • Pry the keyboard away from the casing with the plastic opening tool.

    • The keyboard should come off with almost no force at all.

  10. Samsung Stratosphere Display Replacement: crwdns2935265:010crwdnd2935265:01crwdnd2935265:01crwdne2935265:0
    • Remove the 7 silver 2mm screws attaching the silver metal plate to the rear panel with the Phillips #000 Screwdriver.

  11. Samsung Stratosphere Display Replacement: crwdns2935265:011crwdnd2935265:01crwdnd2935265:01crwdne2935265:0
    • Use the plastic opening tool to carefully loosen the golden metal plate.

    • The golden metal plate is stuck to the rear panel with a strong adhesive, so a moderate amount of force may be needed.

  12. Samsung Stratosphere Display Replacement: crwdns2935265:012crwdnd2935265:01crwdnd2935265:01crwdne2935265:0
    • Lift the gold plate with your fingers, repositioning it to slide through the keyboard casing underneath.

    • Carefully take off the keyboard casing with your fingers.

    • The golden metal plate should fit through the wide slot of the casing.

  13. Samsung Stratosphere Display Replacement: crwdns2935265:013crwdnd2935265:01crwdnd2935265:01crwdne2935265:0
    • Slide the silver metal plate down and away from the to the flex cable and gold metal plate.

    • The metal plate is attached to springs that offer a small amount of resistance, so it will snap into place.

  14. Samsung Stratosphere Display Replacement: crwdns2935265:014crwdnd2935265:01crwdnd2935265:01crwdne2935265:0
    • Unscrew the 4 black 3mm screws from the rear panel with the Phillips #000 Screwdriver.

  15. Samsung Stratosphere Display Replacement: crwdns2935265:015crwdnd2935265:01crwdnd2935265:02crwdne2935265:0 Samsung Stratosphere Display Replacement: crwdns2935265:015crwdnd2935265:02crwdnd2935265:02crwdne2935265:0
    • Insert the plastic opening tool into the groove at the top of the rear panel.

    • Firmly slide the plastic opening tool all around the rear panel. The panel will audibly snap as it comes apart.

    • These 2 pieces are attached well, so a significant amount of force is needed to separate them.

  16. Samsung Stratosphere Display Replacement: crwdns2935265:016crwdnd2935265:01crwdnd2935265:01crwdne2935265:0
    • Lift the flex cable and position it so the part containing the metal plate can come free.

    • Pull the part containing the metal plate away from the rest of the rear panel.

  17. Samsung Stratosphere Display Replacement: crwdns2935265:017crwdnd2935265:01crwdnd2935265:02crwdne2935265:0 Samsung Stratosphere Display Replacement: crwdns2935265:017crwdnd2935265:02crwdnd2935265:02crwdne2935265:0
    • Use tweezers to loosen the front-facing camera from the plastic casing.

    • Pull the black rectangular piece, attached to the front facing camera, away from the rear panel.

  18. Samsung Stratosphere Display Replacement, Flex Cable: crwdns2935265:018crwdnd2935265:01crwdnd2935265:01crwdne2935265:0
    • Carefully peel the blue tape from the bottom of the flex cable and set it aside.

  19. Samsung Stratosphere Display Replacement: crwdns2935265:019crwdnd2935265:01crwdnd2935265:02crwdne2935265:0 Samsung Stratosphere Display Replacement: crwdns2935265:019crwdnd2935265:02crwdnd2935265:02crwdne2935265:0
    • Use one of the plastic opening tools to loosen the flex cable from its central housing.

    • Pull lightly on the flex cable to free it from the housing.

    • The cable may audibly snap as it is freed from its attachment.

  20. Samsung Stratosphere Display Replacement: crwdns2935265:020crwdnd2935265:01crwdnd2935265:01crwdne2935265:0
    • Use tweezers to loosen the flex cable and speaker from the bottom of the phone.

    • Pull upward with the tweezers and the flex cable will come loose.

    • The flex cable will come free with the front-facing camera attached. In order to remove the front-facing camera, see our guide here.

  21. Samsung Stratosphere Display Replacement, Display: crwdns2935265:021crwdnd2935265:01crwdnd2935265:02crwdne2935265:0 Samsung Stratosphere Display Replacement, Display: crwdns2935265:021crwdnd2935265:02crwdnd2935265:02crwdne2935265:0
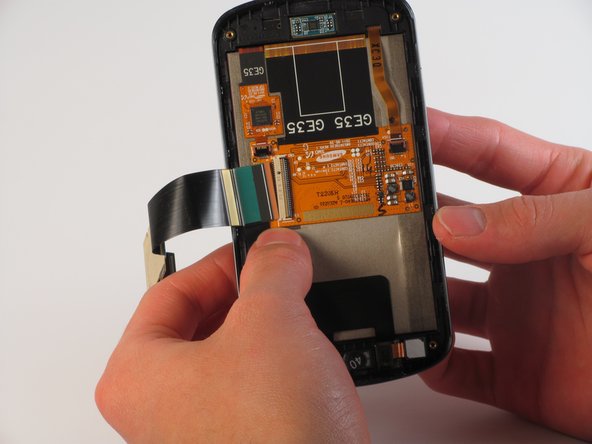
    • Locate the clamp holding the gold display cable to the back of the screen.

    • Using the plastic opener tool, lightly pry the cable attachment into an upright position.

    • The clamp attachment will snap as it is pried upright.

    • Once completed, the attachment should resemble the marked section.

  22. Samsung Stratosphere Display Replacement: crwdns2935265:022crwdnd2935265:01crwdnd2935265:01crwdne2935265:0
    • Using the tweezers, carefully pull the gold display cable to remove it from its attachment.

    • Be careful not to bend the display cable as this is a very sensitive part of the phone.

  23. Samsung Stratosphere Display Replacement: crwdns2935265:023crwdnd2935265:01crwdnd2935265:02crwdne2935265:0 Samsung Stratosphere Display Replacement: crwdns2935265:023crwdnd2935265:02crwdnd2935265:02crwdne2935265:0
    • Pry around the screen with a plastic opening tool to loosen it from the frame.

    • Repeat this process as necessary; a lot of adhesive holds the screen to the frame.

    • Gently push forward from the back of the display to remove the screen from the frame.

crwdns2915888:0crwdne2915888:0

To reassemble your device, follow these instructions in reverse order.

crwdns2935229:013crwdne2935229:0

William Lai

crwdns2935283:010/27/13crwdne2935283:0

217 crwdns2915208:0crwdne2915208:0

crwdns2935295:0crwdne2935295:0

crwdns2915084:0crwdne2915084:0

Cal Poly, Team 11-32, Amido Fall 2013 crwdns2935289:0Cal Poly, Team 11-32, Amido Fall 2013crwdne2935289:0

CPSU-AMIDO-F13S11G32

crwdns2931471:04crwdne2931471:0

crwdns2935297:06crwdne2935297:0

crwdns2917034:0crwdne2917034:0

Overall this was a great presentation. Very thorough and detailed, yet simple, with great pictures. Thank you.

huckleberry41 - crwdns2934203:0crwdne2934203:0

crwdns2917038:0crwdne2917038:0

crwdns2936625:0crwdne2936625:0:

crwdns2936751:024crwdne2936751:0 0

crwdns2936753:07crwdne2936753:0 0

crwdns2936753:030crwdne2936753:0 5

crwdns2942667:0crwdne2942667:0 4,425