crwdns2915892:0crwdne2915892:0
Use this guide to remove the logic board assembly from the casing.
crwdns2942213:0crwdne2942213:0
-
-
Turn the cell phone so that the back side is facing you.
-
Press the upper indent and slide the back cover down.
-
-
-
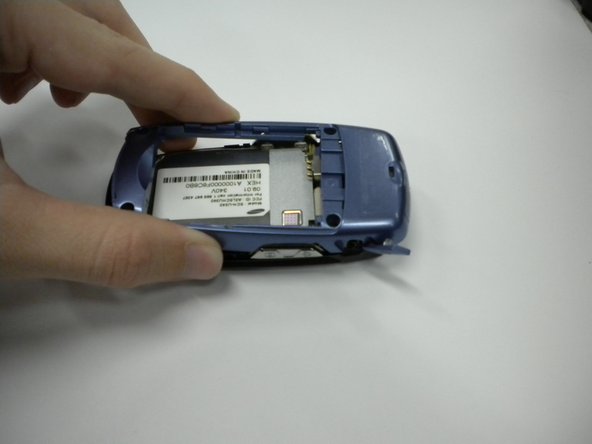
Pull the battery up from indent at the bottom and slide it out.
-
-
-
The outer casing consists of two separate parts on the upper and lower halves of the device. The upper outer casing is held on through a combination of screws and tabs.
-
First, remove the plastic plugs covering the screws with a spudger.
-
-
-
Underneath the plugs are two small screws that can be removed with a small Phillips screwdriver.
-
-
-
-
The outer cover is now secured with seven tabs: one large tab (marked in red) and seven smaller tabs (marked in orange).
-
To begin removing the outer cover, start by prying the large tab up with a flat object.
-
See next slide for details for smaller tabs.
-
-
-
Continue to pry each smaller tab up, taking care not to break the tabs.
-
-
-
After the last tab is removed, tug gently on the outer casing to remove it.
-
-
-
The lower casing is held on by four screws in the corner of the battery enclosure. Remove these screws.
-
-
-
Use a spudger to pry the back assembly off of the device.
-
-
-
Use spudger to pry logic board from the casing.
-
-
-
Rotate the logic board assembly out of the casing, being careful not to break VGA cable.
-
-
-
Lift the number pad straight up from the casing.
-


crwdns2915084:0crwdne2915084:0

Cal Poly, Team 3-21, Maness Winter 2010 crwdns2935289:0Cal Poly, Team 3-21, Maness Winter 2010crwdne2935289:0
CPSU-MANESS-W10S3G21
crwdns2931471:04crwdne2931471:0
crwdns2935297:010crwdne2935297:0