crwdns2933423:0crwdne2933423:0
crwdns2947577:0crwdnd2947577:0crwdne2947577:0

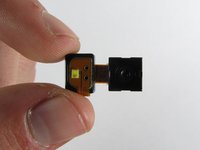
Samsung Rogue Camera Replacement

crwdns2942213:0crwdne2942213:0

    1. Samsung Rogue Camera Replacement, Battery: crwdns2935265:01crwdnd2935265:01crwdnd2935265:02crwdne2935265:0 Samsung Rogue Camera Replacement, Battery: crwdns2935265:01crwdnd2935265:02crwdnd2935265:02crwdne2935265:0
      • Before disassembling your Samsung Rogue, make sure it is powered off.

      • With your thumbs, push down on the back cover of your phone and slide it away from the camera.

      crwdns2952109:0crwdne2952109:0

      crwdns2917038:0crwdne2917038:0

    2. Samsung Rogue Camera Replacement: crwdns2935265:02crwdnd2935265:01crwdnd2935265:02crwdne2935265:0 Samsung Rogue Camera Replacement: crwdns2935265:02crwdnd2935265:02crwdnd2935265:02crwdne2935265:0
      • You can now remove the battery by prying it up with your finger.

      crwdns2952109:0crwdne2952109:0

      crwdns2917038:0crwdne2917038:0

    1. Samsung Rogue Camera Replacement, Motherboard: crwdns2935265:03crwdnd2935265:01crwdnd2935265:01crwdne2935265:0
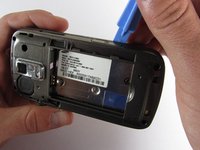
      • Use a plastic opening tool to carefully pry the back cover surrounding the camera up from the phone.

      crwdns2952109:0crwdne2952109:0

      crwdns2917038:0crwdne2917038:0

    2. Samsung Rogue Camera Replacement: crwdns2935265:04crwdnd2935265:01crwdnd2935265:01crwdne2935265:0
      • Remove the five 3.4mm Philips screws securing the backing of the phone.

      crwdns2952109:0crwdne2952109:0

      crwdns2917038:0crwdne2917038:0

    3. Samsung Rogue Camera Replacement: crwdns2935265:05crwdnd2935265:01crwdnd2935265:03crwdne2935265:0 Samsung Rogue Camera Replacement: crwdns2935265:05crwdnd2935265:02crwdnd2935265:03crwdne2935265:0 Samsung Rogue Camera Replacement: crwdns2935265:05crwdnd2935265:03crwdnd2935265:03crwdne2935265:0
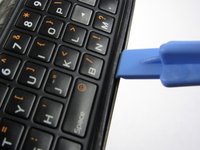
      • Use a plastic opening tool to carefully pry off the back cover.

      • Make sure you are prying along the edge and not between the two halves of the phone that slide away from each other.

      • Be careful to not drop the volume changing piece, for it can easily slip out.

      crwdns2952109:0crwdne2952109:0

      crwdns2917038:0crwdne2917038:0

    4. Samsung Rogue Camera Replacement: crwdns2935265:06crwdnd2935265:01crwdnd2935265:01crwdne2935265:0
      • Remove the two 3.45 mm Philips screws below the white sticker.

      crwdns2952109:0crwdne2952109:0

      crwdns2917038:0crwdne2917038:0

    5. Samsung Rogue Camera Replacement: crwdns2935265:07crwdnd2935265:01crwdnd2935265:02crwdne2935265:0 Samsung Rogue Camera Replacement: crwdns2935265:07crwdnd2935265:02crwdnd2935265:02crwdne2935265:0
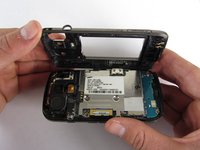
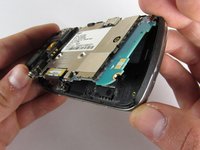
      • Carefully lift the motherboard up from the bottom edge.

      • The film of wires is still attached to the motherboard, so do not completely remove the motherboard just yet or you may damage it.

      crwdns2952109:0crwdne2952109:0

      crwdns2917038:0crwdne2917038:0

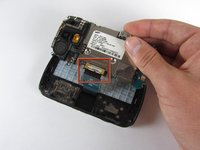
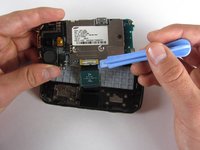
    6. Samsung Rogue Camera Replacement: crwdns2935265:08crwdnd2935265:01crwdnd2935265:02crwdne2935265:0 Samsung Rogue Camera Replacement: crwdns2935265:08crwdnd2935265:02crwdnd2935265:02crwdne2935265:0
      • Use a plastic opening tool to disconnect the film from the motherboard.

      crwdns2952109:0crwdne2952109:0

      crwdns2917038:0crwdne2917038:0

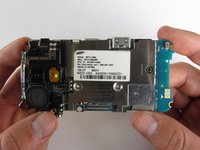
    1. Samsung Rogue Camera Replacement, Speaker/Antenna: crwdns2935265:09crwdnd2935265:01crwdnd2935265:01crwdne2935265:0
      • On the underside of the motherboard, remove the single 3.3mm Philips screw.

      crwdns2952109:0crwdne2952109:0

      crwdns2917038:0crwdne2917038:0

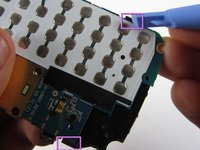
    2. Samsung Rogue Camera Replacement: crwdns2935265:010crwdnd2935265:01crwdnd2935265:03crwdne2935265:0 Samsung Rogue Camera Replacement: crwdns2935265:010crwdnd2935265:02crwdnd2935265:03crwdne2935265:0 Samsung Rogue Camera Replacement: crwdns2935265:010crwdnd2935265:03crwdnd2935265:03crwdne2935265:0
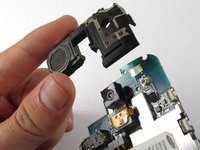
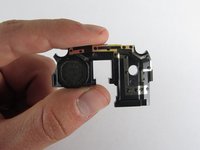
      • The speaker and the antenna are both connected on the same black piece.

      • Use a plastic opening tool to pop off the edges of the speaker/antenna piece from the motherboard.

      • Turn over the motherboard and carefully lift the speaker/antenna piece straight up.

      • The camera is held in the middle of the speaker/antenna piece. Make sure to lift directly up when lifting the speaker/antenna piece, otherwise you can risk damaging the camera.

      crwdns2952109:0crwdne2952109:0

      crwdns2917038:0crwdne2917038:0

    1. Samsung Rogue Camera Replacement, Camera: crwdns2935265:011crwdnd2935265:01crwdnd2935265:03crwdne2935265:0 Samsung Rogue Camera Replacement, Camera: crwdns2935265:011crwdnd2935265:02crwdnd2935265:03crwdne2935265:0 Samsung Rogue Camera Replacement, Camera: crwdns2935265:011crwdnd2935265:03crwdnd2935265:03crwdne2935265:0
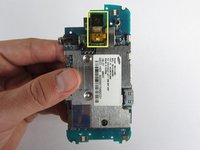
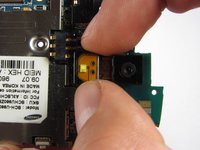
      • With two fingers carefully detach the camera from the motherboard by lifting straight up.

      • Do not pick it up by the camera itself. Handle the little black box it is attached to instead.

      crwdns2952109:0crwdne2952109:0

      crwdns2917038:0crwdne2917038:0

crwdns2915888:0crwdne2915888:0

To reassemble your device, follow these instructions in reverse order.

crwdns2935221:0crwdne2935221:0

Viktoria Mikoultchik

crwdns2935283:004/15/12crwdne2935283:0

25 crwdns2915208:0crwdne2915208:0

crwdns2935297:07crwdne2935297:0

crwdns2935287:0crwdne2935287:0

Cal Poly, Team 7-32, Maness Spring 2012 crwdns2935289:0Cal Poly, Team 7-32, Maness Spring 2012crwdne2935289:0

CPSU-MANESS-S12S7G32

crwdns2931471:04crwdne2931471:0

crwdns2935297:064crwdne2935297:0

crwdns2947412:00crwdne2947412:0

crwdns2917038:0crwdne2917038:0

crwdns2936625:0crwdne2936625:0:

crwdns2936751:024crwdne2936751:0 2

crwdns2936753:07crwdne2936753:0 4

crwdns2936753:030crwdne2936753:0 29

crwdns2942667:0crwdne2942667:0 551