crwdns2915892:0crwdne2915892:0
When it comes time to increase your operating speeds, frames per second, or overall performance of your laptop, you can consider replacing your RAM. The Samsung Notebook 5 NP530E5M has a convenient port on the bottom of the case that can be accessed by removing a single 6.5mm screw. Before replacing RAM or upgrading memory, be sure to check if the new memory you intend to install is compatible with your laptop's motherboard.
There is a misconception that when using multiple sticks of RAM, they must match. The rumor is that they must be the same size, or even the same brand. This is not correct, although you do want to make sure your new RAM is compatible with your current computer.
crwdns2942213:0crwdne2942213:0
-
-
Using a Phillips #000 screwdriver, remove the single 6.5 mm screw that secures the plastic door labeled "Memory" to the bottom case.
-
Set the screw to the side in a secure location.
-
-
-
Insert a spudger or opening pick under the door, and pry it open.
-
-
-
-
Use a pry tool to disengage the pressure clamps holding both sides of the RAM chip.
-
Open both sides simultaneously to release the RAM module.
-
-
-
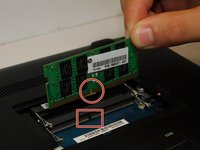
Gripping from the sides, gently pull the RAM from its seat.
-
-
-
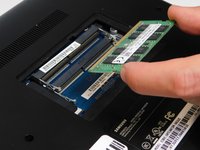
Align the new unit with the RAM slot, and insert the RAM stick at a slight angle, it will rest loosely in its seat.
-
Lightly press down on the RAM until you hear a "snap". This means that the latches have clasped shut, securing the RAM stick.
-
Replace the memory door and secure the screw. Tightening the screw, but be careful not to apply to much torque, "stripping" the screw, rendering it useless.
-


To reassemble your device, follow these instructions in reverse order.
To reassemble your device, follow these instructions in reverse order.
crwdns2935221:0crwdne2935221:0
crwdns2935227:0crwdne2935227:0

crwdns2915084:0crwdne2915084:0

Gateway, Team 1-1, Gonzalez Fall 2023 crwdns2935289:0Gateway, Team 1-1, Gonzalez Fall 2023crwdne2935289:0
GCC-GONZALEZ-F23S1G1
crwdns2931471:04crwdne2931471:0
crwdns2935297:06crwdne2935297:0