crwdns2915892:0crwdne2915892:0
A faulty hard drive can be the underlying cause of many issues with a laptop. This guide will take your through the steps necessary to replace the hard drive so you can get back to using your computer.
crwdns2942213:0crwdne2942213:0
-
-
Lay laptop down so that the bottom is facing the sky.
-
-
-
Push both tabs away from the center of the device.
-
While both are in the fully unlocked position, slide the battery out.
-
-
-
-
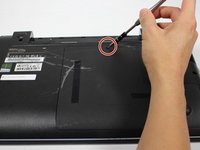
Remove this 4 mm Phillips #8 screw using a Phillips #00 screwdriver.
-
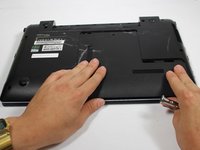
Firmly, but gently pull the cover towards you.
-
After moving the cover about 2 centimeters, you can lift and remove it.
-
-
-
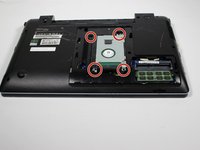
Remove these four 4 mm Phillips #8 screws using a Phillips #00 screwdriver.
-
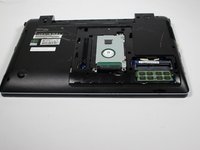
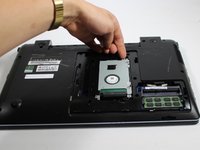
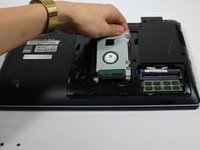
Gently lift the hard drive up, however do not remove it.
-
-
-
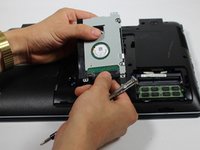
Firmly grasp the base of the connector at the bottom of the hard drive.
-
Gently pull the connector off to free the hard drive.
-


To reassemble your device, follow these instructions in reverse order.
To reassemble your device, follow these instructions in reverse order.
crwdns2935221:0crwdne2935221:0
crwdns2935229:011crwdne2935229:0
crwdns2915084:0crwdne2915084:0

Baylor, Team 10-13, Williams Fall 2015 crwdns2935289:0Baylor, Team 10-13, Williams Fall 2015crwdne2935289:0
BU-WILLIAMS-F15S10G13
crwdns2931471:03crwdne2931471:0
crwdns2935297:04crwdne2935297:0
crwdns2947412:02crwdne2947412:0
I want to change this HDD with a SSD drive. How do I know which drive to look for? Do i need some kind of adapter or i just have to plug it?
The HDD is connected using Serial ATA (SATA) and most modern SSD drives will also use a SATA connection. You will be able to install the new drive without any adapters.
Oscar B -