crwdns2933423:0crwdne2933423:0

Samsung ML2510 Power Button Replacement

crwdns2942213:0crwdne2942213:0

  1. Samsung ML2510 Power Button Replacement, Removing Samsung ML2510 Back Panel: crwdns2935265:01crwdnd2935265:01crwdnd2935265:03crwdne2935265:0 Samsung ML2510 Power Button Replacement, Removing Samsung ML2510 Back Panel: crwdns2935265:01crwdnd2935265:02crwdnd2935265:03crwdne2935265:0 Samsung ML2510 Power Button Replacement, Removing Samsung ML2510 Back Panel: crwdns2935265:01crwdnd2935265:03crwdnd2935265:03crwdne2935265:0
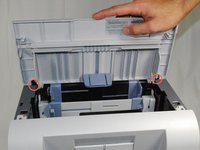
    • Remove the top hinged panel by taking out the pins at the bottom of this panel.

  2. Samsung ML2510 Power Button Replacement: crwdns2935265:02crwdnd2935265:01crwdnd2935265:01crwdne2935265:0
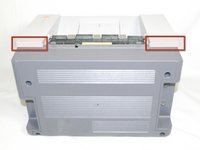
    • Using a Phillips #2 screwdriver, remove the four screws on the back of the printer.

  3. Samsung ML2510 Power Button Replacement: crwdns2935265:03crwdnd2935265:01crwdnd2935265:03crwdne2935265:0 Samsung ML2510 Power Button Replacement: crwdns2935265:03crwdnd2935265:02crwdnd2935265:03crwdne2935265:0 Samsung ML2510 Power Button Replacement: crwdns2935265:03crwdnd2935265:03crwdnd2935265:03crwdne2935265:0
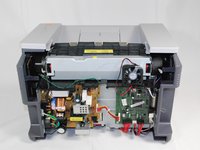
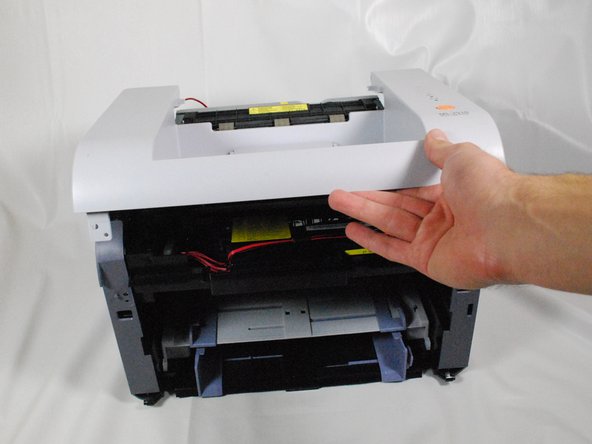
    • Gently lift the top panel while simultaneously pulling off the back panel.

    • Before pulling out the back panel entirely, make sure to remove the rear cooling fan from its slot.

  4. Samsung ML2510 Power Button Replacement, Power Button: crwdns2935265:04crwdnd2935265:01crwdnd2935265:03crwdne2935265:0 Samsung ML2510 Power Button Replacement, Power Button: crwdns2935265:04crwdnd2935265:02crwdnd2935265:03crwdne2935265:0 Samsung ML2510 Power Button Replacement, Power Button: crwdns2935265:04crwdnd2935265:03crwdnd2935265:03crwdne2935265:0
    • Remove the front panel by gently separating the holes on the panel from the pegs attached to the main printer body.

  5. Samsung ML2510 Power Button Replacement: crwdns2935265:05crwdnd2935265:01crwdnd2935265:01crwdne2935265:0
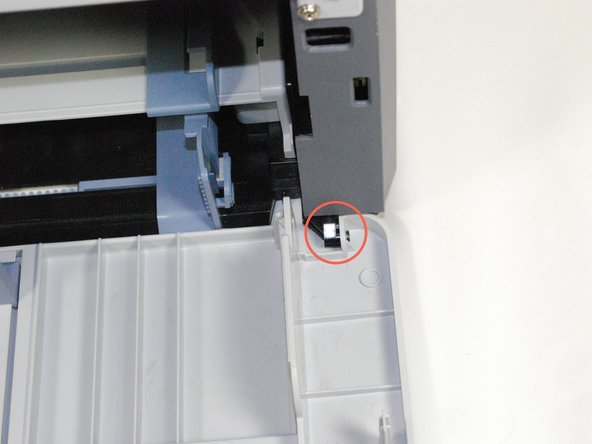
    • Using a Phillips #2 screwdriver, remove both 1" screws on the front face of the printer.

  6. Samsung ML2510 Power Button Replacement: crwdns2935265:06crwdnd2935265:01crwdnd2935265:03crwdne2935265:0 Samsung ML2510 Power Button Replacement: crwdns2935265:06crwdnd2935265:02crwdnd2935265:03crwdne2935265:0 Samsung ML2510 Power Button Replacement: crwdns2935265:06crwdnd2935265:03crwdnd2935265:03crwdne2935265:0
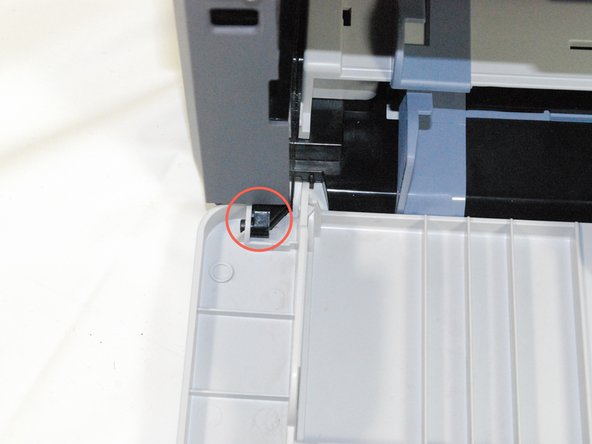
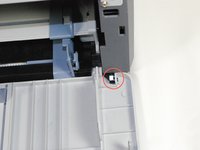
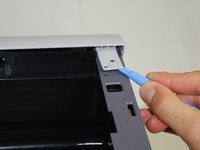
    • Using a plastic opening tool, gently lift one side of the top panel from its peg.

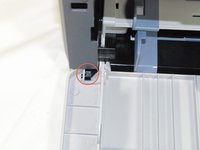
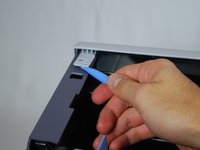
    • Repeat the last step to free the opposite side of the top panel.

    • Lift the top panel from the front to remove it entirely.

    • Turn over the top panel to reveal the button on the underside of the panel.

  7. Samsung ML2510 Power Button Replacement: crwdns2935265:07crwdnd2935265:01crwdnd2935265:01crwdne2935265:0
    • Using a Phillips #2 screwdriver, remove both 1" screws that secure the button to the underside of the top panel.

  8. Samsung ML2510 Power Button Replacement: crwdns2935265:08crwdnd2935265:01crwdnd2935265:02crwdne2935265:0 Samsung ML2510 Power Button Replacement: crwdns2935265:08crwdnd2935265:02crwdnd2935265:02crwdne2935265:0
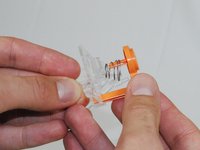
    • Remove the clear plastic piece and the orange button from the panel.

    • Remove the orange button and the spring from the clear plastic holder.

    • Replace the button and reassemble the printer following the directions in reverse order.

crwdns2935217:0crwdne2935217:0

crwdns2935229:02crwdne2935229:0

bbaustin

crwdns2935283:010/12/11crwdne2935283:0

268 crwdns2915208:0crwdne2915208:0

crwdns2935297:06crwdne2935297:0

crwdns2915084:0crwdne2915084:0

Cal Poly, Team 17-18, Regan Fall 2011 crwdns2935289:0Cal Poly, Team 17-18, Regan Fall 2011crwdne2935289:0

CPSU-REGAN-F11S17G18

crwdns2931471:04crwdne2931471:0

crwdns2935297:012crwdne2935297:0

crwdns2944067:00crwdne2944067:0

crwdns2917038:0crwdne2917038:0

crwdns2936625:0crwdne2936625:0:

crwdns2936751:024crwdne2936751:0 0

crwdns2936753:07crwdne2936753:0 8

crwdns2936753:030crwdne2936753:0 14

crwdns2942667:0crwdne2942667:0 3,138