crwdns2933423:0crwdne2933423:0

Samsung Galaxy Tab S7 Plus Frame Bracket and Battery Disconnection Replacement

crwdns2862623:0crwdne2862623:0
crwdns2942641:0crwdne2942641:0

crwdns2942213:0crwdne2942213:0

  1. Samsung Galaxy Tab S7 Plus Frame Bracket and Battery Disconnection Replacement, Unfasten the frame bracket: crwdns2935265:01crwdnd2935265:01crwdnd2935265:03crwdne2935265:0 Samsung Galaxy Tab S7 Plus Frame Bracket and Battery Disconnection Replacement, Unfasten the frame bracket: crwdns2935265:01crwdnd2935265:02crwdnd2935265:03crwdne2935265:0 Samsung Galaxy Tab S7 Plus Frame Bracket and Battery Disconnection Replacement, Unfasten the frame bracket: crwdns2935265:01crwdnd2935265:03crwdnd2935265:03crwdne2935265:0
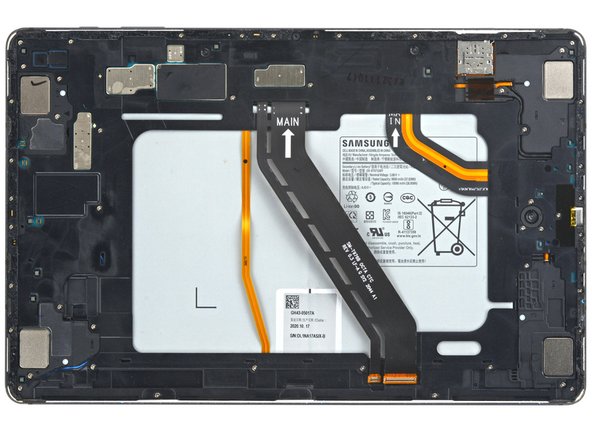
    • Use a Phillips #00 screwdriver to remove the fifty 3 mm-long screws securing the frame bracket to the frame.

    • The third photo has the same screws marked by quadrant. Use this photo during reassembly to help account for all the screws:

    • Bottom-left = 9 screws

    • Bottom-right = 14 screws

    • Top-right = 12 screws

    • Top-left = 15 screws

  2. Samsung Galaxy Tab S7 Plus Frame Bracket and Battery Disconnection Replacement, Remove the frame bracket: crwdns2935265:02crwdnd2935265:01crwdnd2935265:03crwdne2935265:0 Samsung Galaxy Tab S7 Plus Frame Bracket and Battery Disconnection Replacement, Remove the frame bracket: crwdns2935265:02crwdnd2935265:02crwdnd2935265:03crwdne2935265:0 Samsung Galaxy Tab S7 Plus Frame Bracket and Battery Disconnection Replacement, Remove the frame bracket: crwdns2935265:02crwdnd2935265:03crwdnd2935265:03crwdne2935265:0
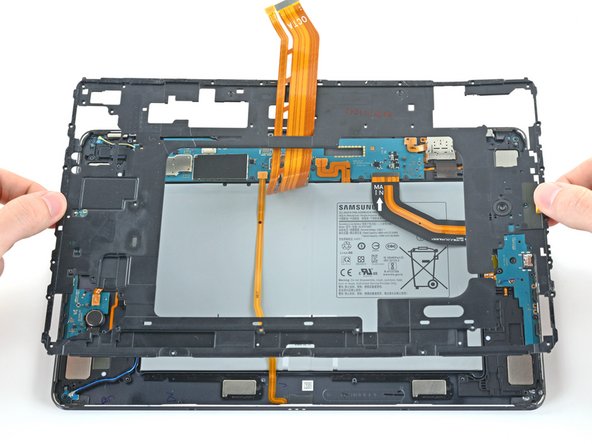
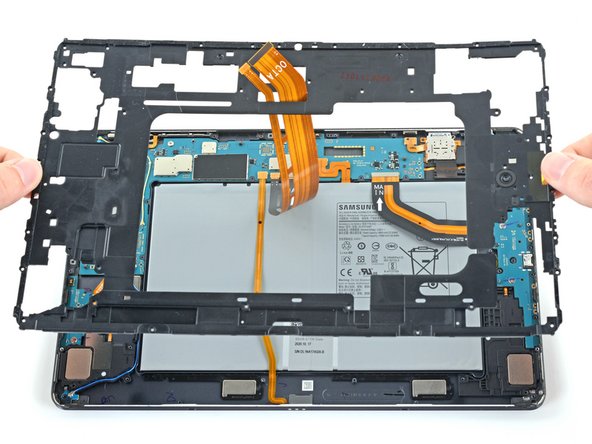
    • Lift the frame bracket away from the frame, making sure to thread the display cable through its socket.

  3. Samsung Galaxy Tab S7 Plus Frame Bracket and Battery Disconnection Replacement, Disconnect the battery: crwdns2935265:03crwdnd2935265:01crwdnd2935265:02crwdne2935265:0 Samsung Galaxy Tab S7 Plus Frame Bracket and Battery Disconnection Replacement, Disconnect the battery: crwdns2935265:03crwdnd2935265:02crwdnd2935265:02crwdne2935265:0
    • Use the flat end of a spudger to pry up and disconnect the battery's press connector secured to the motherboard.

crwdns2915888:0crwdne2915888:0

To reassemble your device, follow these instructions in reverse order.

Alex Diaz-Kokaisl

crwdns2935283:001/16/22crwdne2935283:0

165,576 crwdns2915208:0crwdne2915208:0

crwdns2935297:0769crwdne2935297:0

crwdns2915084:0crwdne2915084:0

iFixit crwdns2935289:0iFixitcrwdne2935289:0

Staff

crwdns2931471:0120crwdne2931471:0

crwdns2935297:020,002crwdne2935297:0

crwdns2947412:00crwdne2947412:0

crwdns2917038:0crwdne2917038:0

crwdns2936625:0crwdne2936625:0:

crwdns2936751:024crwdne2936751:0 0

crwdns2936753:07crwdne2936753:0 0

crwdns2936753:030crwdne2936753:0 0

crwdns2942667:0crwdne2942667:0 20