crwdns2933423:0crwdne2933423:0

Samsung Galaxy Tab S 10.5 Motherboard Replacement

crwdns2942213:0crwdne2942213:0

  1. Samsung Galaxy Tab S 10.5 Motherboard Replacement, Disassembling Galaxy Tab S 10.5 Back Cover: crwdns2935265:01crwdnd2935265:01crwdnd2935265:02crwdne2935265:0 Samsung Galaxy Tab S 10.5 Motherboard Replacement, Disassembling Galaxy Tab S 10.5 Back Cover: crwdns2935265:01crwdnd2935265:02crwdnd2935265:02crwdne2935265:0
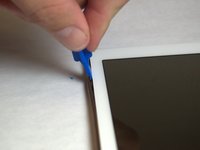
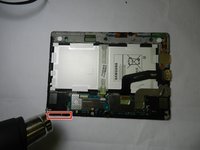
    • Place the plastic opening tool into the SD card slot or charge port.

    • Try in an upward motion until you see a separation between the tablet and back cover.

  2. Samsung Galaxy Tab S 10.5 Motherboard Replacement: crwdns2935265:02crwdnd2935265:01crwdnd2935265:01crwdne2935265:0
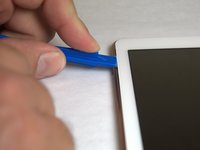
    • Work around the entire device by sliding the plastic opening tool around the rim.

    • If this is the first time, it will be hard to separate the back cover from the tablet.

    • The clips are approximately 5 cm apart. While working around the device, the clips will make a dislocating sound when disconnected.

  3. Samsung Galaxy Tab S 10.5 Motherboard Replacement: crwdns2935265:03crwdnd2935265:01crwdnd2935265:01crwdne2935265:0
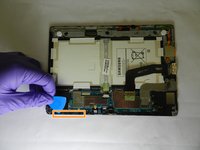
    • Remove the back cover once all links have been separated.

    • Be careful when touching any of the internal components of the tablet.

  4. Samsung Galaxy Tab S 10.5 Motherboard Replacement, Back Rim Cover: crwdns2935265:04crwdnd2935265:01crwdnd2935265:03crwdne2935265:0 Samsung Galaxy Tab S 10.5 Motherboard Replacement, Back Rim Cover: crwdns2935265:04crwdnd2935265:02crwdnd2935265:03crwdne2935265:0 Samsung Galaxy Tab S 10.5 Motherboard Replacement, Back Rim Cover: crwdns2935265:04crwdnd2935265:03crwdnd2935265:03crwdne2935265:0
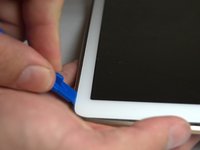
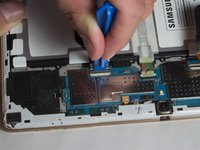
    • Place the plastic opening tool in between the outer rim.

    • Move the tool in a downward motion to separate the 2 parts.

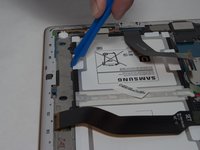
    • Run the tool along the rim to disconnect all connectors holding the outer rim to the back of the device.

  5. Samsung Galaxy Tab S 10.5 Motherboard Replacement: crwdns2935265:05crwdnd2935265:01crwdnd2935265:01crwdne2935265:0
    • Repeat this step for all four sides, then remove the rim.

  6. Samsung Galaxy Tab S 10.5 Motherboard Replacement, Battery: crwdns2935265:06crwdnd2935265:01crwdnd2935265:03crwdne2935265:0 Samsung Galaxy Tab S 10.5 Motherboard Replacement, Battery: crwdns2935265:06crwdnd2935265:02crwdnd2935265:03crwdne2935265:0 Samsung Galaxy Tab S 10.5 Motherboard Replacement, Battery: crwdns2935265:06crwdnd2935265:03crwdnd2935265:03crwdne2935265:0
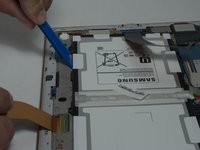
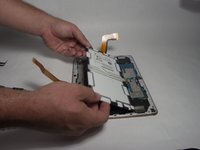
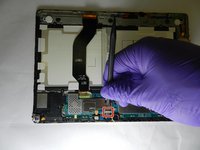
    • Using tweezers, peel back the green tape from the ZIF connectors on the two black ribbon cables.

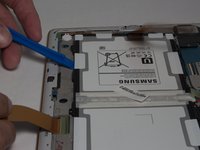
    • Use a plastic opening tool to lift up the plastic clips on the ZIF connectors.

  7. Samsung Galaxy Tab S 10.5 Motherboard Replacement: crwdns2935265:07crwdnd2935265:01crwdnd2935265:01crwdne2935265:0
    • Remove the six 2mm screws Phillips #000 screws surrounding the battery.

  8. Samsung Galaxy Tab S 10.5 Motherboard Replacement: crwdns2935265:08crwdnd2935265:01crwdnd2935265:03crwdne2935265:0 Samsung Galaxy Tab S 10.5 Motherboard Replacement: crwdns2935265:08crwdnd2935265:02crwdnd2935265:03crwdne2935265:0 Samsung Galaxy Tab S 10.5 Motherboard Replacement: crwdns2935265:08crwdnd2935265:03crwdnd2935265:03crwdne2935265:0
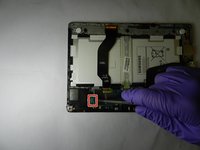
    • Place the plastic opening tool between the frame and battery.

    • Move the plastic opening tool in a downward motion, away from the battery to bring the battery out of the device.

  9. Samsung Galaxy Tab S 10.5 Motherboard Replacement: crwdns2935265:09crwdnd2935265:01crwdnd2935265:03crwdne2935265:0 Samsung Galaxy Tab S 10.5 Motherboard Replacement: crwdns2935265:09crwdnd2935265:02crwdnd2935265:03crwdne2935265:0 Samsung Galaxy Tab S 10.5 Motherboard Replacement: crwdns2935265:09crwdnd2935265:03crwdnd2935265:03crwdne2935265:0
    • Hold the battery and disconnect the plug to remove the battery.

  10. Samsung Galaxy Tab S 10.5 Motherboard Replacement, Motherboard: crwdns2935265:010crwdnd2935265:01crwdnd2935265:01crwdne2935265:0
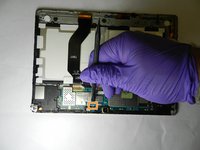
    • Using a Phillips #000 screwdriver, remove two screws on the ribbon cable bracket.

  11. Samsung Galaxy Tab S 10.5 Motherboard Replacement: crwdns2935265:011crwdnd2935265:01crwdnd2935265:01crwdne2935265:0
    • Using a spudger, lift up the flex connector.

  12. Samsung Galaxy Tab S 10.5 Motherboard Replacement: crwdns2935265:012crwdnd2935265:01crwdnd2935265:02crwdne2935265:0 Samsung Galaxy Tab S 10.5 Motherboard Replacement: crwdns2935265:012crwdnd2935265:02crwdnd2935265:02crwdne2935265:0
    • Use a heat gun on the heat bracket and gently pry up the bracket.

  13. Samsung Galaxy Tab S 10.5 Motherboard Replacement: crwdns2935265:013crwdnd2935265:01crwdnd2935265:02crwdne2935265:0 Samsung Galaxy Tab S 10.5 Motherboard Replacement: crwdns2935265:013crwdnd2935265:02crwdnd2935265:02crwdne2935265:0
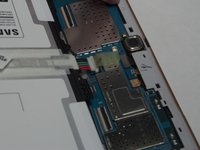
    • Using a spudger, pry up front camera located near the front edge of the tablet.

    • Remove the rear camera with spudger located directly next to the front camera.

  14. Samsung Galaxy Tab S 10.5 Motherboard Replacement: crwdns2935265:014crwdnd2935265:01crwdnd2935265:02crwdne2935265:0 Samsung Galaxy Tab S 10.5 Motherboard Replacement: crwdns2935265:014crwdnd2935265:02crwdnd2935265:02crwdne2935265:0
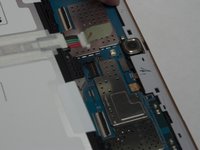
    • Release the loud speaker connection on the left of the tablet from mother board with spudger by prying.

    • Remove the 2 screws on the sides of the headphone jack with Phillips #000 screwdriver.

  15. Samsung Galaxy Tab S 10.5 Motherboard Replacement: crwdns2935265:015crwdnd2935265:01crwdnd2935265:02crwdne2935265:0 Samsung Galaxy Tab S 10.5 Motherboard Replacement: crwdns2935265:015crwdnd2935265:02crwdnd2935265:02crwdne2935265:0
    • Lightly heat the loud speaker module on the front edge slightly from the side.

    • Using a plastic opening pick, detach it and bend it upwards.

  16. Samsung Galaxy Tab S 10.5 Motherboard Replacement: crwdns2935265:016crwdnd2935265:01crwdnd2935265:01crwdne2935265:0
    • Remove the left loud speaker by lightly prying with tweezers.

  17. Samsung Galaxy Tab S 10.5 Motherboard Replacement: crwdns2935265:017crwdnd2935265:01crwdnd2935265:01crwdne2935265:0
    • On the right loud speaker, remove 1 screw from the loud speaker module using Phillips #000 screwdriver.

  18. Samsung Galaxy Tab S 10.5 Motherboard Replacement: crwdns2935265:018crwdnd2935265:01crwdnd2935265:03crwdne2935265:0 Samsung Galaxy Tab S 10.5 Motherboard Replacement: crwdns2935265:018crwdnd2935265:02crwdnd2935265:03crwdne2935265:0 Samsung Galaxy Tab S 10.5 Motherboard Replacement: crwdns2935265:018crwdnd2935265:03crwdnd2935265:03crwdne2935265:0
    • Lightly use heat on right loud speaker module.

    • Pry out the vibration motor with tweezers.

    • Pry out whole loud speaker module with tweezers.

  19. Samsung Galaxy Tab S 10.5 Motherboard Replacement: crwdns2935265:019crwdnd2935265:01crwdnd2935265:01crwdne2935265:0
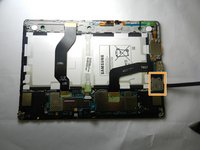
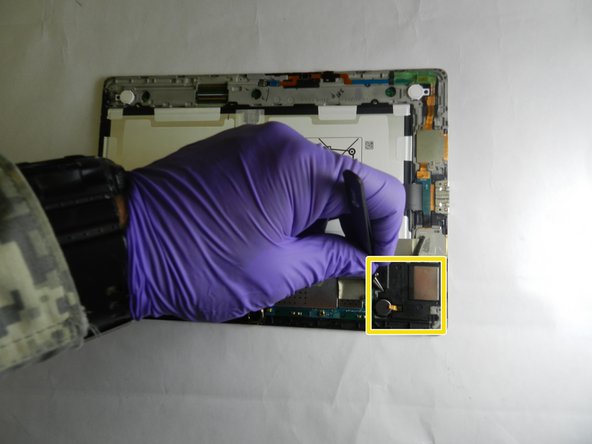
    • Release the connection of the light sensor, next to the front camera, by lifting up with a spudger.

  20. Samsung Galaxy Tab S 10.5 Motherboard Replacement: crwdns2935265:020crwdnd2935265:01crwdnd2935265:01crwdne2935265:0
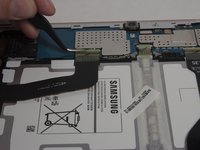
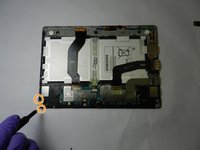
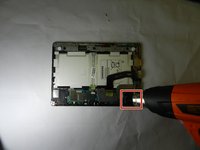
    • Lift out the motherboard with a spudger.

crwdns2915888:0crwdne2915888:0

To reassemble your device, follow these instructions in reverse order.

crwdns2935229:02crwdne2935229:0

Kyle DiLiddo

crwdns2935283:002/20/20crwdne2935283:0

247 crwdns2915208:0crwdne2915208:0

crwdns2935295:0crwdne2935295:0

crwdns2915084:0crwdne2915084:0

The Citadel Military College of South Carolina, Team S3-G15, Eggleston Spring 2020 crwdns2935289:0The Citadel Military College of South Carolina, Team S3-G15, Eggleston Spring 2020crwdne2935289:0

CMCSC-EGGLESTON-S20S3G15

crwdns2931471:03crwdne2931471:0

crwdns2935297:03crwdne2935297:0

crwdns2944067:00crwdne2944067:0

crwdns2917038:0crwdne2917038:0

crwdns2936625:0crwdne2936625:0:

crwdns2936751:024crwdne2936751:0 2

crwdns2936753:07crwdne2936753:0 15

crwdns2936753:030crwdne2936753:0 58

crwdns2942667:0crwdne2942667:0 2,597