crwdns2933423:0crwdne2933423:0

Samsung Galaxy Tab A 9.7 Battery Replacement

crwdns2942213:0crwdne2942213:0

  1. Samsung Galaxy Tab A 9.7  Battery Replacement, Back Cover: crwdns2935265:01crwdnd2935265:01crwdnd2935265:01crwdne2935265:0
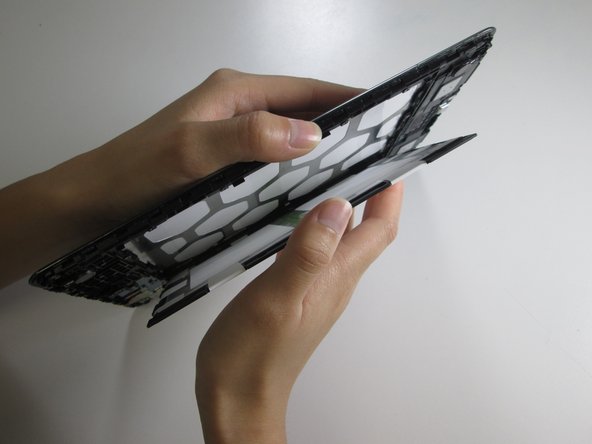
    • Insert a metal spudger between the back case and the screen of the device.

    • The back cover is attached to the device by a series of snaps. The snaps are positioned about an inch from each other.

    • Move the spudger along the perimeter of the device while it is in between the back case and the screen to open each snap.

    • There will be an audible click every time a snap releases.

  2. Samsung Galaxy Tab A 9.7  Battery Replacement, Battery: crwdns2935265:02crwdnd2935265:01crwdnd2935265:02crwdne2935265:0 Samsung Galaxy Tab A 9.7  Battery Replacement, Battery: crwdns2935265:02crwdnd2935265:02crwdnd2935265:02crwdne2935265:0
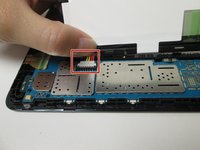
    • Remove the eleven #000 Phillips 2.8mm screws that hold the battery in place.

  3. Samsung Galaxy Tab A 9.7  Battery Replacement: crwdns2935265:03crwdnd2935265:01crwdnd2935265:02crwdne2935265:0 Samsung Galaxy Tab A 9.7  Battery Replacement: crwdns2935265:03crwdnd2935265:02crwdnd2935265:02crwdne2935265:0
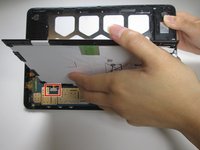
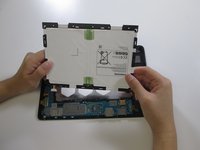
    • Place one hand on the battery and grasp the outer edge of the device with the other hand.

    • Flip the device over so that the battery falls over and onto your hand.

  4. Samsung Galaxy Tab A 9.7  Battery Replacement: crwdns2935265:04crwdnd2935265:01crwdnd2935265:02crwdne2935265:0 Samsung Galaxy Tab A 9.7  Battery Replacement: crwdns2935265:04crwdnd2935265:02crwdnd2935265:02crwdne2935265:0
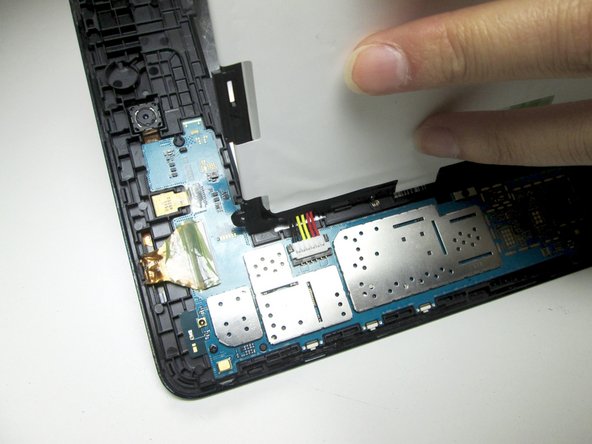
    • Pull the battery out until it is only connected to the device by the black, yellow, and red connectors.

  5. Samsung Galaxy Tab A 9.7  Battery Replacement: crwdns2935265:05crwdnd2935265:01crwdnd2935265:02crwdne2935265:0 Samsung Galaxy Tab A 9.7  Battery Replacement: crwdns2935265:05crwdnd2935265:02crwdnd2935265:02crwdne2935265:0
    • Hold the battery and grip the wires with your thumb and finger.

    • Pull the wires away from the device to remove the white connector from the black socket.

    • Lift the battery away from the device.

crwdns2915888:0crwdne2915888:0

To reassemble your device, follow these instructions in reverse order.

crwdns2935229:013crwdne2935229:0

Paulina Nguyen

crwdns2935283:004/26/17crwdne2935283:0

982 crwdns2915208:0crwdne2915208:0

crwdns2935297:06crwdne2935297:0

crwdns2915084:0crwdne2915084:0

Cal Poly, Team S1-G3, Livingston Spring 2017 crwdns2935289:0Cal Poly, Team S1-G3, Livingston Spring 2017crwdne2935289:0

CPSU-LIVINGSTON-S17S1G3

crwdns2934841:01crwdne2934841:0

crwdns2935297:012crwdne2935297:0

crwdns2944067:00crwdne2944067:0

crwdns2917038:0crwdne2917038:0

crwdns2936625:0crwdne2936625:0:

crwdns2936751:024crwdne2936751:0 1

crwdns2936753:07crwdne2936753:0 16

crwdns2936753:030crwdne2936753:0 55

crwdns2942667:0crwdne2942667:0 11,095