crwdns2933423:0crwdne2933423:0

Samsung Galaxy Tab A 10.1 Motherboard Replacement

crwdns2942213:0crwdne2942213:0

  1. Samsung Galaxy Tab A 10.1 Motherboard Replacement, Back Panel: crwdns2935265:01crwdnd2935265:01crwdnd2935265:02crwdne2935265:0 Samsung Galaxy Tab A 10.1 Motherboard Replacement, Back Panel: crwdns2935265:01crwdnd2935265:02crwdnd2935265:02crwdne2935265:0
    • Have the front of the device facing you.

    • Begin near one of the curved edges of the device (see photo two for visual example).

    • Place a plastic opening tool between the front and back panels.

    • If a plastic opening tool doesn’t work, using a metal spudger may work, but it may damage the plastic on the device.

    • Remember to remove the micro SD card (if present) before you begin.

  2. Samsung Galaxy Tab A 10.1 Motherboard Replacement: crwdns2935265:02crwdnd2935265:01crwdnd2935265:02crwdne2935265:0 Samsung Galaxy Tab A 10.1 Motherboard Replacement: crwdns2935265:02crwdnd2935265:02crwdnd2935265:02crwdne2935265:0
    • Once the plastic opening tool is fully inserted, wedge it around the device’s edges to separate the panels.

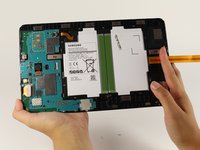
    • Lift the back panel off of the device.

    • The back panel will make a clicking noise while being lifted off of the device.

  3. Samsung Galaxy Tab A 10.1 Motherboard Replacement, Disconnecting the battery: crwdns2935265:03crwdnd2935265:01crwdnd2935265:01crwdne2935265:0
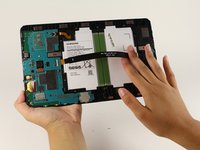
    • Remove the adhesive film and flip up the retaining flap on the ZIF battery connector.

    • Slide the orange battery ribbon cable out of the ZIF connector.

  4. Samsung Galaxy Tab A 10.1 Motherboard Replacement: crwdns2935265:04crwdnd2935265:01crwdnd2935265:02crwdne2935265:0 Samsung Galaxy Tab A 10.1 Motherboard Replacement: crwdns2935265:04crwdnd2935265:02crwdnd2935265:02crwdne2935265:0
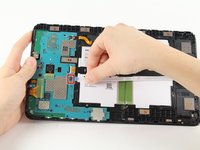
    • Remove the adhesive film, lift the retaining tab and withdraw the white speaker ribbon.

  5. Samsung Galaxy Tab A 10.1 Motherboard Replacement: crwdns2935265:05crwdnd2935265:01crwdnd2935265:03crwdne2935265:0 Samsung Galaxy Tab A 10.1 Motherboard Replacement: crwdns2935265:05crwdnd2935265:02crwdnd2935265:03crwdne2935265:0 Samsung Galaxy Tab A 10.1 Motherboard Replacement: crwdns2935265:05crwdnd2935265:03crwdnd2935265:03crwdne2935265:0
    • Lift the retaining tab and withdraw the black LCD ribbon.

  6. Samsung Galaxy Tab A 10.1 Motherboard Replacement, Battery removal: crwdns2935265:06crwdnd2935265:01crwdnd2935265:02crwdne2935265:0 Samsung Galaxy Tab A 10.1 Motherboard Replacement, Battery removal: crwdns2935265:06crwdnd2935265:02crwdnd2935265:02crwdne2935265:0
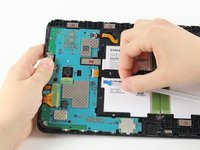
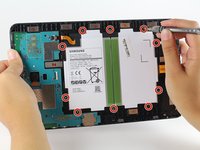
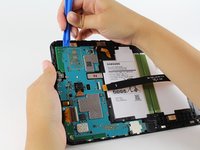
    • Using a Phillips #000 screwdriver, remove the ten 4 mm screws around the battery.

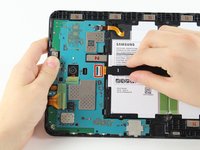
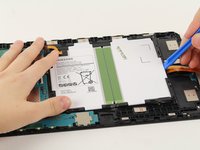
    • Slide a plastic opening tool under the bottom of the battery close to the speakers and lift up.

    • The large rectangular white and black piece is the entire battery. Be careful not to puncture it.

  7. Samsung Galaxy Tab A 10.1 Motherboard Replacement, Motherboard: crwdns2935265:07crwdnd2935265:01crwdnd2935265:03crwdne2935265:0 Samsung Galaxy Tab A 10.1 Motherboard Replacement, Motherboard: crwdns2935265:07crwdnd2935265:02crwdnd2935265:03crwdne2935265:0 Samsung Galaxy Tab A 10.1 Motherboard Replacement, Motherboard: crwdns2935265:07crwdnd2935265:03crwdnd2935265:03crwdne2935265:0
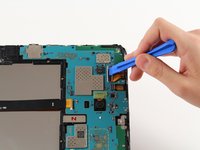
    • Flip up the two ZIF connectors on the motherboard using the plastic opening tool.

    • Slide the orange ribbon cables out of the ZIF connectors.

    • Remove the front-facing camera.

  8. Samsung Galaxy Tab A 10.1 Motherboard Replacement: crwdns2935265:08crwdnd2935265:01crwdnd2935265:01crwdne2935265:0
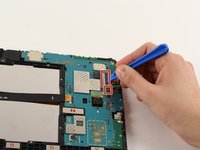
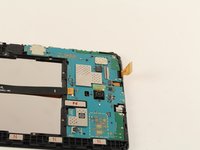
    • Disconnect the headphone jack from the motherboard.

    • Use a Phillips # 000 to remove six 4mm screws.

  9. Samsung Galaxy Tab A 10.1 Motherboard Replacement: crwdns2935265:09crwdnd2935265:01crwdnd2935265:02crwdne2935265:0 Samsung Galaxy Tab A 10.1 Motherboard Replacement: crwdns2935265:09crwdnd2935265:02crwdnd2935265:02crwdne2935265:0
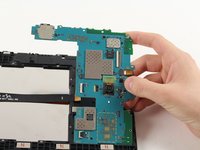
    • Lodge the plastic opening tool under and lift the motherboard out of the tablet.

    • Be careful not to snag any connectors.

    • Remove the metal bracket that was underneath the charging port and set aside.

crwdns2915888:0crwdne2915888:0

To reassemble your device, follow these instructions in reverse order.

crwdns2935229:012crwdne2935229:0

Isabella Li

crwdns2935283:010/02/17crwdne2935283:0

2,358 crwdns2915208:0crwdne2915208:0

crwdns2935297:07crwdne2935297:0

crwdns2915084:0crwdne2915084:0

Cal Poly, Team S15-G6, Livingston Fall 2017 crwdns2935289:0Cal Poly, Team S15-G6, Livingston Fall 2017crwdne2935289:0

CPSU-LIVINGSTON-F17S15G6

crwdns2931471:04crwdne2931471:0

crwdns2935297:026crwdne2935297:0

crwdns2917034:0crwdne2917034:0

habe es geschafft zum zerlegen... leider ist nur der verschluss vom LCD hops gegangen. Ohne diesen geht wohl nix. Kein Bild.

Mike Muley - crwdns2934203:0crwdne2934203:0

crwdns2917038:0crwdne2917038:0

crwdns2936625:0crwdne2936625:0:

crwdns2936751:024crwdne2936751:0 2

crwdns2936753:07crwdne2936753:0 26

crwdns2936753:030crwdne2936753:0 137

crwdns2942667:0crwdne2942667:0 16,162