crwdns2933423:0crwdne2933423:0

Samsung Galaxy Tab 4 8.0 Wi-Fi Motherboard Replacement

crwdns2942213:0crwdne2942213:0

  1. Samsung Galaxy Tab 4 8.0 Wi-Fi Motherboard Replacement, Rear Case: crwdns2935265:01crwdnd2935265:01crwdnd2935265:01crwdne2935265:0
    • Before you being the replacement process, make sure the tablet is completely powered off.

    • Gently insert the plastic opening tool between the metal rim and the back plastic casing at the bottom of the tablet and pry the back casing away from the device. Continue to separate the back panel of the device from the front assembly.

    • Right-handed users will probably be more comfortable prying in a clockwise movement, while left-handed users will feel more comfortable doing a counter clockwise movement.

    • When taking off the rear case there will be periodic clicking noises. Do not worry about those noises. They are just the rear case being disconnected.

    • Be careful not to use too much force as the plastic clips can easily be broken.

  2. Samsung Galaxy Tab 4 8.0 Wi-Fi Motherboard Replacement: crwdns2935265:02crwdnd2935265:01crwdnd2935265:01crwdne2935265:0
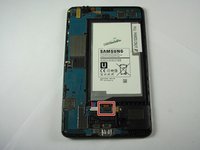
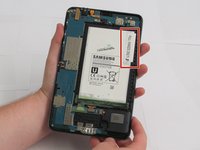
    • Place the tablet screen down on a clean surface.

    • Grasp the back panel and lift it from the device.

  3. Samsung Galaxy Tab 4 8.0 Wi-Fi Motherboard Replacement, Front Facing Camera: crwdns2935265:03crwdnd2935265:01crwdnd2935265:01crwdne2935265:0
    • The front facing camera's ribbon cable is located at the top edge of the motherboard, slightly left of center.

    • Slide the flat end of the blue plastic opening tool underneath the connector at the end of the ribbon cable.

  4. Samsung Galaxy Tab 4 8.0 Wi-Fi Motherboard Replacement: crwdns2935265:04crwdnd2935265:01crwdnd2935265:01crwdne2935265:0
    • Slightly apply pressure and move the blue plastic opening tool downwards to pop the front camera’s gold rectangular connector from its socket on the motherboard.

  5. Samsung Galaxy Tab 4 8.0 Wi-Fi Motherboard Replacement: crwdns2935265:05crwdnd2935265:01crwdnd2935265:01crwdne2935265:0
    • Squeeze the gold rectangular piece with the tweezers to gently lift it from its pit.

  6. Samsung Galaxy Tab 4 8.0 Wi-Fi Motherboard Replacement, Rear Facing Camera: crwdns2935265:06crwdnd2935265:01crwdnd2935265:01crwdne2935265:0
    • The rear facing camera will be located just to the right and below the front facing camera, near the top and center of the motherboard.

  7. Samsung Galaxy Tab 4 8.0 Wi-Fi Motherboard Replacement: crwdns2935265:07crwdnd2935265:01crwdnd2935265:01crwdne2935265:0
    • Slide the flat end of the blue plastic opening tool underneath the rectangular metal connector of the rear facing camera.

    • Apply slight pressure outwards until the camera's metal connector pops from its socket on the motherboard.

  8. Samsung Galaxy Tab 4 8.0 Wi-Fi Motherboard Replacement: crwdns2935265:08crwdnd2935265:01crwdnd2935265:01crwdne2935265:0
    • Remove the camera from it's housing with your tweezers.

  9. Samsung Galaxy Tab 4 8.0 Wi-Fi Motherboard Replacement, Motherboard: crwdns2935265:09crwdnd2935265:01crwdnd2935265:03crwdne2935265:0 Samsung Galaxy Tab 4 8.0 Wi-Fi Motherboard Replacement, Motherboard: crwdns2935265:09crwdnd2935265:02crwdnd2935265:03crwdne2935265:0 Samsung Galaxy Tab 4 8.0 Wi-Fi Motherboard Replacement, Motherboard: crwdns2935265:09crwdnd2935265:03crwdnd2935265:03crwdne2935265:0
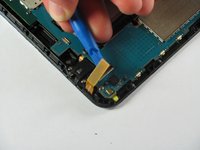
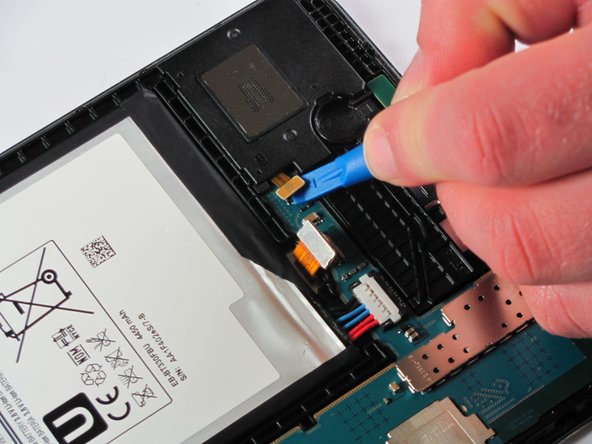
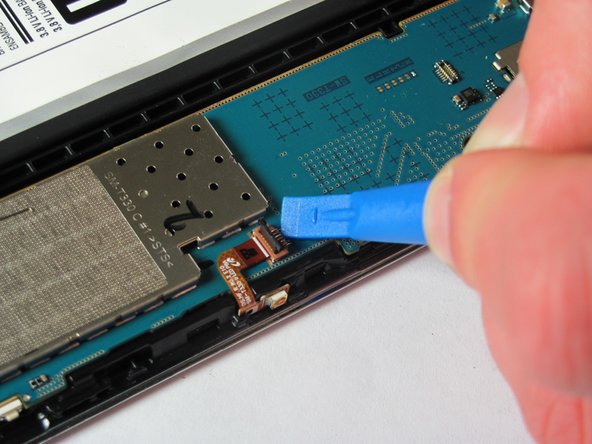
    • Slide the opening tool underneath the connector and apply slight pressure upwards and outwards until the metal connector pops from its socket on the motherboard.

    • Device has been rotated 90 degrees counter-clockwise.

  10. Samsung Galaxy Tab 4 8.0 Wi-Fi Motherboard Replacement: crwdns2935265:010crwdnd2935265:01crwdnd2935265:03crwdne2935265:0 Samsung Galaxy Tab 4 8.0 Wi-Fi Motherboard Replacement: crwdns2935265:010crwdnd2935265:02crwdnd2935265:03crwdne2935265:0 Samsung Galaxy Tab 4 8.0 Wi-Fi Motherboard Replacement: crwdns2935265:010crwdnd2935265:03crwdnd2935265:03crwdne2935265:0
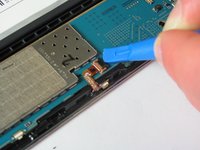
    • Slide the opening tool underneath the connector and apply slight pressure outwards until the gold connector pops from its socket on the motherboard.

    • Device has been rotated 180 degrees.

  11. Samsung Galaxy Tab 4 8.0 Wi-Fi Motherboard Replacement: crwdns2935265:011crwdnd2935265:01crwdnd2935265:03crwdne2935265:0 Samsung Galaxy Tab 4 8.0 Wi-Fi Motherboard Replacement: crwdns2935265:011crwdnd2935265:02crwdnd2935265:03crwdne2935265:0 Samsung Galaxy Tab 4 8.0 Wi-Fi Motherboard Replacement: crwdns2935265:011crwdnd2935265:03crwdnd2935265:03crwdne2935265:0
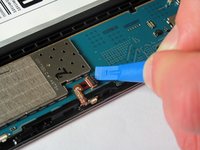
    • Slide the opening tool underneath the connector and apply slight pressure outwards until the small bronze connector pops from its socket on the motherboard.

    • Device has been rotated 90 degrees counter-clockwise.

  12. Samsung Galaxy Tab 4 8.0 Wi-Fi Motherboard Replacement: crwdns2935265:012crwdnd2935265:01crwdnd2935265:03crwdne2935265:0 Samsung Galaxy Tab 4 8.0 Wi-Fi Motherboard Replacement: crwdns2935265:012crwdnd2935265:02crwdnd2935265:03crwdne2935265:0 Samsung Galaxy Tab 4 8.0 Wi-Fi Motherboard Replacement: crwdns2935265:012crwdnd2935265:03crwdnd2935265:03crwdne2935265:0
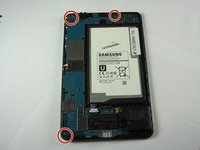
    • Remove both 2 mm #000 Phillips screws from the metal charger port cover.

  13. Samsung Galaxy Tab 4 8.0 Wi-Fi Motherboard Replacement: crwdns2935265:013crwdnd2935265:01crwdnd2935265:02crwdne2935265:0 Samsung Galaxy Tab 4 8.0 Wi-Fi Motherboard Replacement: crwdns2935265:013crwdnd2935265:02crwdnd2935265:02crwdne2935265:0
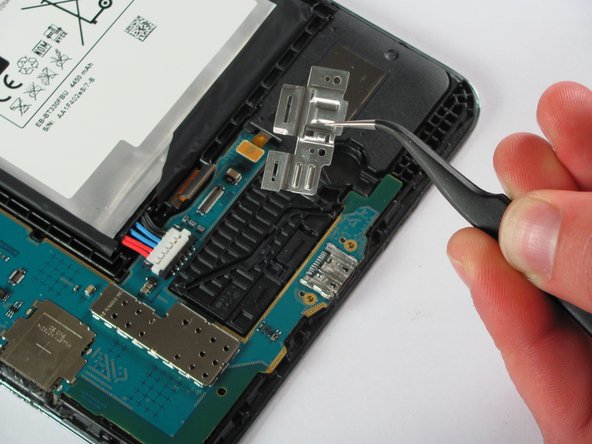
    • Carefully lift the metal cover away with your tweezers.

  14. Samsung Galaxy Tab 4 8.0 Wi-Fi Motherboard Replacement: crwdns2935265:014crwdnd2935265:01crwdnd2935265:03crwdne2935265:0 Samsung Galaxy Tab 4 8.0 Wi-Fi Motherboard Replacement: crwdns2935265:014crwdnd2935265:02crwdnd2935265:03crwdne2935265:0 Samsung Galaxy Tab 4 8.0 Wi-Fi Motherboard Replacement: crwdns2935265:014crwdnd2935265:03crwdnd2935265:03crwdne2935265:0
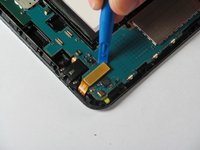
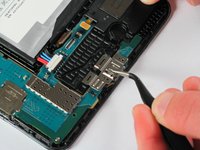
    • Slide the flat end of the opening tool under the black plastic fastener and apply slight pressure outwards until it lifts away.

    • Device has been rotated 90 degrees counter-clockwise.

  15. Samsung Galaxy Tab 4 8.0 Wi-Fi Motherboard Replacement: crwdns2935265:015crwdnd2935265:01crwdnd2935265:01crwdne2935265:0
    • Use your tweezers to pull the golden cable out from underneath the black fastener.

    • The cable is fragile, so be careful when removing it.

    • Device has been rotated 90 degrees clockwise.

  16. Samsung Galaxy Tab 4 8.0 Wi-Fi Motherboard Replacement: crwdns2935265:016crwdnd2935265:01crwdnd2935265:02crwdne2935265:0 Samsung Galaxy Tab 4 8.0 Wi-Fi Motherboard Replacement: crwdns2935265:016crwdnd2935265:02crwdnd2935265:02crwdne2935265:0
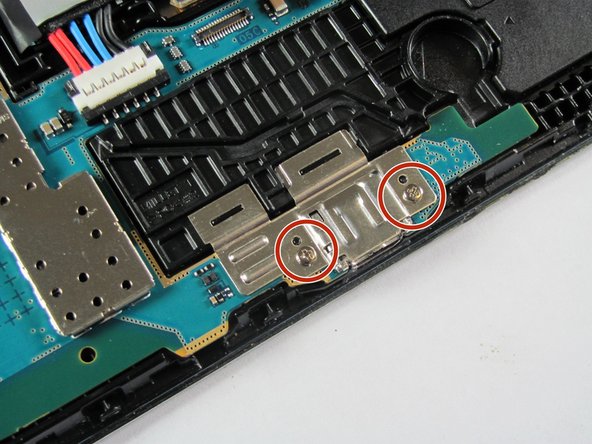
    • Remove all three 2 mm #000 Phillips screws that fasten the mother board to the front panel.

  17. Samsung Galaxy Tab 4 8.0 Wi-Fi Motherboard Replacement: crwdns2935265:017crwdnd2935265:01crwdnd2935265:02crwdne2935265:0 Samsung Galaxy Tab 4 8.0 Wi-Fi Motherboard Replacement: crwdns2935265:017crwdnd2935265:02crwdnd2935265:02crwdne2935265:0
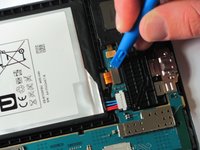
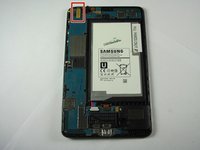
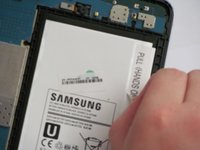
    • Peel the sticker, reading "PULL (HANDS ONLY)," off of the battery starting at the detachable corner.

  18. Samsung Galaxy Tab 4 8.0 Wi-Fi Motherboard Replacement: crwdns2935265:018crwdnd2935265:01crwdnd2935265:01crwdne2935265:0
    • Grab the top right corner of the battery and pull it out of the device.

    • If there is adhesive keeping the battery in place, use the flat end of the spudger and run it between the battery and the front panel.

    • Do not completely remove the battery as doing so could cause damage to the motherboard and the cables attached to the battery.

  19. Samsung Galaxy Tab 4 8.0 Wi-Fi Motherboard Replacement: crwdns2935265:019crwdnd2935265:01crwdnd2935265:01crwdne2935265:0
    • Peel away the green tape starting at the bottom left side.

  20. Samsung Galaxy Tab 4 8.0 Wi-Fi Motherboard Replacement: crwdns2935265:020crwdnd2935265:01crwdnd2935265:02crwdne2935265:0 Samsung Galaxy Tab 4 8.0 Wi-Fi Motherboard Replacement: crwdns2935265:020crwdnd2935265:02crwdnd2935265:02crwdne2935265:0
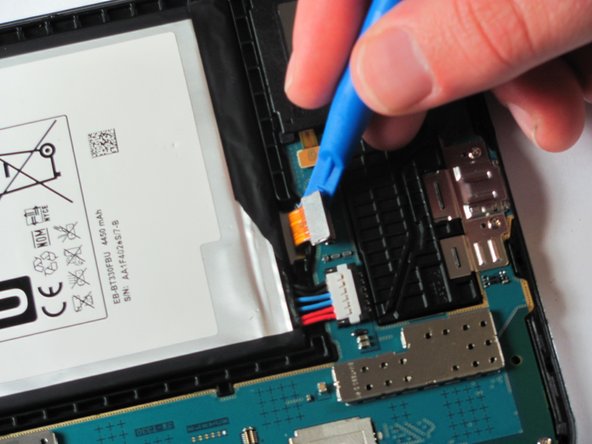
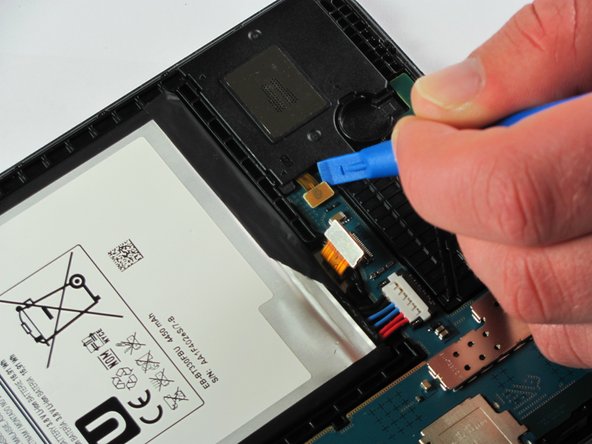
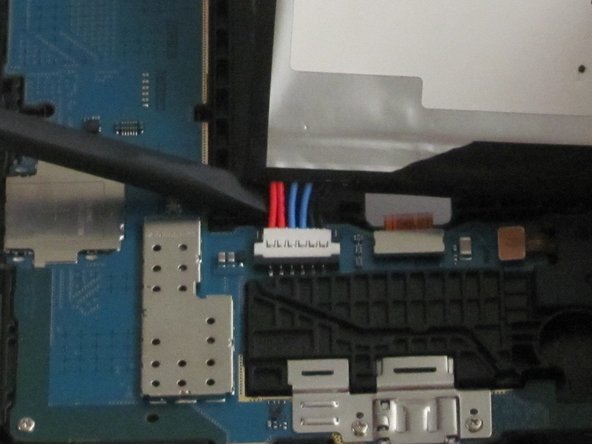
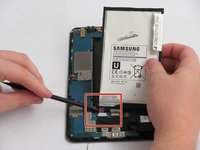
    • Use the spudger to disconnect the battery connector by running it along the underside of the battery.

    • Lift the battery out of the assembly.

  21. Samsung Galaxy Tab 4 8.0 Wi-Fi Motherboard Replacement: crwdns2935265:021crwdnd2935265:01crwdnd2935265:01crwdne2935265:0
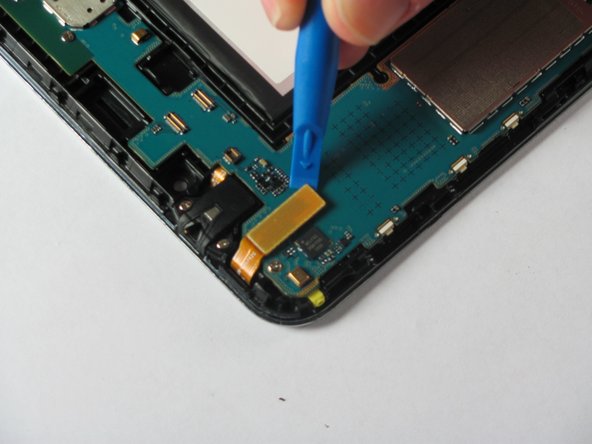
    • Simply grasp the motherboard with both hands from the top and bottom on opposite corners and lift it free of the device.

    • Be sure to place the motherboard on a static-free surface like paper towels so as to prevent any further damage.

crwdns2915888:0crwdne2915888:0

Replace the defective motherboard with the new one, then, to reassemble your device, follow the instructions in reverse order.

crwdns2935229:03crwdne2935229:0

Jonathan Wharton

crwdns2935283:004/12/16crwdne2935283:0

299 crwdns2915208:0crwdne2915208:0

crwdns2935295:0crwdne2935295:0

crwdns2915084:0crwdne2915084:0

Cal Poly, Team 25-3, Maness Spring 2016 crwdns2935289:0Cal Poly, Team 25-3, Maness Spring 2016crwdne2935289:0

CPSU-MANESS-S16S25G3

crwdns2931471:04crwdne2931471:0

crwdns2935297:010crwdne2935297:0

crwdns2944067:00crwdne2944067:0

crwdns2917038:0crwdne2917038:0

crwdns2936625:0crwdne2936625:0:

crwdns2936751:024crwdne2936751:0 0

crwdns2936753:07crwdne2936753:0 1

crwdns2936753:030crwdne2936753:0 5

crwdns2942667:0crwdne2942667:0 2,230