crwdns2933423:0crwdne2933423:0

Samsung Galaxy Tab 3 10.1 Motherboard Replacement

crwdns2942213:0crwdne2942213:0

  1. Samsung Galaxy Tab 3 10.1 Motherboard Replacement, Rear Case: crwdns2935265:01crwdnd2935265:01crwdnd2935265:02crwdne2935265:0 Samsung Galaxy Tab 3 10.1 Motherboard Replacement, Rear Case: crwdns2935265:01crwdnd2935265:02crwdnd2935265:02crwdne2935265:0
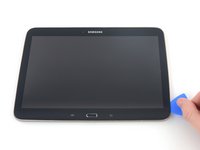
    • Insert an opening pick between the rear case and the plastic rim.

    • You may need to add multiple picks to detach the clips.

    • Slide the pick along the edge of the rear case until you release the plastic clips attaching the rear case to the display.

    • Continue to slide the pick around the edge of the rear case until all clips are released.

  2. Samsung Galaxy Tab 3 10.1 Motherboard Replacement: crwdns2935265:02crwdnd2935265:01crwdnd2935265:02crwdne2935265:0 Samsung Galaxy Tab 3 10.1 Motherboard Replacement: crwdns2935265:02crwdnd2935265:02crwdnd2935265:02crwdne2935265:0
    • Lift the case up to remove it.

  3. Samsung Galaxy Tab 3 10.1 Motherboard Replacement, Battery: crwdns2935265:03crwdnd2935265:01crwdnd2935265:03crwdne2935265:0 Samsung Galaxy Tab 3 10.1 Motherboard Replacement, Battery: crwdns2935265:03crwdnd2935265:02crwdnd2935265:03crwdne2935265:0 Samsung Galaxy Tab 3 10.1 Motherboard Replacement, Battery: crwdns2935265:03crwdnd2935265:03crwdnd2935265:03crwdne2935265:0
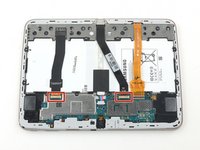
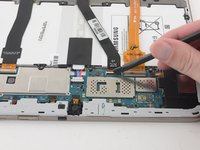
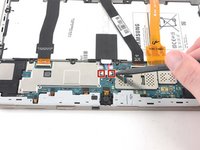
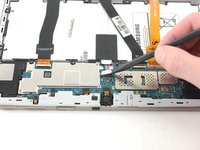
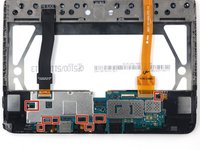
    • Use the flat end of a nlyon spudger to pry up the black plastic tabs securing the two ZIF connectors.

  4. Samsung Galaxy Tab 3 10.1 Motherboard Replacement: crwdns2935265:04crwdnd2935265:01crwdnd2935265:02crwdne2935265:0 Samsung Galaxy Tab 3 10.1 Motherboard Replacement: crwdns2935265:04crwdnd2935265:02crwdnd2935265:02crwdne2935265:0
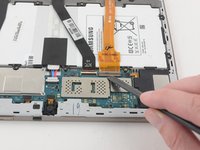
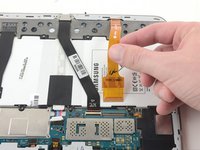
    • Use the flat end of a nylon spudger to pry up the brown plastic tab securing the orange ribbon cable.

  5. Samsung Galaxy Tab 3 10.1 Motherboard Replacement: crwdns2935265:05crwdnd2935265:01crwdnd2935265:03crwdne2935265:0 Samsung Galaxy Tab 3 10.1 Motherboard Replacement: crwdns2935265:05crwdnd2935265:02crwdnd2935265:03crwdne2935265:0 Samsung Galaxy Tab 3 10.1 Motherboard Replacement: crwdns2935265:05crwdnd2935265:03crwdnd2935265:03crwdne2935265:0
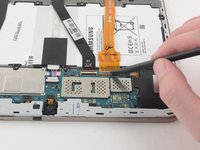
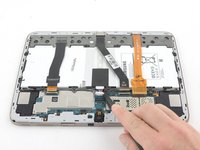
    • Remove all three ribbon cables by gently pulling the cables away from the ZIF connectors.

  6. Samsung Galaxy Tab 3 10.1 Motherboard Replacement: crwdns2935265:06crwdnd2935265:01crwdnd2935265:01crwdne2935265:0
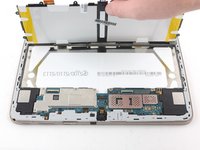
    • Use a Phillips #000 screwdriver to remove the ten 3mm screws securing the battery to the chassis.

  7. Samsung Galaxy Tab 3 10.1 Motherboard Replacement: crwdns2935265:07crwdnd2935265:01crwdnd2935265:02crwdne2935265:0 Samsung Galaxy Tab 3 10.1 Motherboard Replacement: crwdns2935265:07crwdnd2935265:02crwdnd2935265:02crwdne2935265:0
    • Use the pointed end of a nylon spudger to pry the two battery connections away from the motherboard.

  8. Samsung Galaxy Tab 3 10.1 Motherboard Replacement: crwdns2935265:08crwdnd2935265:01crwdnd2935265:02crwdne2935265:0 Samsung Galaxy Tab 3 10.1 Motherboard Replacement: crwdns2935265:08crwdnd2935265:02crwdnd2935265:02crwdne2935265:0
    • Lift with a nylon spudger to remove the battery.

  9. Samsung Galaxy Tab 3 10.1 Motherboard Replacement, Motherboard: crwdns2935265:09crwdnd2935265:01crwdnd2935265:02crwdne2935265:0 Samsung Galaxy Tab 3 10.1 Motherboard Replacement, Motherboard: crwdns2935265:09crwdnd2935265:02crwdnd2935265:02crwdne2935265:0
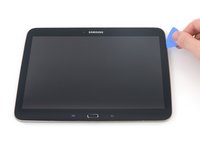
    • Insert an opening pick between the plastic frame and the screen.

    • Slide the opening pick around the perimeter of the screen.

    • You will hear clicking noises as each plastic clip is released from the display chassis.

  10. Samsung Galaxy Tab 3 10.1 Motherboard Replacement: crwdns2935265:010crwdnd2935265:01crwdnd2935265:01crwdne2935265:0
    • Lift the plastic frame to remove.

    • Avoid the three delicate ribbon cables.

  11. Samsung Galaxy Tab 3 10.1 Motherboard Replacement: crwdns2935265:011crwdnd2935265:01crwdnd2935265:01crwdne2935265:0
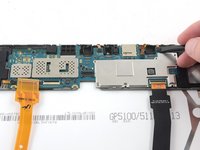
    • Use a Phillips #000 screwdriver to remove the 3mm screw attaching the motherboard to the display chassis.

  12. Samsung Galaxy Tab 3 10.1 Motherboard Replacement: crwdns2935265:012crwdnd2935265:01crwdnd2935265:03crwdne2935265:0 Samsung Galaxy Tab 3 10.1 Motherboard Replacement: crwdns2935265:012crwdnd2935265:02crwdnd2935265:03crwdne2935265:0 Samsung Galaxy Tab 3 10.1 Motherboard Replacement: crwdns2935265:012crwdnd2935265:03crwdnd2935265:03crwdne2935265:0
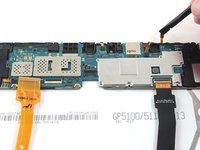
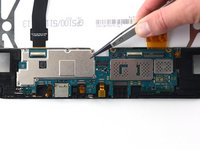
    • Use a nylon spudger to flip up the eight press-fit connectors from the motherboard.

    • The vibration motor is missing from these photos.

  13. Samsung Galaxy Tab 3 10.1 Motherboard Replacement: crwdns2935265:013crwdnd2935265:01crwdnd2935265:02crwdne2935265:0 Samsung Galaxy Tab 3 10.1 Motherboard Replacement: crwdns2935265:013crwdnd2935265:02crwdnd2935265:02crwdne2935265:0
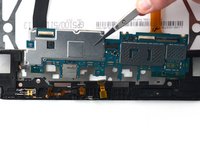
    • Use nylon-tipped tweezers to remove the motherboard.

crwdns2915888:0crwdne2915888:0

To reassemble your device, follow these instructions in reverse order.

crwdns2935229:012crwdne2935229:0

Corey Brown

crwdns2935283:006/24/16crwdne2935283:0

8,682 crwdns2915208:0crwdne2915208:0

crwdns2935297:011crwdne2935297:0

crwdns2944067:03crwdne2944067:0

Great guide, project completed.

Edgar Merced - crwdns2934203:0crwdne2934203:0

Simplemente GENIAL!!!!

Muy claro.

Felicitaciones.

Cuenten con mis aportes al foro

Ahora que pude retirar placa base voy a ver esquemático, porque WIFI se desactiva . No funciona.

Saludos

DARIO GASTAUDO - crwdns2934203:0crwdne2934203:0

very easy to destroy the Galaxy. finicky to the max!

ein Stein - crwdns2934203:0crwdne2934203:0

crwdns2917038:0crwdne2917038:0

crwdns2936625:0crwdne2936625:0:

crwdns2936751:024crwdne2936751:0 2

crwdns2936753:07crwdne2936753:0 4

crwdns2936753:030crwdne2936753:0 44

crwdns2942667:0crwdne2942667:0 9,620