crwdns2933423:0crwdne2933423:0

Samsung Galaxy Tab 3 10.1 LED Light Replacement

crwdns2942213:0crwdne2942213:0

  1. Samsung Galaxy Tab 3 10.1 LED Light Replacement, Rear Case: crwdns2935265:01crwdnd2935265:01crwdnd2935265:02crwdne2935265:0 Samsung Galaxy Tab 3 10.1 LED Light Replacement, Rear Case: crwdns2935265:01crwdnd2935265:02crwdnd2935265:02crwdne2935265:0
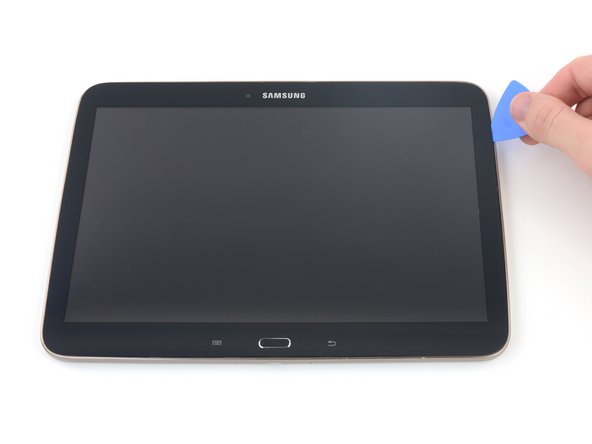
    • Insert an opening pick between the rear case and the plastic rim.

    • You may need to add multiple picks to detach the clips.

    • Slide the pick along the edge of the rear case until you release the plastic clips attaching the rear case to the display.

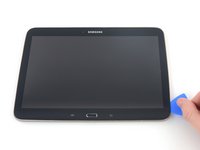
    • Continue to slide the pick around the edge of the rear case until all clips are released.

  2. Samsung Galaxy Tab 3 10.1 LED Light Replacement: crwdns2935265:02crwdnd2935265:01crwdnd2935265:02crwdne2935265:0 Samsung Galaxy Tab 3 10.1 LED Light Replacement: crwdns2935265:02crwdnd2935265:02crwdnd2935265:02crwdne2935265:0
    • Lift the case up to remove it.

  3. Samsung Galaxy Tab 3 10.1 LED Light Replacement, LED Light: crwdns2935265:03crwdnd2935265:01crwdnd2935265:02crwdne2935265:0 Samsung Galaxy Tab 3 10.1 LED Light Replacement, LED Light: crwdns2935265:03crwdnd2935265:02crwdnd2935265:02crwdne2935265:0
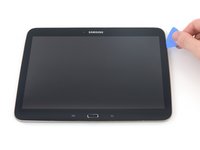
    • Insert an opening pick between the plastic frame and the screen.

    • Slide the opening pick around the perimeter of the screen.

    • You will hear clicking noises as each plastic clip is released from the display chassis.

  4. Samsung Galaxy Tab 3 10.1 LED Light Replacement: crwdns2935265:04crwdnd2935265:01crwdnd2935265:01crwdne2935265:0
    • Lift the plastic frame to remove.

    • Avoid the three delicate ribbon cables.

  5. Samsung Galaxy Tab 3 10.1 LED Light Replacement: crwdns2935265:05crwdnd2935265:01crwdnd2935265:03crwdne2935265:0 Samsung Galaxy Tab 3 10.1 LED Light Replacement: crwdns2935265:05crwdnd2935265:02crwdnd2935265:03crwdne2935265:0 Samsung Galaxy Tab 3 10.1 LED Light Replacement: crwdns2935265:05crwdnd2935265:03crwdnd2935265:03crwdne2935265:0
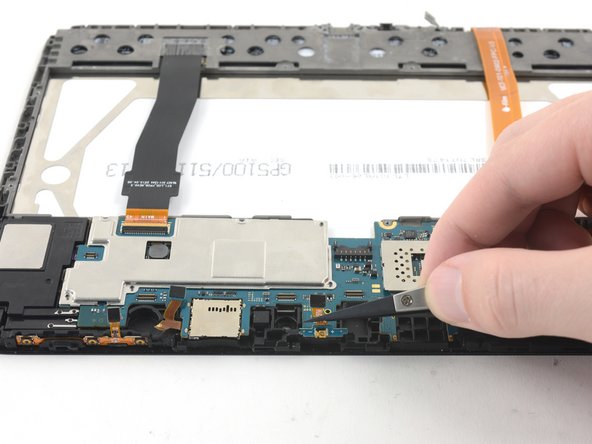
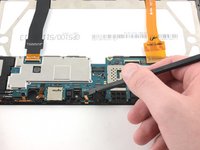
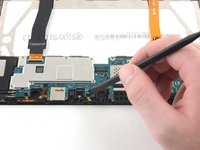
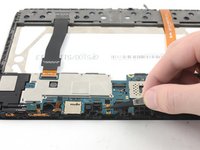
    • Use the flat end of the spudger to flip up the press-fit connector attaching the LED to the motherboard.

    • Remove the LED indicator light by gently pulling upward with nylon-tipped tweezers.

crwdns2915888:0crwdne2915888:0

To reassemble your device, follow these instructions in reverse order.

crwdns2935229:04crwdne2935229:0

Corey Brown

crwdns2935283:006/24/16crwdne2935283:0

8.679 crwdns2915208:0crwdne2915208:0

crwdns2935297:011crwdne2935297:0

crwdns2917034:0crwdne2917034:0

Above article is useful for removing LED Light.

Which LED are we removing - Camera Flash or screen display LED?

How to fit new LED Light?

Please reply. I am facing issues with screen display and flash for camera is also not working

Ashwini Dughad - crwdns2934203:0crwdne2934203:0

crwdns2917038:0crwdne2917038:0

crwdns2936625:0crwdne2936625:0:

crwdns2936751:024crwdne2936751:0 0

crwdns2936753:07crwdne2936753:0 4

crwdns2936753:030crwdne2936753:0 11

crwdns2942667:0crwdne2942667:0 4,185