crwdns2933423:0crwdne2933423:0

Samsung Galaxy Tab 3 10.1 Battery Replacement

crwdns2942213:0crwdne2942213:0

  1. Samsung Galaxy Tab 3 10.1 Battery Replacement, Rear Case: crwdns2935265:01crwdnd2935265:01crwdnd2935265:02crwdne2935265:0 Samsung Galaxy Tab 3 10.1 Battery Replacement, Rear Case: crwdns2935265:01crwdnd2935265:02crwdnd2935265:02crwdne2935265:0
    • Insert an opening pick between the rear case and the plastic rim.

    • You may need to add multiple picks to detach the clips.

    • Slide the pick along the edge of the rear case until you release the plastic clips attaching the rear case to the display.

    • Continue to slide the pick around the edge of the rear case until all clips are released.

  2. Samsung Galaxy Tab 3 10.1 Battery Replacement: crwdns2935265:02crwdnd2935265:01crwdnd2935265:02crwdne2935265:0 Samsung Galaxy Tab 3 10.1 Battery Replacement: crwdns2935265:02crwdnd2935265:02crwdnd2935265:02crwdne2935265:0
    • Lift the case up to remove it.

  3. Samsung Galaxy Tab 3 10.1 Battery Replacement, Battery: crwdns2935265:03crwdnd2935265:01crwdnd2935265:03crwdne2935265:0 Samsung Galaxy Tab 3 10.1 Battery Replacement, Battery: crwdns2935265:03crwdnd2935265:02crwdnd2935265:03crwdne2935265:0 Samsung Galaxy Tab 3 10.1 Battery Replacement, Battery: crwdns2935265:03crwdnd2935265:03crwdnd2935265:03crwdne2935265:0
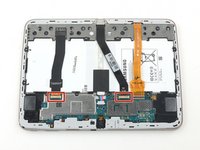
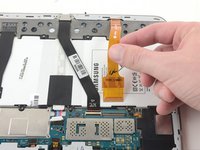
    • Use the flat end of a nlyon spudger to pry up the black plastic tabs securing the two ZIF connectors.

  4. Samsung Galaxy Tab 3 10.1 Battery Replacement: crwdns2935265:04crwdnd2935265:01crwdnd2935265:02crwdne2935265:0 Samsung Galaxy Tab 3 10.1 Battery Replacement: crwdns2935265:04crwdnd2935265:02crwdnd2935265:02crwdne2935265:0
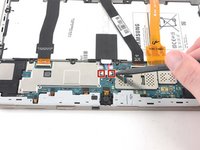
    • Use the flat end of a nylon spudger to pry up the brown plastic tab securing the orange ribbon cable.

  5. Samsung Galaxy Tab 3 10.1 Battery Replacement: crwdns2935265:05crwdnd2935265:01crwdnd2935265:03crwdne2935265:0 Samsung Galaxy Tab 3 10.1 Battery Replacement: crwdns2935265:05crwdnd2935265:02crwdnd2935265:03crwdne2935265:0 Samsung Galaxy Tab 3 10.1 Battery Replacement: crwdns2935265:05crwdnd2935265:03crwdnd2935265:03crwdne2935265:0
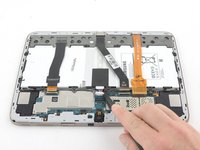
    • Remove all three ribbon cables by gently pulling the cables away from the ZIF connectors.

  6. Samsung Galaxy Tab 3 10.1 Battery Replacement: crwdns2935265:06crwdnd2935265:01crwdnd2935265:01crwdne2935265:0
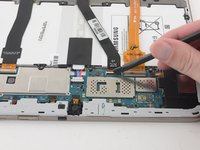
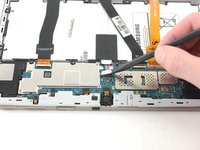
    • Use a Phillips #000 screwdriver to remove the ten 3mm screws securing the battery to the chassis.

  7. Samsung Galaxy Tab 3 10.1 Battery Replacement: crwdns2935265:07crwdnd2935265:01crwdnd2935265:02crwdne2935265:0 Samsung Galaxy Tab 3 10.1 Battery Replacement: crwdns2935265:07crwdnd2935265:02crwdnd2935265:02crwdne2935265:0
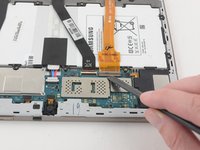
    • Use the pointed end of a nylon spudger to pry the two battery connections away from the motherboard.

  8. Samsung Galaxy Tab 3 10.1 Battery Replacement: crwdns2935265:08crwdnd2935265:01crwdnd2935265:02crwdne2935265:0 Samsung Galaxy Tab 3 10.1 Battery Replacement: crwdns2935265:08crwdnd2935265:02crwdnd2935265:02crwdne2935265:0
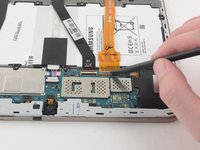
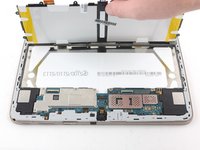
    • Lift with a nylon spudger to remove the battery.

crwdns2915888:0crwdne2915888:0

To reassemble your device, follow these instructions in reverse order.

crwdns2935229:075crwdne2935229:0

Corey Brown

crwdns2935283:006/24/16crwdne2935283:0

8,682 crwdns2915208:0crwdne2915208:0

crwdns2935297:011crwdne2935297:0

crwdns2944067:07crwdne2944067:0

Great, Thanks for the help. It was very useful.

nyhorseracing - crwdns2934203:0crwdne2934203:0

why are there white lines all over the screen after a new battery was installed

Rosita Fowler - crwdns2934203:0crwdne2934203:0

brilliant ! worked extremely well !

Carmelo Aquilina - crwdns2934203:0crwdne2934203:0

Thank you very much for the information. I have one question, though. The new battery works, but it takes a VERY long time to charge. More than a day, in fact. Any idea what could be causing that? Is it possible that one of the connections is not tight enough? If so, which connection might that be?

Thank you.

Paul Ross - crwdns2934203:0crwdne2934203:0

Very easy instructions. Thank you. My only snag was that the ten screws holding the battery were extremely reluctant to undo. wrecked the IFxit screw driver. Fortunately, I had another one. My tip for anyone doing this little job, is to use quit a lot of downward pressure on the screws. Turn them 1/4 turn anticlockwise and back again. Do this several times until they turn freely. You will then have an easy job. I will replace those screws with a tiny blob of 'Never Seize'.

Keith Aldworth - crwdns2934203:0crwdne2934203:0

crwdns2917038:0crwdne2917038:0

crwdns2936625:0crwdne2936625:0:

crwdns2936751:024crwdne2936751:0 8

crwdns2936753:07crwdne2936753:0 44

crwdns2936753:030crwdne2936753:0 272

crwdns2942667:0crwdne2942667:0 42,959