crwdns2915892:0crwdne2915892:0
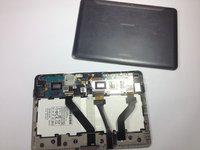
In this guide, you will learn how to remove the back panel for either replacement or to get to other components in your Samsung Galaxy Tab 10.1.
crwdns2942213:0crwdne2942213:0
-
crwdns2935267:0crwdne2935267:0Tweezers$4.99
-
Place the bottom of the tablet towards you.
-
Remove the 4.1mm screws near the charge port with a Tri-Wing screwdriver.
-
If there are plastic tabs covering these screws, use pointed tweezers to pry the tabs out.
-
-
-
-
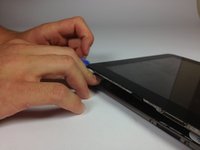
Start in the middle of the left side and insert a plastic opening tool between the rear panel and the front panel assembly.
-
Carefully run the plastic opening tool along the left and top edge to pry the rear panel away from the rest of the device.
-
-
-
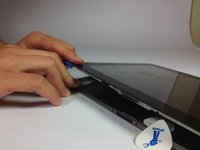
Using the plastic opening tools, continue to carefully run along the right and bottom edge, and then lift the screen from the back panel.
-


To reassemble your device, follow these instructions in reverse order.
To reassemble your device, follow these instructions in reverse order.
crwdns2935221:0crwdne2935221:0
crwdns2935229:013crwdne2935229:0
crwdns2915084:0crwdne2915084:0

Cal Poly, Team 13-5, Forte Fall 2013 crwdns2935289:0Cal Poly, Team 13-5, Forte Fall 2013crwdne2935289:0
CPSU-FORTE-F13S13G5
crwdns2931471:05crwdne2931471:0
crwdns2935297:017crwdne2935297:0
crwdns2947412:04crwdne2947412:0
Very interesting, but my note 10.1 does not have these two screws adjacent to the charge point as you describe. So mine is a bit different. There are no screws anywhere on the tablet. So how do I take the back off mine ??
It currently won’t start and I have read about a fix that requires the back to be removed.
What - How - Ware ? Yes I looked online for the parts, no I was not successful in finding the parts online. Can you tell me ware you found the parts for this project?
i need the panel