crwdns2915892:0crwdne2915892:0
This guide will walk you through removing the back panel of the device and disconnecting the battery. Both of these steps are necessary before any other parts can be replaced. You will hear audible pops as you pry the back off of the device. Don't worry, that's supposed to happen. Focus on prying the bottom corner and two bottom edges away from the device before moving elsewhere. Doing so will make the rest of the back panel pop off the device relatively easily.
crwdns2942213:0crwdne2942213:0
-
-
Screen side facing you, rotate device 180 degrees so the "SAMSUNG" logo is upside down.
-
-
-
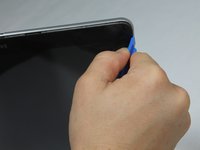
Using the plastic opening tool, start in the center near the charge port and wedge the angled tip between the plastic back and the glass screen.
-
Create a wedge and apply pressure. Use the tool to separate the screen from the back until you hear an audible “pop."
-
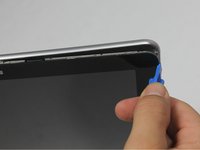
Continue to wedge the tool about every inch along the current edge.
-
-
-
-
Once the bottom edge has been loosened, work towards a bottom corner from the other edge and continue to wedge gently until you can “pop” the corner out.
-
Continue this process on the other bottom corner until it can be popped out as well.
-
-
-
Place your hand between the device and the back panel. Then continue the wedging motion along the top edge of the device until the back panel comes loose.
-
-
-
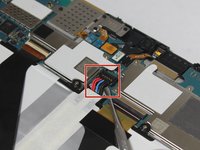
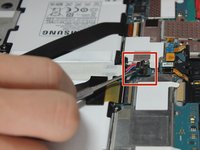
The connection between the battery and motherboard is a group of four wires in black housing that can be found near the top middle of the device. Using a plastic spudger or a flat, slim tool, lift the black connector housing upwards to disconnect it.
-


To reassemble your device, follow these instructions in reverse order.
To reassemble your device, follow these instructions in reverse order.
crwdns2935221:0crwdne2935221:0
crwdns2935229:05crwdne2935229:0
crwdns2915084:0crwdne2915084:0

Baylor, Team 10-11, Williams Fall 2015 crwdns2935289:0Baylor, Team 10-11, Williams Fall 2015crwdne2935289:0
BU-WILLIAMS-F15S10G11
crwdns2931471:03crwdne2931471:0
crwdns2935297:016crwdne2935297:0