crwdns2915892:0crwdne2915892:0
This guide will explain how to replace the volume buttons cable on your Samsung Galaxy S8. This phone requires multiple screws to be removed, cables to be disconnected, and parts to be moved before you can access the volume button cable.
crwdns2942213:0crwdne2942213:0
-
-
Heat an iOpener and apply it to a long edge of the S8 for about 2 minutes.
-
-
-
In the following steps you will be cutting through the adhesive around the edge of the rear glass panel.
-
The adhesive on the rear case is laid out as seen in the first image.
-
The prying pattern as seen from the outside of the phone is as follows:
-
Thick portions of adhesive
-
Thin areas of adhesive
-
Avoid prying here, to protect the fingerprint sensor.
Go clockwise (or counter-clockwise) around the border to avoid causing extra stress on the back. The bottom has a lot more adhesive than you think, towards the top-center.
Failing completely at this step. I’ve heated the opener like 5 times and the phone is hot to the touch, but I can’t get even the tip of the pick into the opening.
Added a hair dryer to the effort and stil making no headway at all.
Be careful. Insanely careful. If you think you are careful enough, this means you need to be even more careful. If you think it is not possible to be more careful, then be a little more careful and you might be able to remove the back cover without breaking it. Especially the bottom of the phone.
-
-
-
Once the back panel is warm to the touch, apply a suction cup as close to the heated edge of the phone as you can while avoiding the curved edge.
-
Lift on the suction cup, and insert an opening pick under the rear glass.
We can't seem to get anything between the edges even after heating the back panel. Any tips?
Hi Megan, unfortunately the adhesive is super tough on this one. I’d recommend carefully continuing to apply heat, very gradually so that you don’t accidentally overheat the battery. Eventually you should be able to get a little gap with the suction handle.
I’ve been attempting to get the adhesive to loosen for four hours now. Exactly how much time is this supposed to take? The pictures makes it look like it should be easy. The adhesive still hasn’t budged and I’m beyond frustrated.
Hi Lori, sorry to hear the adhesive is being extra stubborn! If reheating and reapplying the iOpener isn’t working, you can try heating the edge with a hairdryer or heat gun. That way you can get more heat onto the edge faster, but be very careful not to overheat the battery inside.
I used a stanley knife - very carefully, after trying for several hours to get the adhesive to loosen. I bought another back cover with adhesive for the assmbley, which is the best option in my opinion. Just be careful not the scratch the case of the phone, and be prepared for the back glass cover to break when removing it.
The manufacturers really want to make this impossible, huh… I’ve gone 3 years without ever cracking this phone and end up cracking the corner of the back trying to prise it open. Probably should’ve gotten a heat gun too. This is super tight.
I am currently working on this. I have heated the phone to just barely to hot to hold. No matter how many times I've done this and pulled up with a suction cup I cannot get an edge to lift.
Being that this is my second phone repair does anyone have advice on this? I've watched several YouTube videos and it looks so easy.
I suggest you try to lift on the middle of an edge using the thinnest spudger you have. also as the edge is curved remember to insert it so to follow the curve. Hopes it helps
Cajuteq -
Our issue was that a small gap would open when using the iOpener, but not large enough to get spudger or opening picks in there (also tried hair dryer but same result). Luckily as a guitar player I had some very thin nylon picks that we were able to get in there, which opened up a large enough gap to get the spudger and opening picks in. From there, we were able to heat the other sides and guide the spudger around the entire edge to get the back glass off.
First we used a Dunlop nylon .38 mm guitar pick, then a .60 mm pick, and that allowed us to get the spudger in.
This is by far the hardest part of any tutorial that requires you to open the Samsung. The iOpener is totally useless on my opinion (it doesn’t get warm enough). What I did instead is use a hairdryer but it took me time before I could get the adhesive soft enough. Especially since I was not able to measure the temperature of the phone will warming it. Also I think that the halberd is not thin enough so I used a radiology sheet (don’t know the right word in English) to get into the phone and it was much more effective and time saving. Thank you for the tutorial and good luck !
Use a utility knife blade to work around the edges. Careful not to pry on the blade since you risk cracking the back
I bought a back glass replacement kit with the battery kit since mine was cracked already. I used both iOpeners to uniformly heat the whole back along both long edges. I microwaved each pack twice over 10 mins. 5 mins apply, microwave, 5 minutes apply. That worked!
Similar to other posts, this appeared simpler. I have a couple of tube socks filled with rice that we use a lot for a sore back. Put in microwave for 5 minutes and an amazing heat pack. So I thought I would try this instead of the iOpener as it just was not getting the phone warm enough. Wrapped the phone in the riced-filled-tube sock for a couple of minutes, to the point where I could at least pick it up and hold it. Also, I have the full IFIXIT kit, so I pulled out the jimmy. Viola. Got right in and then allowed me to use the halberd and picks to finish it off.
I was able to do this with the iOpener warming pad by microwaving for the suggested 30secs then leaving it on for 10 mins. repeated this process 2 more times for a total of 3 times @ 30 mins and used the suction tool and the picks to get it open. There is a considerable amount of adhesive on the tops and bottoms of the phone. So consider warming the whole phone before doing it.
Note: if you already have a cracked back panel (like me) prior to starting the process, consider getting the replacement as the already cracked panel will crack even more as you are cutting away at the adhesive. Goodluck!
After over an hour of trying to use heat and the suction tool loosen the adhesive and try to get an opening on one of the edges, I used the blue spudger to see if it would slip thru the edge and it did. I was able to loosen the majority of the back glass but ended up getting excited and rushing and cracked the top corner. I was able to complete the battery replacement and use the cracked back glass. I’m going to order a replacement for that and that should be easier. Lesson to be learned, if any part of the back glass is getting a little tougher to loosen, hit it with heat again just to be safe. The rest of the replacement we pretty straight forward.
The spudger provided in ifixit repair tool kit is not the same as the one used in this guide and can not be used in the same way as the spudger used in this guide. So I am pretty much winging it on the most critical point of this disassembly. This is extremely frustrating.
I’ve repaired many iphones but this was my first attempt on a Samsung. I made no headway at all on opening the case and I’ve decided to just live with the battery being kind of weak. Even with a short life, I would much rather use this phone than an Iphone.
I've tried 5 times in over the course of 4 hours to loosen the adhesive on this phone, and it won't budge. Unfortunately this kit is useless to me
Once I opened one edge, I heated up the other edges then just moved the pick around the entire perimeter of the phone to break the adhesive.
-
-
-
Once you have the tool firmly inserted into the glass, reheat and reapply the iOpener to soften the adhesive.
-
-
-
Slide the opening pick down the side of the phone, separating the adhesive.
Cracked my glass multiple times, do this very slowly and with more heat to each new area.
Second on cracking the back glass. Go slow and apply heat to each side before trying to pry it open.
Steps 9 to 11 > Be careful.. the NFC and Wireless charging might be stuck to the roof of the back panel. This will look very similar to whats in the video... the difference is that the cable goes away from you, rather than towards the top of the phone. The fingerprint sensor cable is very easy to disassemble, so if you feel resistance, heat up the back cover a little more.
-
-
-
Repeat the previous heating and cutting procedure for the remaining three sides of the phone.
-
Leave an opening pick on each side as you continue to the next to prevent the adhesive from resealing.
Petite erreur: le guide dit iPhone au lieu de S7 :)
Bonjour Nicolas ! Merci pour la remarque ;-) Nous l’avons prise en compte et corrigé la traduction. La prochaine fois, n’hésitez pas à corriger directement en cliquant sur le bouton Traduire en haut à droite de l’étape.
Just in case you didnt see comment in Step 9.
Steps 9 to 11 > Be careful.. the NFC and Wireless charging might be stuck to the roof of the back panel. This will look very similar to whats in the video... the difference is that the cable goes away from you, rather than towards the top of the phone. The fingerprint sensor cable is very easy to disassemble, so if you feel resistance, heat up the back cover a little more.
-
-
-
-
Use the opening picks to slice through any remaining adhesive and open the phone slightly.
-
Remove the glass from the phone.
For reassembly, if the fingerprint scanner is removed from the back cover: it’s much easier to place the fingerprint scanner in the small compartment on the back of the phone, connect it and then finally put the replacement back cover on. The adhesive on the inside of the back cover will get connect to the fingerprint scanner and hold it tightly.
I wish I saw this comment earlier because it's absolutely correct. I hope iFixit remedies this because it is incredibly difficult to connect the sensor when it's already adhered to the glass. It took me a good while and I ended up using some tape to keep the back glass aligned while I used the spudger to push blindly until it snapped into place. The only way I knew it worked was because I tested the sensor before fully sealing the glass.
The NFC antenna and coil assembly might get stick to the back cover due to adhesive spreads while trying to pry the back cover to open the phone. Take a look inside to ensure the assebly has not got sticked. If so, try using a credit card like plastic to get it peeled of from back cover without breaking the assembly always paying attention to the fingerprint sensor as well.
Reconnecting this cable seems like it would be very tricky: how can you get the pieces close enough together to make the connection without having the perimeter adhesive start to connect the front and back? It seems like that adhesive could easily get messed up at this point.
To remove the akku, high temperature was NOT constructive!! I used ethanol (cc.) instead and it worked in between 2 minutes. I think it´s also better to open the coverage in this way. Instead of heating it.
-
-
crwdns2935267:0crwdne2935267:0Tweezers$4.99
-
Use tweezers to peel away any remaining adhesive from the phone's chassis. Then clean the adhesion areas with high concentration isopropyl alcohol (at least 90%) and a lint-free cloth to prep the surface for the new adhesive.
-
Peel the adhesive backing off of the new rear glass, carefully line up one edge of the glass against the phone chassis, and firmly press the glass onto the phone.
Bonjour,
Vous parlez d’ajouter de l’adhésif, comment et où le trouve-t-on cet adhésif ?
Difficile à appliquer ?
Cordialement,
Stéphane
Mille excuses, je viens de voir les “adhesive strips” :)
I broke the rear glass trying to get all the adhesive off! Be very careful!!
Be careful with the NFC Antenna/Charging Coil Assembly. It’s covered in a black wrapping that can look like adhesive. Don’t scratch too hard with the spudger, the wrapping will come off!
Hello, I appreciate that tuto, very detailed for a somewhat subtle job . Is it possible to use one of the 7000 or 8000 glues in place of the adhesive Stickers ? Thanks
-
-
-
Detach the fingerprint scanner cable from the motherboard with the spudger.
-
-
-
Remove all 14 screws with the Phillips #00 screwdriver.
-
-
-
Pry open the three sections of the internal frame with the spudger.
-
-
-
Detach all seven cables from the motherboard with the spudger.
-
-
-
Insert the SIM card ejector tool into the hole and remove the tray.
-
-
-
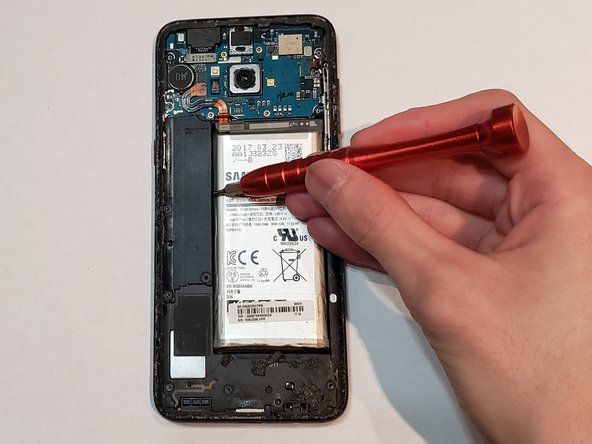
Detach the volume button cable with the spudger.
-
-
-
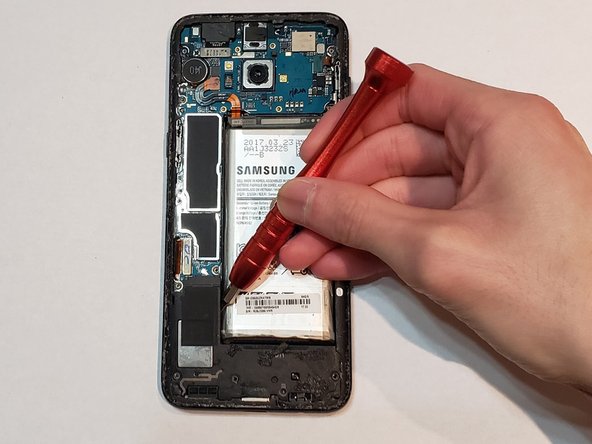
Pry the rest of the volume button cable with the spudger.
-
Remove the volume button cable from the phone.
-


To reassemble your device, follow these instructions in reverse order.
To reassemble your device, follow these instructions in reverse order.
crwdns2935221:0crwdne2935221:0
crwdns2935227:0crwdne2935227:0
crwdns2915084:0crwdne2915084:0

University of North Texas, Team 2-7, Raign Spring 2023 crwdns2935289:0University of North Texas, Team 2-7, Raign Spring 2023crwdne2935289:0
UNT-RAIGN-S23S2G7
crwdns2931471:02crwdne2931471:0
crwdns2935297:06crwdne2935297:0
crwdns2947410:01crwdne2947410:0
Nice description. I would add in step 16 the following (since it is the most difficult part that needs attention):
* The volume up/down and Bixby button comprises two pieces, the one with contacts that are connected with the cable that is attached to the phone (part 1), and another part (part 2) that sits between the contacts (part 1) and the buttons you push outside from the phone (part 3).
* To pry the two pieces from the phone you should start to lift up the metal nose above the cable, which is connecting the buttons with the phone on the top close to the volume-up button.
* As soon it is coming out a little bit you can continue on the very top to lift up the power button as there is a little gap where you can squeeze the spudger in between the plastic cover and metal of the power button.
* Try to lift up the power button on the lower side close to the Bixby button next and continue on the top and button alternately.
* Take care since the two pieces are squeezed tightly into the cavity.
What type of adhesive should be used to seal? Or better said, what would you recommend.
Ion Ion - crwdns2934203:0crwdne2934203:0
I’d recommend precut adhesive designed for the rear cover. If that’s not available, thin, hi-bond double sided tape like 1 mm wide Tesa 61395 tape will work well.
Adam O'Camb -
Yes, different microwaves have different power levels (e.g., wattage) so one microwave may explode the iOpener after 31 seconds of heating whereas another microwave will barely warm it. It would be helpful to have a more precise target temperature. My microwave is fairly weak so I’m heating it for seven seconds for every two minutes against the phone. In theory, this should slowly add more heat than is dissipated into the phone and surrounding atmosphere.
Brett Stime - crwdns2934203:0crwdne2934203:0