crwdns2915892:0crwdne2915892:0
Use this guide to replace the lithium-ion battery in your Galaxy S8 Plus. With daily use, a typical battery will last around 18-24 months before losing significant capacity. If your battery no longer holds a full charge or is causing unexpected shutdowns, you can follow the instructions below to restore your phone to good working order.
Before disassembling your phone, discharge the battery below 25%. A charged lithium-ion battery can catch fire and/or explode if accidentally punctured.
If your battery is swollen, take appropriate precautions. Do not heat your phone. If needed, you can use a dropper or syringe to inject isopropyl alcohol (90+%) around the edges of the back cover to weaken the adhesive. Swollen batteries can be very dangerous, so wear eye protection and exercise due caution, or take it to a professional if you're not sure how to proceed.
crwdns2942213:0crwdne2942213:0
-
-
Prepare an iOpener and heat the back of the phone along its left edge for about two minutes. This will help soften the adhesive securing the back cover.
-
-
-
In the following steps, you'll be cutting through the adhesive securing the back cover.
-
As seen from outside the phone, you'll be slicing through the adhesive in the areas shown:
-
Thick portions of adhesive
-
Thin areas of adhesive
-
Avoid prying or slicing in this area, to protect the fingerprint sensor flex cable.
-
-
-
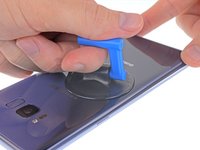
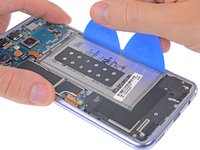
Secure a suction cup to the back cover, as close to the heated edge as possible.
-
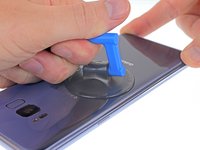
Lift the back cover's left edge with your suction cup, opening a slight gap between the back cover and the frame.
-
-
-
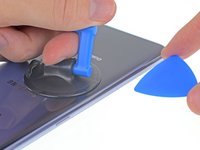
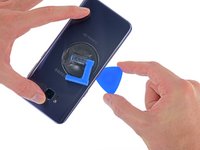
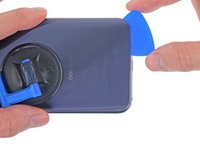
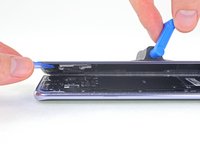
Insert an opening pick into the gap.
I strongly advise using a modeling knife to cut the adhesive when you get a sufficient gap otherwise you may easily break the corners of the extremely thin back glass on the phone (as I did).
There are NO "Opening Picks" in the repair kit!!!!!
-
-
-
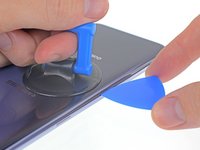
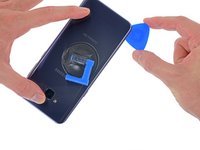
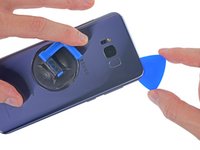
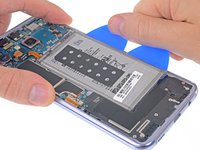
Slide your opening pick along the left edge of the phone to slice through the adhesive securing the back cover.
-
-
-
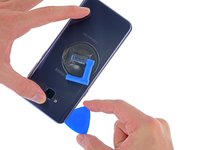
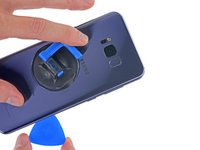
Continue slicing through the adhesive along the bottom edge of the phone.
-
Again, it may help to leave the opening pick in place and grab another one for the following step.
-
-
-
-
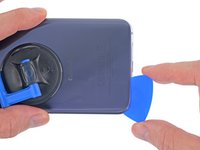
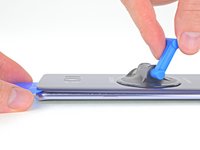
Slice through the remaining adhesive along the top edge and right side.
-
-
-
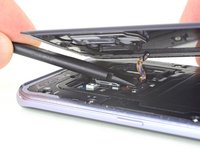
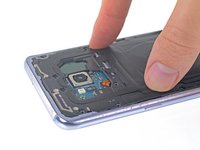
Lift the back cover from its left edge and hinge it open slightly.
-
-
-
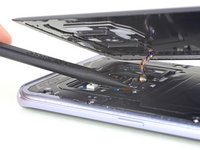
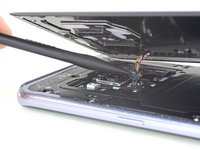
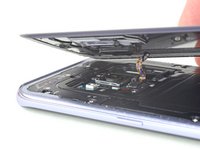
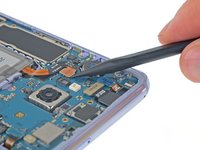
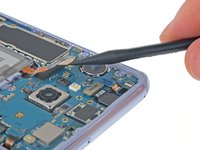
Use the point of a spudger to pry up and disconnect the fingerprint sensor flex cable.
-
-
-
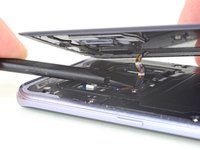
Then, use the flat end of your spudger to gently snap the connector into place by pressing it straight down.
-
-
crwdns2935267:0crwdne2935267:0Tweezers$4.99
-
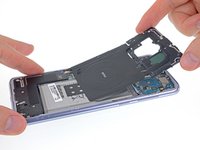
Remove the back cover.
-
Use tweezers to peel away any remaining adhesive from the phone's chassis. Then clean the adhesion areas with high concentration isopropyl alcohol (at least 90%) and a lint-free cloth to prep the surface for the new adhesive.
-
Peel the adhesive backing off of the new rear glass, carefully line up one edge of the glass against the phone chassis, and firmly press the glass onto the phone.
-
-
crwdns2935267:0crwdne2935267:0Tweezers$4.99
-
Remove the eleven 3.7 mm Phillips screws securing the wireless charging coil + antenna assembly.
-
If any screws are difficult to remove even when fully loosened, you can pull them out with tweezers.
-
-
-
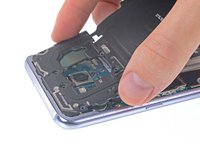
Use a spudger to gently pry up the plastic in the marked areas to pop the clips free.
The spudger tool has a pointy end and a flat end, it’s not clear which end should be used. Furthermore, the flat end is too wide to insert into the area shown, so the pointy end would seem obvious, but there is no clear indication whether it should be used to push any tabs in the area referenced, which I couldn’t find any, or if you’re meant to just sort of pry it in there until the area pops up, which is what I had to do. Then use the flat end of the spudger to lift it up gently after releasing, or popping the opposite side up as well.
-
-
-
Remove the wireless charging coil + antenna assembly.
-
-
-
Use a spudger to disconnect the battery by prying the connector straight up from its socket.
-
-
-
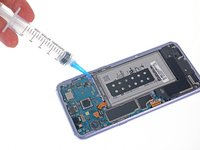
Apply 1-2 drops of high-concentration (>90%) isopropyl alcohol under each corner of the battery and allow it to penetrate for several minutes to help weaken the adhesive.
-
Alternatively, apply a freshly heated iOpener to the display directly behind the battery for two minutes to help soften the adhesive. Re-heat and reapply the iOpener as necessary.
I'm replacing the battery on this phone for a friend. The back glass had partially come loose because the battery was swollen. I already have two of the tool packs from other phone repairs but this is my first battery swap and first time reading one of your repair guides. When I was first given the phone and saw one corner of the back coming loose, I grabbed one of the blue pics and carefully removed the back glass to do a visual. I didn't know the finger print reader is glued to the back glass. When I took the back off the FP reader stayed with the phone so the back was a breeze to take off.
-
-
crwdns2935267:0crwdne2935267:0Plastic Cards$2.99
-
Insert a couple of opening picks or a plastic card along the outer edge of the battery.
-
Apply steady, even pressure to slowly lever the battery up and out of the phone.
-
-
-
Remove the battery.
-
If you used isopropyl alcohol, wait ten minutes before installing the new battery to allow the alcohol to completely evaporate.
-


To reassemble your device, follow these instructions in reverse order.
For optimal performance, calibrate your newly installed battery after completing this guide.
To reassemble your device, follow these instructions in reverse order.
For optimal performance, calibrate your newly installed battery after completing this guide.
crwdns2935221:0crwdne2935221:0
crwdns2935229:051crwdne2935229:0


crwdns2947412:014crwdne2947412:0
this Iso + Heat method makes tough adhesive a thing of the past! just be patient. like the guide says, 2 mins to allow iso to penetrate
I applied the alcohol using a small paint brush, dipped into my iso jar, and “painted” along the battery edges.
roughly 30 seconds with heat gun on the front glass, boom, a freed battery
Just received this kit and I see it comes with the big adhesive, but it also has a smaller blue adhesive and a rectangle thing(that I think goes behind the battery?) that has a small one with it. Where do these things go?
Check out their guide they have up now for the replacement of this adhesive. Specifically, take a look at the pictures in step 10 to see where the little pieces are supposed to go.
Scott -
Highly recommend against doing this. Even going carefully and reheating, 2 of the corners cracked when moving the pick through. So much for taking perfect care of the phone for 2 years =o(
Ditto. I ended up cracking my glass using the iOpener method as well. After no ordering and replacing the rear glass as well now, I am resorting to only using isopropyl alcohol from now on. No matter how hot I got the iOpener, how long I let it heat soak the adhesive, or how many times i reheated the iOpener and reapplied it, I never got any of this adhesive to come off without a risky struggle. And upon ordering all the adhesive kits, I still was shipped missing pieces of adhesive (camera, fingerprint reader, specific support adhesive, etc.). Very frustrating and time consuming process; far more than what these guides say it takes.
Scott -
why no diagrams of where all the gaskets go?! I’m lost.
Hi Jason,
Follow this link for a general Galaxy S adhesive guide! Hope that helps.
I’m back! The battery lasted about 16 months,. 2nd time went a lot smoother, particularly since the adhesive behind the battery was now much less. The replacement battery-only did not come with adhesive at all, so I just didn’t use any this time. I ended up just replacing the back to go along with it so I wouldn’t worry about cracking it and it was much easier.
Bonjour.
Tuto parfait mais incomplet. Le kit iFixit comprend tous les adhésifs nécessaires. Mais le lien vers le tutoriel adhésifs ne présente que la mise en place de l’adhésif de la batterie - rien sur les autres qui sont pourtant bcp plus difficiles.
Les étapes les moins faciles :
- le retrait de la colle
- La remise en place la plaque arrière qui colle de partout à cause des adhésifs qui sont en place et où il ne faut pas se louper pour la reconnexion du fingerprint
- l’insertion du premier mediator pour trouver l’interstice : tout est affaire de dosage, fermeté mais pas trop, chaleur suffisante, etc …
Le iOpener (gel chauffant) m’a aidé à décoller la batterie en chauffant coté écran; par contre, il est insuffisant pour décoller la coque arrière (preferer séche cheveux)
Soyez patient et réfléchi et vous arriverez.
This guide should have said that the rear glass is likely to break. I used the IOpener and was very carefully with the picks but 2 corners are cracked. The rest went fine. The phone is working but the rear glass is broken. This is for me okay because I don’t care if the phone is not completly waterproof. I would recommend everyone who doensn’t want their phone to look like this buying a new rear glass and the battery kit togerther. It saves you cleaning time and can be easily done at the end. Also it only costs under 20 $. Or maybe use isopropyl alcohol. Also this kit only includes one isopropyl alcohol pad. This was not enough!!! The cleaning took me more than an hour and there was still glue at some parts of the phone. All in all I needed 3 hours.
I just followed all the guides on here to replace my charging port, back glass cover and replace my battery. I managed to do it in around an hour with my Ifixit kit and it has already been paid for on my first phone. Awesome guides as well!
I tried a bag of heated water but heatgun was easier and faster.
After replacing the battery the phone works fine. But it won’t charge. Any ideas what the problem could be?
These instructions are terrible! This is only half the job. What about putting it back together. I tried the links above and it kind of helps but the photos don't match what I have, even slightly, or again is half the steps. I have already wasted what I believe should have gone around the camera because I couldn't figure out it's rotation, before and after the backing was removed. Which way up do these go? Now that the battery glue strip is in, now what? How do I get the back glass on? No instructions, no links, no nothing. NOT IMPRESSED.
This guide is NOT sufficient. Changing the physical battery is only one part of the process. This guide does not address the software side of things. It was the most disappointing feeling to see that there was NO change in battery behaviour after swapping out batteries. The phone still thinks it is an old battery and tries to limit charge level. As far as I know, there is no way to reset battery stats without rooting.
Maybe this will be helpful to someone, haven't tried it myself.