crwdns2933423:0crwdne2933423:0

Samsung Galaxy S7 Active Motherboard Replacement

crwdns2942213:0crwdne2942213:0

  1. Samsung Galaxy S7 Active Motherboard Replacement, Samsung Galaxy S7 Active Disassembly: crwdns2935265:01crwdnd2935265:01crwdnd2935265:01crwdne2935265:0
    • Melt the adhesive on the screen by applying a blow dryer directly on the screen.

    • Your phone is hot, please do not touch it with your bare hand.

  2. Samsung Galaxy S7 Active Motherboard Replacement: crwdns2935265:02crwdnd2935265:01crwdnd2935265:01crwdne2935265:0
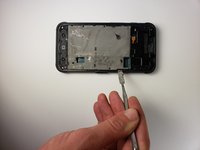
    • Wedge the metal spudger in between the screen and the frame to begin separating them.

    • It would be easier to separate the screen from the sealing adhesive on the frame if you with more than one metal spudger.

    • Your phone might no longer be watertight after you reassemble it.

  3. Samsung Galaxy S7 Active Motherboard Replacement: crwdns2935265:03crwdnd2935265:01crwdnd2935265:02crwdne2935265:0 Samsung Galaxy S7 Active Motherboard Replacement: crwdns2935265:03crwdnd2935265:02crwdnd2935265:02crwdne2935265:0
    • Slide the metal spudger around the phone at least once.

    • It would be easier to slide your metal spudger if you apply the blow dryer to where you are currently sliding.

  4. Samsung Galaxy S7 Active Motherboard Replacement: crwdns2935265:04crwdnd2935265:01crwdnd2935265:01crwdne2935265:0
    • Lift the screen up with your hands.

    • Please wash your hands thoroughly with hot water and soap after you finish.

  5. Samsung Galaxy S7 Active Motherboard Replacement, Battery: crwdns2935265:05crwdnd2935265:01crwdnd2935265:01crwdne2935265:0
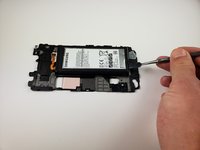
    • Use a Phillips #000 screwdriver to remove a single screw.

  6. Samsung Galaxy S7 Active Motherboard Replacement: crwdns2935265:06crwdnd2935265:01crwdnd2935265:01crwdne2935265:0
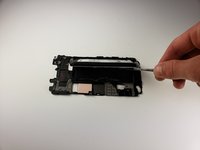
    • Use tweezers to remove the small plastic cover you just unscrewed.

  7. Samsung Galaxy S7 Active Motherboard Replacement: crwdns2935265:07crwdnd2935265:01crwdnd2935265:01crwdne2935265:0
    • Use tweezers to remove the other small plastic cover.

  8. Samsung Galaxy S7 Active Motherboard Replacement: crwdns2935265:08crwdnd2935265:01crwdnd2935265:01crwdne2935265:0
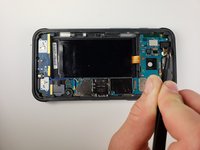
    • Use a Phillips head #000 to take out the eleven screws marked in the photo.

  9. Samsung Galaxy S7 Active Motherboard Replacement: crwdns2935265:09crwdnd2935265:01crwdnd2935265:01crwdne2935265:0
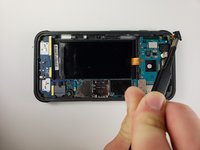
    • Use tweezers to disconnect the marked pieces from the motherboard.

  10. Samsung Galaxy S7 Active Motherboard Replacement: crwdns2935265:010crwdnd2935265:01crwdnd2935265:01crwdne2935265:0
    • Use tweezers to take out the middle button and its connection to the motherboard.

  11. Samsung Galaxy S7 Active Motherboard Replacement: crwdns2935265:011crwdnd2935265:01crwdnd2935265:03crwdne2935265:0 Samsung Galaxy S7 Active Motherboard Replacement: crwdns2935265:011crwdnd2935265:02crwdnd2935265:03crwdne2935265:0 Samsung Galaxy S7 Active Motherboard Replacement: crwdns2935265:011crwdnd2935265:03crwdnd2935265:03crwdne2935265:0
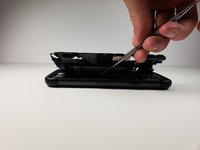
    • Use a metal spudger to pull the mid frame and battery off of the motherboard.

  12. Samsung Galaxy S7 Active Motherboard Replacement: crwdns2935265:012crwdnd2935265:01crwdnd2935265:02crwdne2935265:0 Samsung Galaxy S7 Active Motherboard Replacement: crwdns2935265:012crwdnd2935265:02crwdnd2935265:02crwdne2935265:0
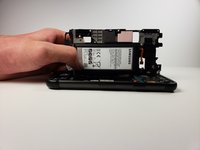
    • Use a spudger to remove the battery from the midframe.

    • To install a new battery and adhesive, follow this guide.

  13. Samsung Galaxy S7 Active Motherboard Replacement, Rear Camera: crwdns2935265:013crwdnd2935265:01crwdnd2935265:01crwdne2935265:0
    • Use tweezers to disconnect the front camera from the battery.

    • The connector should unsnap similar to a lego piece.

  14. Samsung Galaxy S7 Active Motherboard Replacement, Motherboard: crwdns2935265:014crwdnd2935265:01crwdnd2935265:01crwdne2935265:0
    • Use a Phillips 000 screwdriver to remove the screw covering the proximity sensor.

  15. Samsung Galaxy S7 Active Motherboard Replacement: crwdns2935265:015crwdnd2935265:01crwdnd2935265:02crwdne2935265:0 Samsung Galaxy S7 Active Motherboard Replacement: crwdns2935265:015crwdnd2935265:02crwdnd2935265:02crwdne2935265:0
    • Use tweezers to remove the proximity sensor.

    • Set this aside for now.

  16. Samsung Galaxy S7 Active Motherboard Replacement: crwdns2935265:016crwdnd2935265:01crwdnd2935265:01crwdne2935265:0
    • Use tweezers to disconnect the front mic and the two cables that have been marked in the photo.

  17. Samsung Galaxy S7 Active Motherboard Replacement: crwdns2935265:017crwdnd2935265:01crwdnd2935265:01crwdne2935265:0
    • Use your hands and a metal spudger to lift the motherboard out of the phone.

    • Be gentle, as there is still a connection on the underside of the motherboard.

    • Use a metal spudger to remove this connection.

crwdns2915888:0crwdne2915888:0

To reassemble your device, follow these instructions in reverse order.

crwdns2935229:03crwdne2935229:0

Joe De Leone

crwdns2935283:004/18/18crwdne2935283:0

310 crwdns2915208:0crwdne2915208:0

crwdns2935297:03crwdne2935297:0

crwdns2915084:0crwdne2915084:0

Cal Poly, Team S18-G1, Livingston Spring 2018 crwdns2935289:0Cal Poly, Team S18-G1, Livingston Spring 2018crwdne2935289:0

CPSU-LIVINGSTON-S18S18G1

crwdns2931471:04crwdne2931471:0

crwdns2935297:015crwdne2935297:0

crwdns2944067:00crwdne2944067:0

crwdns2917038:0crwdne2917038:0

crwdns2936625:0crwdne2936625:0:

crwdns2936751:024crwdne2936751:0 0

crwdns2936753:07crwdne2936753:0 3

crwdns2936753:030crwdne2936753:0 27

crwdns2942667:0crwdne2942667:0 5,151