crwdns2915892:0crwdne2915892:0
Follow this guide to replace the home button on a Samsung Galaxy S6.
This guide involves removing the rear glass. Removing the rear glass destroys the adhesive holding it in place. Follow this guide to reinstall the rear glass.
crwdns2942213:0crwdne2942213:0
-
-
Insert a paper clip or SIM eject tool into the hole in the SIM card slot on the power button side of the phone.
-
Press to eject the SIM card tray.
-
-
-
Remove the SIM card tray from the phone.
-
-
-
Place the iOpener in the center of the microwave.
-
-
-
Heat the iOpener for thirty seconds.
-
Throughout the repair procedure, as the iOpener cools, reheat it in the microwave for an additional thirty seconds at a time.
-
-
-
Remove the iOpener from the microwave, holding it by one of the two flat ends to avoid the hot center.
-
-
-
Fill a pot or pan with enough water to fully submerge an iOpener.
-
Heat the water to a boil. Turn off the heat.
-
Place an iOpener into the hot water for 2-3 minutes. Make sure the iOpener is fully submerged in the water.
-
Use tongs to extract the heated iOpener from the hot water.
-
Thoroughly dry the iOpener with a towel.
-
Your iOpener is ready for use! If you need to reheat the iOpener, heat the water to a boil, turn off the heat, and place the iOpener in the water for 2-3 minutes.
-
-
-
Lay the heated iOpener over the rear panel for about two minutes to loosen the adhesive around the edge of the glass.
-
Shift the iOpener to heat the remaining section of the panel for another two minutes.
the way we do it at Get it fixed cellphone repair calgary is with a heat gun, wich is way easier than this, make sure to wear some gloves and dont worry to use to much heat as long as you point just to the back of the phone, (the back panel is thick enough to protect the logic board from over heat) instead of the usual blue plastic piece i sugest to use the thinnest metal razor knife and a business card so you can insert the business card and move it all around the frame, those blue plastic things are way too thick that will break the glass panel if you apply to much pressure
After did that with my own heat pad, the white paint got ripped off but luckily glass back cover did not break. So I scratched all white part of the back cover and now its all transparent.
haha, the same happened for me after using a hair dryer. While still hot, the paint peeled of very easily. (too bad the mid-frame visually blocks most of the circuits…)
Michael -
I used a purpose built heating device at 100 degree celsius. Lower temperatures didn't work.
I used a blow dryer, attached my multimeter heat sensor to the back to monitor the temperature. At 54 degrees Celsius I could separate the back with a suction cup from my phone without damaging the paint.
I gave up on the hot bag after 4 heat and apply cycles. I was only getting the back up to 60c using an infrared thermometer. I switched to a harbor freight 1500w heat gun set to Low, moving constantly around the back, until the back read 95c. The back came off easily at that point.
I found another site that said temps of 203F/95C were required to soften the glues. Once I started using those temps with my heat gun, as well as a tool I made by just cutting the flat front/back panel from a package of screws (any plastic package that has a flat panel will work) , I had the back off in no time. Had I continued to use the plastic pick shown in the instructions, I really doubt I would have gotten the back off since I couldn’t get enough force on the back from my suction cup. The thin package plastic acted almost like a knife as I moved it around the outside edge. WARNING: If you have to reheat the back, REMOVE THE PACKAGE PLASTIC!! It will start to melt from the heat of a heat gun. Good Luck!!
I had a pristine s6 edge I’m replacing the battery in. I can agree with many others about the amount of heart needed and need to where gloves. I had to heat several times using a heat gun. After several attempts phone broke free from suction cup went flying and now I have a phone with broken screen. Oh well, glad it’s not my primary phone. After getting it above 100c, the back glass finally started to separate. You need another person to be ready with a pick. Once you get one pick in, the rest is .
Neither I had any success with the iopener. I ended up heating with a hair dryer. The metallic edges become quite hot.
BTW: My phone’s “Rear Glass” is actually plastic. It didn’t seem like it would crack very easily.
To get an even heat distribution at just the right temperature to easily pry the back off I used a steam iron, dry, set between wool and cotton. To hold down the phone I clamped it at the long edges with 2 strips of 1/4” furniture grade plywood cut at 7 degrees, screwed to 2’ 2x6; and then clamped the 2x6 to my work table. This made it much easier to persuade to back off without any oops!
I used a hot and cold gel pad usually intended for injuries. It needed about 4 cycles of warming the phone but then worked like a charm.
-
-
-
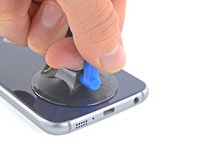
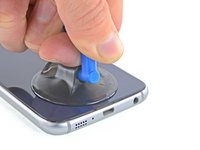
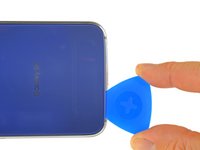
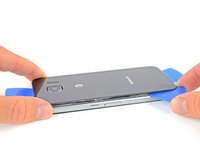
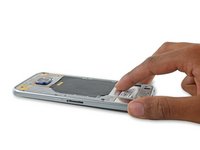
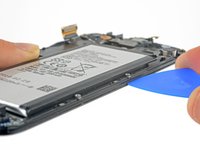
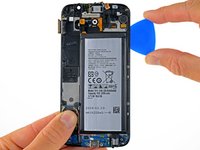
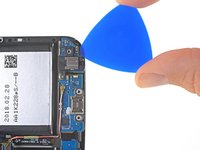
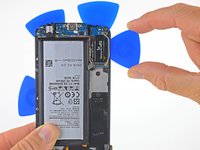
Once the rear glass is hot to the touch, apply a suction cup near the bottom edge of the glass.
-
Lift on the suction cup to create a small gap underneath the rear glass, and insert an opening pick into the gap.
If the rear screen is cracked/smashed, you will not be able to use a suction cup to remove it. The suction could would not seal because of the cracks. I tried masking tape, 3M shiny HVAC tape, and others, and the suction could would not seal to those surfaces either.
I ended up using the sharp point of the smudger to remove some shards of glass to get underneath the cover to leverage it up and out. Definitely use gloves and safety glasses if you have to do this.
Thank you for your comment. I needed to see this particular instance of what to do when the back cover was cracked. I was going to try to suction it with tape covering it. This saved me some heartache. You're an angel!!
Be careful during this step- reapply heat before attempting this one (battery issues tend to melt internal “areas” ) and this area is most prone to crack during the lifting of the back plate.
I think it is just about impossible to do this without at least removing some paint on the edges. Order a new back before you attempt this. It has the adhesive already on it and costs less than $10 on eBay.
In order to get in more easily, I normally use the iFlex (the metal one) which is thin enough to create a little space, and then i insert a thinner plastic sheet, just like the default screen protector you might find on some huawei or xiaomi phones. That plus half a drop of alcohol should do the trick. Use caution and be very patient.
Ridiculous. I put a heat gun on mine for 30 seconds, 3 times, couldn’t get the screen to move AT ALL while pulling very hard with suction cups.
Enough of this ‘you don’t get to mess with the battery’ nonsense. Quit screwing people over. Also, I love my ifixit kit. I had to make the post less negative.
Really struggling removing the screen. It’s not budging at all.
-
-
-
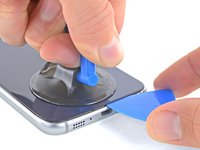
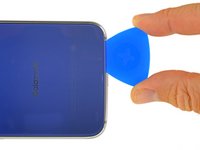
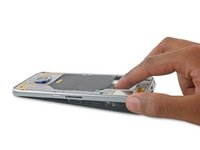
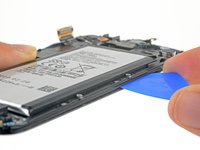
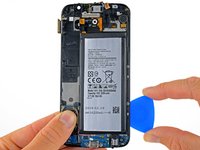
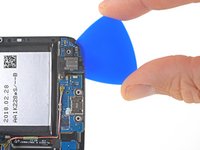
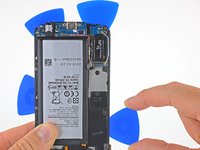
Slide the pick along the bottom edge of the phone to slice through the adhesive securing the rear glass.
Be careful that the bottom of the phone is well heated, and add a drop or so of isopropyl alcohol. When I removed the back glass of my S6, some of the black coating on the glass stayed stuck to the adhesive, so to return my phone to its original appearance, I’ll have to get a new back glass.
I needed help of a second person to insert the first pick. Apart from that, it was a one person job for me.
-
-
-
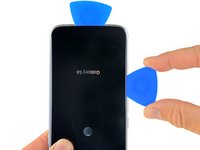
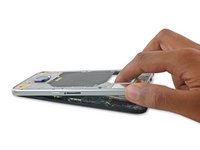
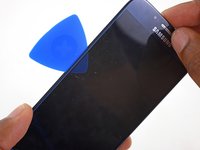
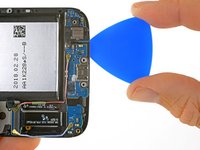
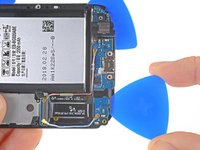
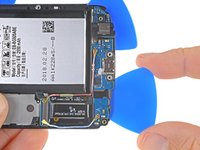
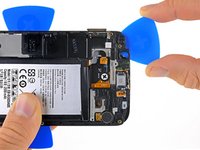
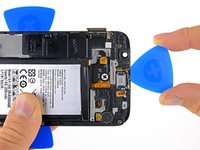
Repeat the heating and cutting procedure for the remaining three sides of the phone.
-
Leave an opening pick under each edge to prevent the adhesive from resealing.
At this stage I didn’t use a plastic pick as I think they are too thick and will crack a screen that’s not already cracked. I used a stainless steel
I sesame blade which does a much better job of cutting through the adhesive. Just be careful not to insert it in too far. I sometimes put a mark on my blade to ensure it doesn’t go in too far.
I used a card like the ones people use to play poker or any card game with. Only one was needed to separate the back without any damage to the paint.
Be sure to apply a decent amount of heat when removing the last bit of the rear glass, cracked the rear of my screen (only a small amount mind) trying too use too much force not enough heat for the last spot.
-
-
-
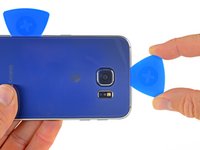
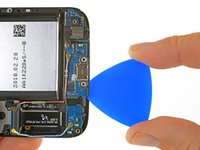
Use an opening pick to slice through any remaining adhesive.
-
Remove the rear glass.
The rear glass is very fragile. I cracked mine across the camera opening while cleaning off the old sealant. Next time ( I will have to order one and do it again…doh) I’ll place it on a flat surface while cleaning it.
This is also a really good time to remove the SIM tray
Why nobody mentioned - in the comments, AND in the tutorial - to watchout for the ribbon cables/ wifi antenna ???
-
-
crwdns2935267:0crwdne2935267:0Tweezers$4.99
-
Use tweezers to peel away any remaining adhesive from the phone's chassis.
-
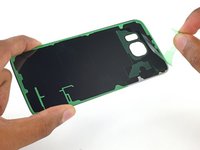
Clean the adhesion areas with high concentration isopropyl alcohol (at least 90%) and a lint-free cloth. Swipe in one direction only, not back and forth. This will help prep the surface for the new adhesive.
-
Peel the adhesive backing off of the new rear glass, carefully line up one edge of the glass against the phone chassis, and firmly press the glass onto the phone.
You should note that the adhesive strip may need to be fully removed from the frame in order to proceed with repairs. The adhesive on my phone covered all of the screws exposed in the next step.
When I did my battery, the adhesive stayed almost 100% on the back glass and was still in good shape. What didn’t remain attached only lifted slightly and I was able to coax it back to its original location with tweezers. I didn’t bother to remove and replace the adhesive layer because mine was still good. I set the glass out of the way where it wouldn’t get dirt on the adhesive while I finished the battery swap. I added some additional heat (hair dryer) after reattaching the glass to make sure the adhesive made the best seal.
-
-
-
Remove the thirteen 3.5mm Phillips #00 screws securing the midframe to the phone.
Make sure you do not mix up these thirteen screws with a hidden 14th screw under the mid-frame chassis, on the left side of the headphone port, on daughter-board. This 14th screw is shorter than the other screws, so make sure you do not replace it with one of the longer screws. It will push up against the front glass and lift it away from the adhesive.
Some of the female threads are soft plastic and will strip out easily (especially those near the bottom). I was pressing down too hard when removing these screws, and several of them stripped out. The frame still screwed together, but I couldn’t get them very tight.
-
-
-
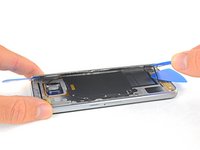
Firmly grasp the edge of the midframe assembly.
-
Lift up on the midframe assembly while pushing down on the battery to separate the midframe assembly from the rest of the phone.
-
While lifting the midframe, be careful to avoid snagging it on the audio jack or charging port.
-
Once the midframe is partially seperated, carefully run an opening pick around the edges of the rest of the phone to separate the top of the midframe.
-
To avoid damage to the headphone jack, remove the top of the midframe first, then push the midframe downwards to disengage it from the headphone jack.
-
You may need to heat and apply an iOpener to the edges of the display to soften the display adhesive if midframe separation is difficult.
FIRMLY GRASP IT! - Patrick
%#*@ coulda told me sooner
Bei diesem Schritt sicher sein, dass SIM Card Fach entfernt ist!
I found the glue still very sticky here, i had to go around with my picks to free it, its very stuck with a UK version, beware!!
I damaged my screen here a bit, be careful not too slide your pick between the digitizer and the screen.
Anton -
i suggest to apply heat on the corners of the front screen to lose the adhesive a lil bit and push from the bottom back of the phone right where the wireless charger is because of the charging port
When grabbing from the bottom, you fun the risk of damaging the charging port and headphone jack. I would suggest starting from the top. This is because the two ports at the bottom slide down into the frame. There is also adhesive that will give you a little resistance.
Step 18 is not correct, you have to start from the top. You can damage the charge port
On mine the adhesive actually tore away part of the colored film on the back of the screen glass rather than separating from it. I’m guessing applying heat to the screen corners first would help avoid this (I didn’t). https://imgur.com/a/V7vZQ
Don’t stick a pick into the screen side of the frame. You will almost certainly start to separate the digitizer and LCD. Plus there is hardly anything to pry against anyway.
-
-
-
Lift the midframe assembly up to separate it from the rest of the phone.
Achtung! Bei meiner Reperatur, besonders bei Schritt 14, Auf gar keinen Fall versuchen den Kleber mit einem der Plektren zu lösen. Dort kann man schnell zwischen Displayrahmen und Glas rutschen und so das Display beschädigen!!!
-
-
-
-
Use the flat end of the spudger to disconnect the battery connector from its socket on the motherboard.
-
-
-
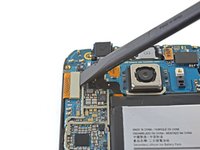
Use the pointed edge of a spudger to disconnect the Bluetooth and Wi-Fi antenna cable connectors from their sockets on the motherboard.
This portion of the repair caused me problems after phone was closed up. The bluetooth cable on the left of the phone was not placed back into its cable track and was pinched off by screen once frame was placed in metal housing.
-
-
-
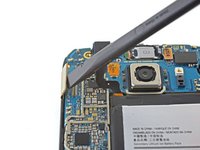
Use the flat end of the spudger to disconnect the home button connector.
-
-
-
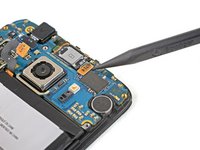
Use the flat end of a spudger to disconnect the display assembly cable from the motherboard.
Does taking the motherboard out wipe the phone?
No, after disconnecting the battery there’s no way for info to be moved from the memory, until it’s connected to a power source again.
-
-
-
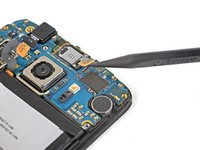
Disconnect the earpiece speaker assembly cable connector from the motherboard.
-
-
-
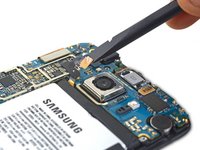
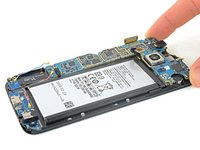
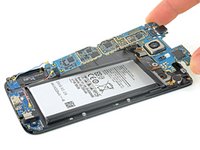
Lift the camera-side end of the motherboard to separate it from the display frame.
-
-
-
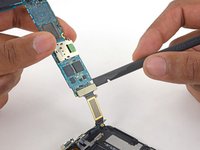
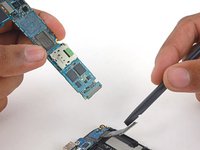
Use the flat end of a spudger to disconnect the daughterboard ribbon cable connector from its socket on the underside of the motherboard.
-
-
-
If your display glass is badly cracked, tape over the glass to contain stray glass and make prying easier.
-
Reheat the iOpener.
-
Lay the iOpener across the S6 display. After two minutes, shift the iOpener to the other half of the screen.
-
-
-
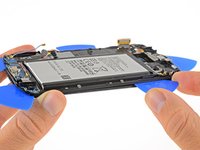
Insert the opening pick in the battery-side edge of the phone, between the frame and display, at an upward angle.
-
-
-
Slide the pick down the edge of the display to separate the adhesive underneath.
-
Stop cutting when you get to the daughterboard to avoid the delicate capacitive button under the display.
-
After cutting the adhesive, leave the pick in the side of the display to prevent the display from re-adhering to the frame.
-
-
-
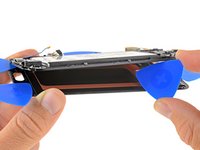
Slide the pick along the bottom edge of the phone, from the headphone jack to just past the charging port.
-
Do not insert the opening pick more than 0.25 inches (~6mm) to avoid damaging the home button.
-
-
-
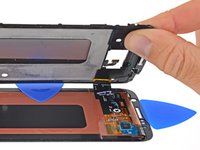
Insert an opening pick about 0.5 inches (~12mm) under the bottom corner of the display, near the headphone jack.
-
Leave the pick under the display to prevent the button from re-adhering to the display.
-
-
-
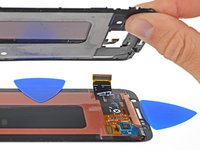
Insert an opening pick about 0.5 inches (~12mm) under the opposite bottom corner of the display.
-
Leave the pick under the display to prevent the button from re-adhering to the display.
-
-
-
Slide an opening pick along the side of the phone opposite the battery to separate the adhesive underneath.
-
After cutting the adhesive, leave the pick in the side of the display to prevent the display from re-adhering to the frame.
-
-
-
Slide a pick along the top of the phone towards the vibrator.
-
-
-
Use an opening pick to gently pry the battery side of the frame away from the display.
-
If the display and frame to not separate easily, use an opening pick to cut any remaining adhesive. If cutting is difficult, reheat and reapply an iOpener.
-
-
-
Route the display's flex cable through its hole in the frame in order to fully separate the right edge of the display.
-
-
-
After removing all traces of glue and glass from the frame, clean the adhesion areas with 90% (or higher) isopropyl alcohol and a lint-free cloth or coffee filter. Swipe in one direction only, not back and forth.
-
-
-
Remove the single 3.0mm Phillips #00 screw securing the daughterboard to the display frame.
-
-
-
Insert the pointed edge of the spudger into the groove next to the right soft button LED cable.
-
Gently lift the LED cable off the display frame.
I was transferring the daughterboard to a different frame. Flipped up the led cables and realized that the LEDs remained in the recessed area on the old frame. I thought these LEDs would peel off as a unit with the cables. It did not. Is this normal?
-
-
-
Insert the pointed edge of the spudger into the groove above the left soft button LED cable.
-
Lift the left soft button LED cable off the plastic frame.
-
-
-
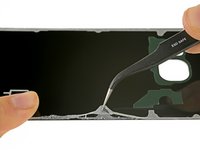
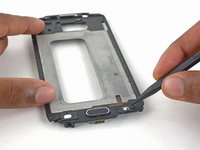
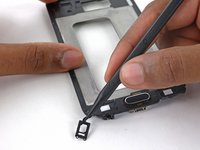
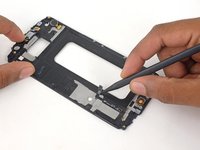
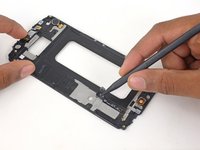
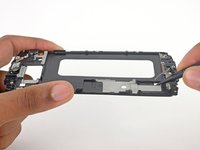
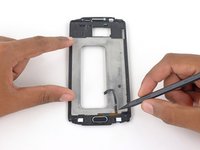
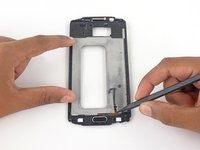
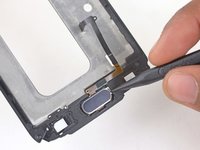
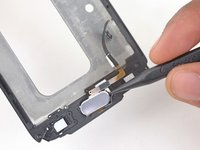
Use the pointed edge of the spudger to separate the home button ribbon cable from the display frame.
-
-
-
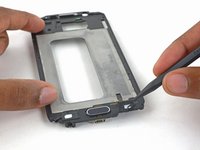
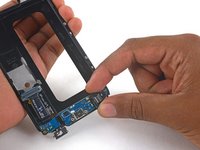
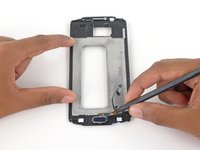
Use the pointed end of a spudger to push the home button cable through the display frame.
-
-
-
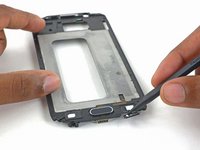
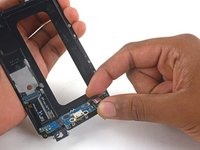
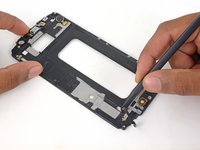
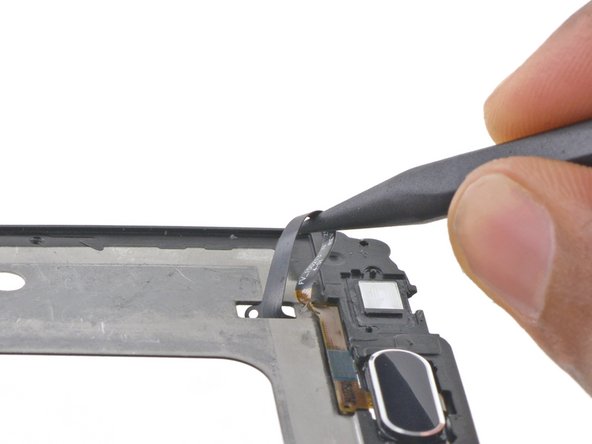
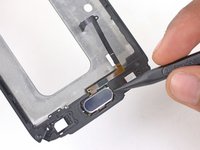
Flip the display frame over and use the pointed end of a spudger to pull the home button cable completely through the hole.
-
-
-
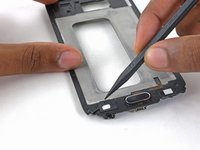
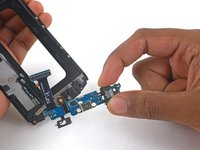
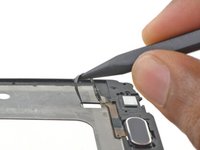
Slide the spudger under the cable to continue separating it from the frame.
-
-
-
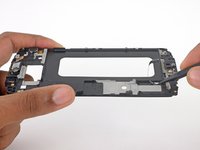
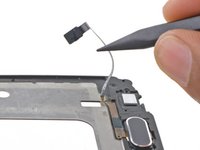
Once the cable is entirely separated from the frame, use a spudger to push the home button to the far left of its bracket.
-
Use a spudger to push the home button up and out of its bracket.
-


To reassemble your device, follow these instructions in reverse order. When reinstalling the rear glass, refer to the rear glass adhesive replacement guide.
To reassemble your device, follow these instructions in reverse order. When reinstalling the rear glass, refer to the rear glass adhesive replacement guide.
crwdns2935221:0crwdne2935221:0
crwdns2935229:023crwdne2935229:0

crwdns2947412:06crwdne2947412:0
So it's literally the last thing you remove on the entire stinking thing /facepalm
Can i change the fingerprint sensor? My fingerprint sensor is having a issue: "make sure the home key is clean and dry". But its so clean and so dry. Can sameone help me? Would I fix that sensor or change it to another?
You forgot to mention how to enable the fingerprint sensor when you replace the home button. When you replace the home button the fingerprint sensor wont work. Not sure what Samsung does but it has to be a software flash to allow the new part to marry to the mother board. There are lots of how to articles and videos that are half assed and just give enough info to get you into trouble. Though I wouldnt pay Samsung $100 to replace a button, these facts should be included in the repair article. Im really surprised no one has the fix for this in the form of an APK. Ive seen lots of screen replacement videos and all are half assed that show you the wrong way to remove the screen digitizer. I ripped my home button and back buttons circuit because of idiots that post how to videos that skip these important steps. I wish I would have paid the extra $$ and had the local shop do my repair from the start. He told me that the sensor wont work after repair and so far he is correct.
I broke my display doing this :( I suggest you not to do it if you are not 100 % sure of yours skills.
This is such BS. there is a faster way to get to the button if you think f it. they are just trying to make it seem difficult/complex so you pay others to do it.
These instructions are downright incorrect and dangerous! Going from the outside in with a pick like that is guaranteed to damage the LCD and separate it from the digitizer due to the way they are assembled. You should be using that little window in the plastic frame underneath where the battery was to start removing the plastic frame, and once that’s lifted up it’s safe to continue working around the outside.
It really needs to be stated at the outset that if doing this repair to replace the daughterboard, there is a high likelihood that the display will be destroyed (even if you don’t break the display, the foil backing on it will likely be destroyed rendering it unusable). The PDF version of this guide states this at the beginning, but this online version does not.
David White - crwdns2934203:0crwdne2934203:0
Done. Thanks for the tip!
Minor editor -