crwdns2915892:0crwdne2915892:0
Use this guide to replace the front-facing camera in your Samsung Galaxy S4.
crwdns2942213:0crwdne2942213:0
-
-
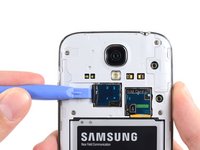
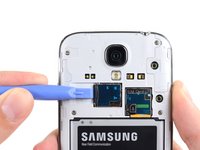
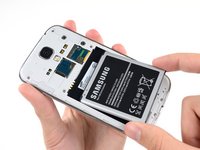
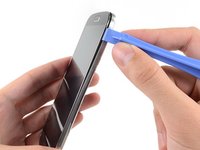
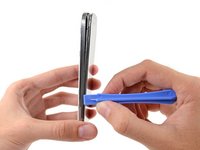
Pry with a plastic opening tool, or your fingernail, in the divot to the left of the rear-facing camera, near the power button.
-
-
-
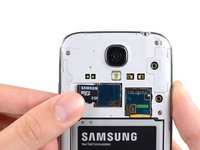
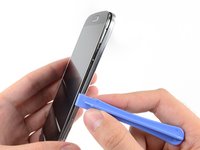
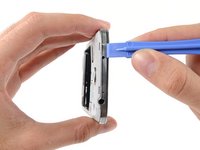
Lift the rear case by the corner nearest the divot and remove it from the phone.
Where is the divot? Please let me know that
I purchased a blue plastic opening tool(AKA: Spudge) like the one used in the above Step 1 rear cover pic and found the divot and was able to take off the rear cover as per the “Step 2 “ instructions.
-
-
-
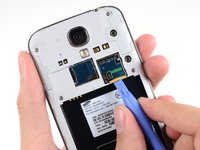
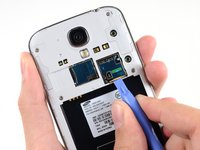
Use the flat end of a spudger, or your fingernail, to press the microSD card slightly deeper into its slot until you hear a click.
-
After the click, release the card and it will pop out of its slot.
-
Remove the microSD card.
I was able to remove the MicroSD Card as per the Step 3 MicroSD instructions with no problems.
-
-
-
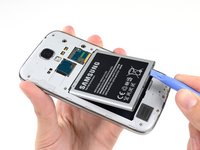
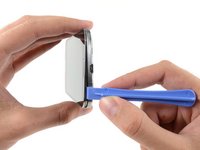
Insert a plastic opening tool, or your finger, into the notch of the battery compartment and lift the battery upward.
-
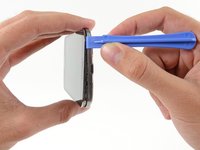
Remove the battery from your phone.
-
-
-
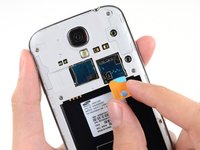
Use a plastic opening tool, or your fingernail, to press the SIM card slightly deeper into its slot until you hear a click.
-
After the click, release the card and it will pop out of its slot.
-
Remove the SIM card.
Looks easy but doesn't work. No one has a plastic opening tool. Using fingernail, you can press SIM card into slot but it does not pop out so you can remove it.
I agree with the comment above
I also don't have a plastic tool and my finger nail won't pop the card out.
Grethe Montano. September 22
-
-
-
-
Remove the nine 4.0 mm Phillips #00 screws securing the midframe to the display assembly.
How much it will cost to replace a midframe
How much cost will be on replace a midframe
I'm seeing midframes available on Ebay for around $10.
I purchased a 1.5x40mm Phillips screw driver and was able to remove all 9 40mm screws from the midframe as per the Step 6 Midframe instructions.
-
-
-
Starting on the volume button side of the phone, insert your plastic opening tool between the chrome bezel around the display glass and the larger chrome border piece. Look for the seam between the two.
-
Slide the opening tool along the seam, separating the plastic clips as you go.
I used same tool as in the photo and i broke the display. I think you should use a very thin plastic tool, such as a credit card but even more thin and flexible.
I purchased a blue plastic opening tool(AKA: Spudger) and was able to remove the midframe from the display assembly as per the Step 7. I had to hold the cell phone firmly in my left hand while I gently forced the spudger between the chrome bezel and the midframe with my right hand and heard plastics clips separate and saw the midframe start to separate from the display assembly. Don’t be afraid to get that spudger in and just gently go down the side of the phone and you will hear the plastics clips detach and the midframe to separate more and more until you are able to separate them 100%. I started at the volume button side of the phone in Step 7 and ended at the power button side in Step 9.
This blue Case Opening tool has a less rigid edge that is kinder to trim than the hard black Spudger shown in later steps. I was glad to have the right tool on hand at this step. Use it as a wedge and slide it along the gap.
-
-
-
Continue prying around the corner of the phone.
-
Slide your opening tool along the seam between the midframe and display along the bottom of the device, releasing more of the plastic clips.
I purchased a blue plastic opening tool(AKA: Spudger) and was able to remove the midframe from the display assembly as per the Step 7. I had to hold the cell phone firmly in my left hand while I gently forced the spudger between the chrome bezel and the midframe with my right hand and heard plastics clips separate and saw the midframe start to separate from the display assembly. Don’t be afraid to get that spudger in and just gently go down the side of the phone and you will hear the plastics clips detach and the midframe to separate more and more until you are able to separate them 100%. I started at the volume button side of the phone in Step 7 and ended at the power button side in Step 9.
-
-
-
Again, pry around the corner, to the power button side.
-
Slide the opening tool along the seam.
-
-
-
Continue sliding the opening tool around the top of the phone, releasing the last of the clips and freeing the midframe from the display assembly.
On my phone, there was another clip holding the white midframe to the battery compartment, in the middle of the top edge of the battery compartment, near the battery contacts. If you don't release that before removing the midframe, it is easy to break.
I purchased a blue plastic opening tool(AKA: Spudger) and was able to remove the midframe from the display assembly as per the Step 7. I had to hold the cell phone firmly in my left hand while I gently forced the spudger between the chrome bezel and the midframe with my right hand and heard plastics clips separate and saw the midframe start to separate from the display assembly. Don’t be afraid to get that spudger in and just gently go down the side of the phone and you will hear the plastics clips detach and the midframe to separate more and more until you are able to separate them 100%. I started at the volume button side of the phone in Step 7 and ended at the power button side in Step 9. In Step 10 just make sure all the plastic clips are separated from the midframe and the display assembly so you can pull them apart 100% without breaking them.
-
-
-
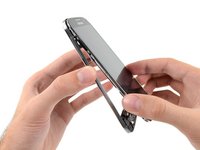
Remove the midframe from the display assembly.
My Sprint S4 was slightly different then the one pictured above but I just completed this repair in under 10 minutes.. It would have been slightly quicker but fooling around with those little screws can be irritating if you have big hands.
Just did this on my S4. Instructions were extremely helpful, but I had to remove a screw (step 10.5?) to remove the upper display assembly bracket. Other than that, flawless! Thanks!
The 3rd image of the 11th step shows that when the midframe is removed, some parts come along with it (at the bottom part of it). What are these parts? should they be removed too and placed in the new midframe? Are they easy to remove?
-
-
-
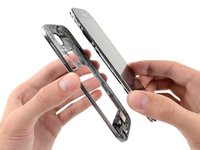
Remove the upper display assembly bracket.
-
-
-
Using the flat end of a spudger, disconnect the front-facing camera cable connector.
-


To reassemble your device, follow these instructions in reverse order.
To reassemble your device, follow these instructions in reverse order.
crwdns2935221:0crwdne2935221:0
crwdns2935229:066crwdne2935229:0


crwdns2947412:010crwdne2947412:0
Hi my front camera is bright white all of a sudden... is it broken or am I I'm some sort of mode it's only the front facing cam. .
Any instructions for replacing the front speaker? I think I clogged it with glue when replacing the front glass.
Thanks!
Great set of instructions! Pictures are very accurate and helpful! When it only take 5-10 mins to do something you have never tried before, you know the instructions were excellent! Thanks
Excellent instructions. At step 12, the bracket is fragile and can easily ping off across the room so be careful. Thanks.
My front camera is a bright white also, even on video recording but you can still hear sound.
My screen cracked today right where my front facing camera is. I now cannot take pictures unless I use my rear camera. Will replacing the screen fix this or do I need to replace the camera too?
hi my camera ( front & back) on my samsung galaxy s4 will not work, the screen is black, everything else works great
My phone got wet from the rain but not soaked I took phone apart and let it dry once it was dry I put it together. However my front camera doesn't work. It freezes what ever was displayed on the back screen. Is there anything to do to fix it ?
I am considering doing this... It looks simple enough with the help of your awesome instructions...thanks kindly wish me luck!!
My samsunng galaxy s4 the front facing camera is broken.