crwdns2933423:0crwdne2933423:0

Samsung Galaxy S Vibrant LCD Screen Replacement

crwdns2942213:0crwdne2942213:0

  1. Samsung Galaxy S Vibrant LCD Screen Replacement, Battery: crwdns2935265:01crwdnd2935265:01crwdnd2935265:03crwdne2935265:0 Samsung Galaxy S Vibrant LCD Screen Replacement, Battery: crwdns2935265:01crwdnd2935265:02crwdnd2935265:03crwdne2935265:0 Samsung Galaxy S Vibrant LCD Screen Replacement, Battery: crwdns2935265:01crwdnd2935265:03crwdnd2935265:03crwdne2935265:0
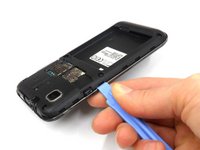
    • Locate the small slit on the bottom edge of the device between the back and front cases.

    • Pop the back case off by inserting your finger and pulling the case away from the phone.

    • If necessary (it shouldn't be), use the Plastic Opening Tools to pry the back case off.

  2. Samsung Galaxy S Vibrant LCD Screen Replacement: crwdns2935265:02crwdnd2935265:01crwdnd2935265:02crwdne2935265:0 Samsung Galaxy S Vibrant LCD Screen Replacement: crwdns2935265:02crwdnd2935265:02crwdnd2935265:02crwdne2935265:0
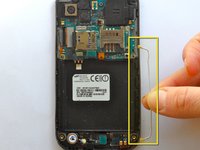
    • Remove the battery by pushing the bottom edge of the battery up and away from the phone

    • If you would prefer, you may use the Plastic Opening Tools for this step as well.

  3. Samsung Galaxy S Vibrant LCD Screen Replacement, Midframe: crwdns2935265:03crwdnd2935265:01crwdnd2935265:01crwdne2935265:0
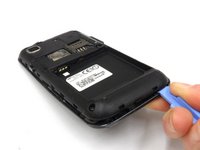
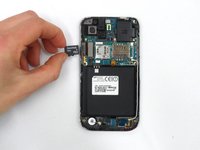
    • Remove SIM card by pushing down and away from the slot, then pulling it out toward the bottom edge of the phone.

  4. Samsung Galaxy S Vibrant LCD Screen Replacement: crwdns2935265:04crwdnd2935265:01crwdnd2935265:01crwdne2935265:0
    • Remove the seven 4.5 mm Phillips #00 screws along the perimeter of the phone.

  5. Samsung Galaxy S Vibrant LCD Screen Replacement: crwdns2935265:05crwdnd2935265:01crwdnd2935265:03crwdne2935265:0 Samsung Galaxy S Vibrant LCD Screen Replacement: crwdns2935265:05crwdnd2935265:02crwdnd2935265:03crwdne2935265:0 Samsung Galaxy S Vibrant LCD Screen Replacement: crwdns2935265:05crwdnd2935265:03crwdnd2935265:03crwdne2935265:0
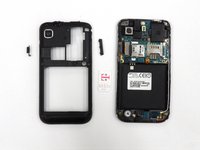
    • Staring near the power button, use a plastic opening tool to disengage the plastic clips securing the midframe.

    • Work carefully, and disengage all of the clips before removing the midframe.

    • The power button and the volume control button on the sides of the phone will fall out when the midframe is removed.

  6. Samsung Galaxy S Vibrant LCD Screen Replacement: crwdns2935265:06crwdnd2935265:01crwdnd2935265:02crwdne2935265:0 Samsung Galaxy S Vibrant LCD Screen Replacement: crwdns2935265:06crwdnd2935265:02crwdnd2935265:02crwdne2935265:0
    • Slide the SD card out of its slot.

  7. Samsung Galaxy S Vibrant LCD Screen Replacement, Unhooking Antenna Cable: crwdns2935265:07crwdnd2935265:01crwdnd2935265:03crwdne2935265:0 Samsung Galaxy S Vibrant LCD Screen Replacement, Unhooking Antenna Cable: crwdns2935265:07crwdnd2935265:02crwdnd2935265:03crwdne2935265:0 Samsung Galaxy S Vibrant LCD Screen Replacement, Unhooking Antenna Cable: crwdns2935265:07crwdnd2935265:03crwdnd2935265:03crwdne2935265:0
    crwdns2935267:0crwdne2935267:0
    Tweezers
    $4.99
    crwdns2942207:0crwdne2942207:0
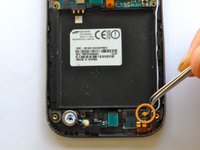
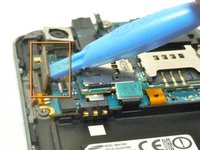
    • Disconnect the antenna using Tweezers. Do the lower end first, and then the upper.

    • Do the lower end first, and then the upper.

    • Pull the antenna cable out.

  8. Samsung Galaxy S Vibrant LCD Screen Replacement, Headphone Jack/Ear Speaker: crwdns2935265:08crwdnd2935265:01crwdnd2935265:02crwdne2935265:0 Samsung Galaxy S Vibrant LCD Screen Replacement, Headphone Jack/Ear Speaker: crwdns2935265:08crwdnd2935265:02crwdnd2935265:02crwdne2935265:0
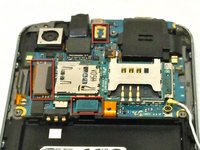
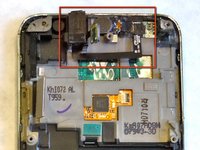
    • Locate the three snap on ribbon cable connectors on the motherboard.

    • Carefully disconnect the ribbon cable connectors using the Plastic Opening Tools.

  9. Samsung Galaxy S Vibrant LCD Screen Replacement: crwdns2935265:09crwdnd2935265:01crwdnd2935265:01crwdne2935265:0
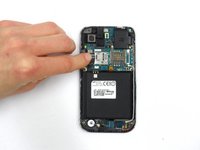
    • With the three ribbon cable connectors detached, the motherboard can be folded over to the left.

    • Take care when moving the motherboard not to allow any of the ribbon cables to be pulled on.

    • The motherboard will still be connected to the body of the phone by the power button's ribbon cable, which is glued in place.

  10. Samsung Galaxy S Vibrant LCD Screen Replacement: crwdns2935265:010crwdnd2935265:01crwdnd2935265:01crwdne2935265:0
    • Remove the power button ribbon cable from the body of the phone by using the Plastic Opening Tools.

    • Take care to not damage the button itself or its connecting ribbon cable when detaching the button.

    • The glue which holds the button in place will remain tacky allowing the button to be replaced without the need for additional glue.

  11. Samsung Galaxy S Vibrant LCD Screen Replacement: crwdns2935265:011crwdnd2935265:01crwdnd2935265:02crwdne2935265:0 Samsung Galaxy S Vibrant LCD Screen Replacement: crwdns2935265:011crwdnd2935265:02crwdnd2935265:02crwdne2935265:0
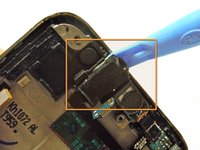
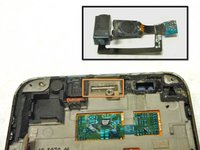
    • With the motherboard removed, the Headset Jack and Ear Speaker are now accessible.

    • Use the Plastic Opening Tools to gently pry up the Headphone Jack to remove it from the body of the phone.

    • The Headphone Jack is held in place with adhesive that will remain tacky after being removed, allowing it to be replace without the need for additional glue.

  12. Samsung Galaxy S Vibrant LCD Screen Replacement: crwdns2935265:012crwdnd2935265:01crwdnd2935265:02crwdne2935265:0 Samsung Galaxy S Vibrant LCD Screen Replacement: crwdns2935265:012crwdnd2935265:02crwdnd2935265:02crwdne2935265:0
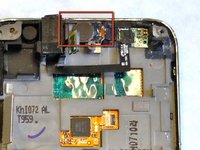
    • Disconnect the Ear Speaker from the body of the phone be gently prying up the speaker using the Plastic Opening Tools.

    • The connection holding the Ear Speaker in place is the same kind as the snap on ribbon cables that were disconnected in a previous step.

    • With the Headphone Jack and Ear Speaker both disconnected from the body of the phone, they can be removed from the phone and set aside.

  13. Samsung Galaxy S Vibrant LCD Screen Replacement, LCD Screen: crwdns2935265:013crwdnd2935265:01crwdnd2935265:01crwdne2935265:0
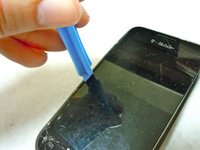
    • Use a heat gun or hairdryer to loosen the adhesive that secures the touch panel to the screen assembly.

    • Wear heat resistant gloves when removing the screen.

  14. Samsung Galaxy S Vibrant LCD Screen Replacement: crwdns2935265:014crwdnd2935265:01crwdnd2935265:02crwdne2935265:0 Samsung Galaxy S Vibrant LCD Screen Replacement: crwdns2935265:014crwdnd2935265:02crwdnd2935265:02crwdne2935265:0
    • Use a plastic opening tool or guitar pick to carefully remove the touch panel from the screen assembly.

    • Start from the top edge and carefully wedge your tool between the screen and frame.

    • Carefully slide your tool along the framework.

    • If the screen is cracked, cover the face in masking tape to prevent broken glass from chipping off.

    • You may need to reheat the adhesive as you work around the edges.

crwdns2915888:0crwdne2915888:0

To reassemble your device, follow these instructions in reverse order.

crwdns2935229:06crwdne2935229:0

Taylor Catlin

crwdns2935283:001/15/13crwdne2935283:0

79 crwdns2915208:0crwdne2915208:0

crwdns2935297:06crwdne2935297:0

crwdns2915084:0crwdne2915084:0

Cal Poly, Team 18-37, Regan Winter 2013 crwdns2935289:0Cal Poly, Team 18-37, Regan Winter 2013crwdne2935289:0

CPSU-REGAN-W13S18G37

crwdns2931471:04crwdne2931471:0

crwdns2935297:08crwdne2935297:0

crwdns2944067:00crwdne2944067:0

crwdns2917038:0crwdne2917038:0

crwdns2936625:0crwdne2936625:0:

crwdns2936751:024crwdne2936751:0 4

crwdns2936753:07crwdne2936753:0 4

crwdns2936753:030crwdne2936753:0 9

crwdns2942667:0crwdne2942667:0 15,931