crwdns2933423:0crwdne2933423:0

Samsung Galaxy S Plus Front Panel Assembly Replacement

crwdns2942213:0crwdne2942213:0

  1. Samsung Galaxy S Plus Front Panel Assembly Replacement, Front Panel Assembly: crwdns2935265:01crwdnd2935265:01crwdnd2935265:02crwdne2935265:0 Samsung Galaxy S Plus Front Panel Assembly Replacement, Front Panel Assembly: crwdns2935265:01crwdnd2935265:02crwdnd2935265:02crwdne2935265:0
    • Unscrew 7 screws on the rear using a Phillips screw driver.

  2. Samsung Galaxy S Plus Front Panel Assembly Replacement: crwdns2935265:02crwdnd2935265:01crwdnd2935265:03crwdne2935265:0 Samsung Galaxy S Plus Front Panel Assembly Replacement: crwdns2935265:02crwdnd2935265:02crwdnd2935265:03crwdne2935265:0 Samsung Galaxy S Plus Front Panel Assembly Replacement: crwdns2935265:02crwdnd2935265:03crwdnd2935265:03crwdne2935265:0
    • Unhook the rear using a soft plastic prying tool to remove the rear cover

    • Be careful not to damage the rear cover when unhooking it.

  3. Samsung Galaxy S Plus Front Panel Assembly Replacement: crwdns2935265:03crwdnd2935265:01crwdnd2935265:01crwdne2935265:0
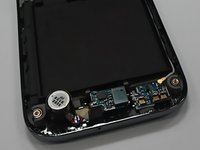
    • Detach the Power Key FPCB, that is stick to the bracket by a double-sided tape, using tweezers. Make sure to remove all remaining tape on the bracket.

  4. Samsung Galaxy S Plus Front Panel Assembly Replacement: crwdns2935265:04crwdnd2935265:01crwdnd2935265:01crwdne2935265:0
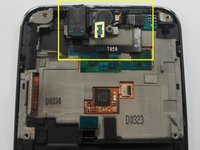
    • Disconnect LCD Connector,Receiver Connector, Sub-touch Key Connector and Antenna cable from the Main PBA

    • Disconnecting the camera connector isn't necessary!

  5. Samsung Galaxy S Plus Front Panel Assembly Replacement: crwdns2935265:05crwdnd2935265:01crwdnd2935265:01crwdne2935265:0
    • After disconnecting the connectors carefully pull the Main PBA out of the bracket.

    • Make sure that the Power Key FPCB does not get stuck!

  6. Samsung Galaxy S Plus Front Panel Assembly Replacement: crwdns2935265:06crwdnd2935265:01crwdnd2935265:03crwdne2935265:0 Samsung Galaxy S Plus Front Panel Assembly Replacement: crwdns2935265:06crwdnd2935265:02crwdnd2935265:03crwdne2935265:0 Samsung Galaxy S Plus Front Panel Assembly Replacement: crwdns2935265:06crwdnd2935265:03crwdnd2935265:03crwdne2935265:0
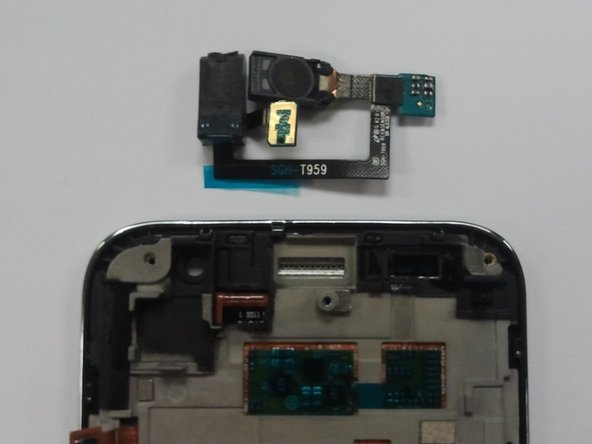
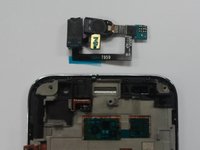
    • Remove the antenna cable from the main Antenna PCB on the sub-touch key module of your broken Screen Digitizer Frame

    • Pull out the Receiver module from the bracket. Be careful not to damage the FPC.

    • Now assembly both Receiver module and antenna cable into the new Screen Digitizer Frame and reverse the process of disassembly!

crwdns2915888:0crwdne2915888:0

To reassemble your device, follow these instructions in reverse order.

crwdns2935229:013crwdne2935229:0

Joao de Matos

crwdns2935283:007/02/13crwdne2935283:0

362 crwdns2915208:0crwdne2915208:0

crwdns2935295:0crwdne2935295:0

crwdns2944067:00crwdne2944067:0

crwdns2917038:0crwdne2917038:0

crwdns2936625:0crwdne2936625:0:

crwdns2936751:024crwdne2936751:0 0

crwdns2936753:07crwdne2936753:0 4

crwdns2936753:030crwdne2936753:0 10

crwdns2942667:0crwdne2942667:0 8,529