crwdns2933423:0crwdne2933423:0

Samsung Galaxy Player 5.0 Screen Replacement

crwdns2942213:0crwdne2942213:0

  1. Samsung Galaxy Player 5.0 Screen Replacement, Screen: crwdns2935265:01crwdnd2935265:01crwdnd2935265:01crwdne2935265:0
    • Remove the SD card before disassembling the device.

    • Use a screwdriver to remove the screw near the SD card.

  2. Samsung Galaxy Player 5.0 Screen Replacement: crwdns2935265:02crwdnd2935265:01crwdnd2935265:02crwdne2935265:0 Samsung Galaxy Player 5.0 Screen Replacement: crwdns2935265:02crwdnd2935265:02crwdnd2935265:02crwdne2935265:0
    • Go to the bottom of the device and remove the white caps covering the screws.

    • If it is difficult to remove the white caps, use a heat blower to heat them before removing them.

    • After removing the caps, use a screwdriver to remove the screws at the bottom of the device. Set aside.

  3. Samsung Galaxy Player 5.0 Screen Replacement: crwdns2935265:03crwdnd2935265:01crwdnd2935265:03crwdne2935265:0 Samsung Galaxy Player 5.0 Screen Replacement: crwdns2935265:03crwdnd2935265:02crwdnd2935265:03crwdne2935265:0 Samsung Galaxy Player 5.0 Screen Replacement: crwdns2935265:03crwdnd2935265:03crwdnd2935265:03crwdne2935265:0
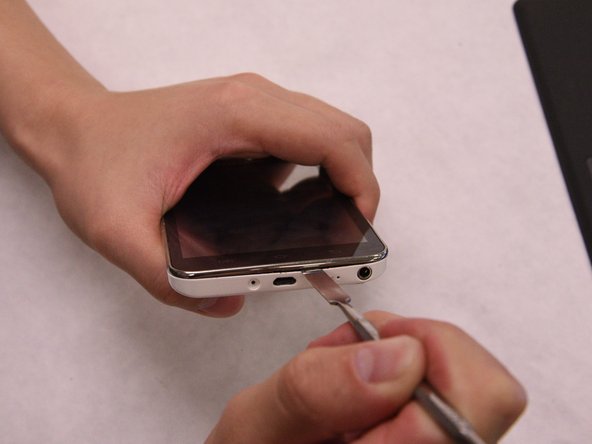
    • Starting from the bottom, use a pry tool to separate the front housing cover from the back cover.

    • Use a plastic prying tool if you can. Be extremely careful when separating the front housing cover.

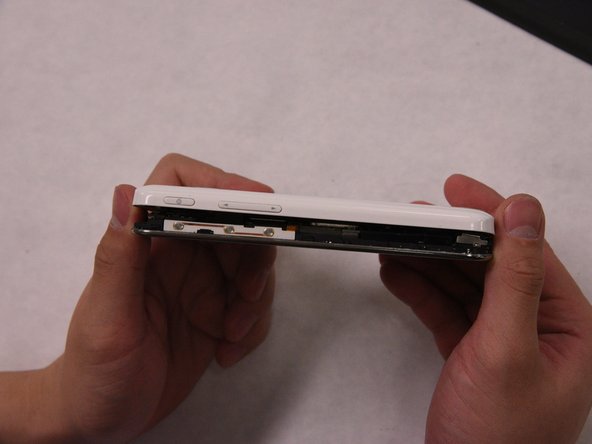
    • Pull the front and back cover halves apart completely.

  4. Samsung Galaxy Player 5.0 Screen Replacement: crwdns2935265:04crwdnd2935265:01crwdnd2935265:01crwdne2935265:0
    • Use the pry tool to separate the tab connecting the battery and motherboard.

  5. Samsung Galaxy Player 5.0 Screen Replacement: crwdns2935265:05crwdnd2935265:01crwdnd2935265:01crwdne2935265:0
    crwdns2935267:0crwdne2935267:0
    Plastic Cards
    $2.99
    crwdns2942207:0crwdne2942207:0
    • Use the prying tool to separate the battery from the motherboard.

    • Metal spudgers and similar pry tools can puncture an unprotected battery, potentially causing a fire. To be on the safe side, it’s better to use a plastic card or nylon spudger.

  6. Samsung Galaxy Player 5.0 Screen Replacement: crwdns2935265:06crwdnd2935265:01crwdnd2935265:01crwdne2935265:0
    • Remove the ear piece using a pry tool. Set aside.

  7. Samsung Galaxy Player 5.0 Screen Replacement: crwdns2935265:07crwdnd2935265:01crwdnd2935265:01crwdne2935265:0
    • Remove the front and rear cameras.

  8. Samsung Galaxy Player 5.0 Screen Replacement: crwdns2935265:08crwdnd2935265:01crwdnd2935265:01crwdne2935265:0
    • Disconnect the volume button from the motherboard.

    • It is not necessary to completely remove the volume buttons from the device after they have been disconnected.

  9. Samsung Galaxy Player 5.0 Screen Replacement: crwdns2935265:09crwdnd2935265:01crwdnd2935265:02crwdne2935265:0 Samsung Galaxy Player 5.0 Screen Replacement: crwdns2935265:09crwdnd2935265:02crwdnd2935265:02crwdne2935265:0
    • Use a screwdriver to remove the screw pictured.

    • Use a prying tool to remove the headphone jack.

    • Set both carefully aside.

  10. Samsung Galaxy Player 5.0 Screen Replacement: crwdns2935265:010crwdnd2935265:01crwdnd2935265:01crwdne2935265:0
    • Disconnect the mean button flex cable.

    • Use a pry tool to open the locker on the motherboard and remove flex cable.

  11. Samsung Galaxy Player 5.0 Screen Replacement: crwdns2935265:011crwdnd2935265:01crwdnd2935265:02crwdne2935265:0 Samsung Galaxy Player 5.0 Screen Replacement: crwdns2935265:011crwdnd2935265:02crwdnd2935265:02crwdne2935265:0
    • Disconnect the LCD flex cable.

    • Use a screwdriver to remove six screws pictured.

  12. Samsung Galaxy Player 5.0 Screen Replacement: crwdns2935265:012crwdnd2935265:01crwdnd2935265:03crwdne2935265:0 Samsung Galaxy Player 5.0 Screen Replacement: crwdns2935265:012crwdnd2935265:02crwdnd2935265:03crwdne2935265:0 Samsung Galaxy Player 5.0 Screen Replacement: crwdns2935265:012crwdnd2935265:03crwdnd2935265:03crwdne2935265:0
    • Hold the PCD unit and lift it up.

    • Switch out the old digitizer for the new one. Reconnect all the cables and screws in the reverse sequence.

crwdns2915888:0crwdne2915888:0

To reassemble your device, follow these instructions in reverse order.

crwdns2935227:0crwdne2935227:0

Wenbin Weng

crwdns2935283:001/28/17crwdne2935283:0

122 crwdns2915208:0crwdne2915208:0

crwdns2935295:0crwdne2935295:0

crwdns2915084:0crwdne2915084:0

IUPUI, Team S4-G4, Wilson Spring 2017 crwdns2935289:0IUPUI, Team S4-G4, Wilson Spring 2017crwdne2935289:0

IUPUI-WILSON-S17S4G4

crwdns2931471:04crwdne2931471:0

crwdns2935297:02crwdne2935297:0

crwdns2944067:00crwdne2944067:0

crwdns2917038:0crwdne2917038:0

crwdns2936625:0crwdne2936625:0:

crwdns2936751:024crwdne2936751:0 1

crwdns2936753:07crwdne2936753:0 3

crwdns2936753:030crwdne2936753:0 8

crwdns2942667:0crwdne2942667:0 682