crwdns2933423:0crwdne2933423:0

Samsung Galaxy Note10+ Battery Replacement

crwdns2942213:0crwdne2942213:0

  1. Samsung Galaxy Note10+ Battery Replacement, Heat the rear cover: crwdns2935265:01crwdnd2935265:01crwdnd2935265:01crwdne2935265:0
    • Completely power off your phone before you begin disassembly.

    • Prepare an iOpener and apply it to the left edge of the rear cover for one minute.

    • A hair dryer, heat gun, or hot plate may also be used, but be careful not to overheat the phone—the display and internal battery are both susceptible to heat damage.

    I have an adjustable hot plate. I bought it when I replaced the back and battery on a previous note. I am wondering about some type of shim so that the camera bump is not in contact with the hot plate. I am thinking about fender washers. Is there a better way?

    Rusty Lingenfelter - crwdns2934203:0crwdne2934203:0

  2. Samsung Galaxy Note10+ Battery Replacement, Insert an opening pick: crwdns2935265:02crwdnd2935265:01crwdnd2935265:03crwdne2935265:0 Samsung Galaxy Note10+ Battery Replacement, Insert an opening pick: crwdns2935265:02crwdnd2935265:02crwdnd2935265:03crwdne2935265:0 Samsung Galaxy Note10+ Battery Replacement, Insert an opening pick: crwdns2935265:02crwdnd2935265:03crwdnd2935265:03crwdne2935265:0
    • Apply a suction cup to the heated edge of the rear cover, as close to the edge as possible.

    • If your rear cover is badly cracked, covering it with a layer of clear packing tape may allow the suction cup to adhere. Alternatively, very strong tape may be used instead of the suction cup. If all else fails, you can superglue the suction cup to the broken cover.

    • Pull up on the suction cup with strong, steady force to create a gap between the rear cover and the frame.

    • Depending on the age of your phone, this may be difficult. If you are having trouble, apply more heat to the edge and try again.

    • Insert the point of an opening pick into the gap.

  3. Samsung Galaxy Note10+ Battery Replacement, Begin to slice the adhesive: crwdns2935265:03crwdnd2935265:01crwdnd2935265:03crwdne2935265:0 Samsung Galaxy Note10+ Battery Replacement, Begin to slice the adhesive: crwdns2935265:03crwdnd2935265:02crwdnd2935265:03crwdne2935265:0 Samsung Galaxy Note10+ Battery Replacement, Begin to slice the adhesive: crwdns2935265:03crwdnd2935265:03crwdnd2935265:03crwdne2935265:0
    • Slide the opening pick along the left edge towards the bottom left corner to slice the adhesive.

    • Don't insert the opening pick more than halfway into the phone or you risk damaging internal components.

    • Leave the pick inserted in the bottom left corner to prevent the adhesive from re-sealing.

  4. Samsung Galaxy Note10+ Battery Replacement, Slice around the perimeter of the phone: crwdns2935265:04crwdnd2935265:01crwdnd2935265:03crwdne2935265:0 Samsung Galaxy Note10+ Battery Replacement, Slice around the perimeter of the phone: crwdns2935265:04crwdnd2935265:02crwdnd2935265:03crwdne2935265:0 Samsung Galaxy Note10+ Battery Replacement, Slice around the perimeter of the phone: crwdns2935265:04crwdnd2935265:03crwdnd2935265:03crwdne2935265:0
    • Repeat the previous heating and cutting procedure for the remaining three sides of the phone.

    • Leave an opening pick on each side as you continue to the next to prevent the adhesive from resealing.

    • The rear cover will begin to separate from the phone as you finish all sides of the phone.

    Be extremely carefull: rear cover is very fragile!

    Elbert Ainstein - crwdns2934203:0crwdne2934203:0

  5. Samsung Galaxy Note10+ Battery Replacement, Lift off the rear cover: crwdns2935265:05crwdnd2935265:01crwdnd2935265:02crwdne2935265:0 Samsung Galaxy Note10+ Battery Replacement, Lift off the rear cover: crwdns2935265:05crwdnd2935265:02crwdnd2935265:02crwdne2935265:0
    • Lift the rear cover straight up to remove it.

    • Follow this guide to reinstall the rear cover and replace the adhesive.

    • Be sure to turn on your device and test your repair before installing new adhesive and resealing the device.

    • If you're using Tesa tape to reattach components, follow this guide.

    Muy buena la guia. nada que añadir. para montar solo limpia el equipo donde estaba el tape anterior, y remoueve los el tape de la tapa nueva solo ponla y listo…

    Manuel carrion - crwdns2934203:0crwdne2934203:0

  6. Samsung Galaxy Note10+ Battery Replacement, Lift up the metal cover: crwdns2935265:06crwdnd2935265:01crwdnd2935265:01crwdne2935265:0
    • Use a Phillips screwdriver to remove the five 4 mm screws securing the wireless charging coil.

  7. Samsung Galaxy Note10+ Battery Replacement: crwdns2935265:07crwdnd2935265:01crwdnd2935265:03crwdne2935265:0 Samsung Galaxy Note10+ Battery Replacement: crwdns2935265:07crwdnd2935265:02crwdnd2935265:03crwdne2935265:0 Samsung Galaxy Note10+ Battery Replacement: crwdns2935265:07crwdnd2935265:03crwdnd2935265:03crwdne2935265:0
    • Use a pair of tweezers to lift up and flip back the metal shield covering the battery connector.

  8. Samsung Galaxy Note10+ Battery Replacement, Disconnect the battery: crwdns2935265:08crwdnd2935265:01crwdnd2935265:02crwdne2935265:0 Samsung Galaxy Note10+ Battery Replacement, Disconnect the battery: crwdns2935265:08crwdnd2935265:02crwdnd2935265:02crwdne2935265:0
    • While holding the metal shield up and out of the way, use the pointed end of a spudger to pry up the battery connector to disconnect it.

  9. Samsung Galaxy Note10+ Battery Replacement, Disconnect the wireless charging coil: crwdns2935265:09crwdnd2935265:01crwdnd2935265:02crwdne2935265:0 Samsung Galaxy Note10+ Battery Replacement, Disconnect the wireless charging coil: crwdns2935265:09crwdnd2935265:02crwdnd2935265:02crwdne2935265:0
    • Use the pointed end of a spudger to disconnect the wireless charging coil connector from the motherboard.

  10. Samsung Galaxy Note10+ Battery Replacement, Remove the wireless charging coil: crwdns2935265:010crwdnd2935265:01crwdnd2935265:03crwdne2935265:0 Samsung Galaxy Note10+ Battery Replacement, Remove the wireless charging coil: crwdns2935265:010crwdnd2935265:02crwdnd2935265:03crwdne2935265:0 Samsung Galaxy Note10+ Battery Replacement, Remove the wireless charging coil: crwdns2935265:010crwdnd2935265:03crwdnd2935265:03crwdne2935265:0
    • Tilt the metal shielding up so you can grip it with your fingers.

    • Peel the wireless charging coil up and away from the device.

    • The wireless charging coil is secured to the phone with some light adhesive.

    • Remove the wireless charging coil.

    Can you reuse the wireless charging coil? I don’t see a replacement on the site. I just learning all this.

    Jon Marble - crwdns2934203:0crwdne2934203:0

  11. Samsung Galaxy Note10+ Battery Replacement, Remove the loudspeaker screws: crwdns2935265:011crwdnd2935265:01crwdnd2935265:01crwdne2935265:0
    • Use a Phillips screwdriver to remove the five 4 mm screws securing the loudspeaker.

  12. Samsung Galaxy Note10+ Battery Replacement, Remove the loudspeaker: crwdns2935265:012crwdnd2935265:01crwdnd2935265:03crwdne2935265:0 Samsung Galaxy Note10+ Battery Replacement, Remove the loudspeaker: crwdns2935265:012crwdnd2935265:02crwdnd2935265:03crwdne2935265:0 Samsung Galaxy Note10+ Battery Replacement, Remove the loudspeaker: crwdns2935265:012crwdnd2935265:03crwdnd2935265:03crwdne2935265:0
    • Use a pair of tweezers to remove the loudspeaker.

  13. Samsung Galaxy Note10+ Battery Replacement, Remove the interconnect cables: crwdns2935265:013crwdnd2935265:01crwdnd2935265:03crwdne2935265:0 Samsung Galaxy Note10+ Battery Replacement, Remove the interconnect cables: crwdns2935265:013crwdnd2935265:02crwdnd2935265:03crwdne2935265:0 Samsung Galaxy Note10+ Battery Replacement, Remove the interconnect cables: crwdns2935265:013crwdnd2935265:03crwdnd2935265:03crwdne2935265:0
    • Use the pointed end of a spudger to disconnect the main interconnect cable from the motherboard.

    • Disconnect the secondary interconnect cable from the motherboard.

  14. Samsung Galaxy Note10+ Battery Replacement: crwdns2935265:014crwdnd2935265:01crwdnd2935265:03crwdne2935265:0 Samsung Galaxy Note10+ Battery Replacement: crwdns2935265:014crwdnd2935265:02crwdnd2935265:03crwdne2935265:0 Samsung Galaxy Note10+ Battery Replacement: crwdns2935265:014crwdnd2935265:03crwdnd2935265:03crwdne2935265:0
    • Use the pointed end of a spudger to disconnect the main interconnect cable from the daughterboard.

    • Disconnect the secondary interconnect cable from the daughterboard.

  15. Samsung Galaxy Note10+ Battery Replacement: crwdns2935265:015crwdnd2935265:01crwdnd2935265:02crwdne2935265:0 Samsung Galaxy Note10+ Battery Replacement: crwdns2935265:015crwdnd2935265:02crwdnd2935265:02crwdne2935265:0
    • Remove both interconnect cables.

  16. Samsung Galaxy Note10+ Battery Replacement, Disconnect the display cable: crwdns2935265:016crwdnd2935265:01crwdnd2935265:02crwdne2935265:0 Samsung Galaxy Note10+ Battery Replacement, Disconnect the display cable: crwdns2935265:016crwdnd2935265:02crwdnd2935265:02crwdne2935265:0
    • Use the pointed end of a spudger to disconnect the display cable connector from the motherboard.

  17. Samsung Galaxy Note10+ Battery Replacement, Loosen the battery adhesive: crwdns2935265:017crwdnd2935265:01crwdnd2935265:02crwdne2935265:0 Samsung Galaxy Note10+ Battery Replacement, Loosen the battery adhesive: crwdns2935265:017crwdnd2935265:02crwdnd2935265:02crwdne2935265:0
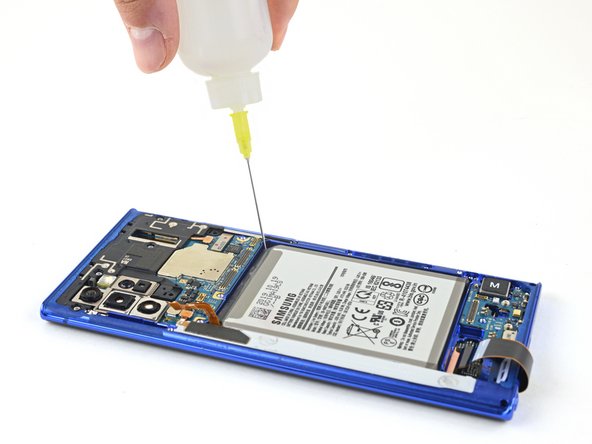
    • Apply a few drops of high concentration (90% or greater) isopropyl alcohol underneath the battery at the tear-shaped indents near the corners of the battery well.

    • Wait about two minutes for the isopropyl alcohol to penetrate and weaken the battery adhesive before you proceed to the next step.

  18. Samsung Galaxy Note10+ Battery Replacement, Remove the battery: crwdns2935265:018crwdnd2935265:01crwdnd2935265:03crwdne2935265:0 Samsung Galaxy Note10+ Battery Replacement, Remove the battery: crwdns2935265:018crwdnd2935265:02crwdnd2935265:03crwdne2935265:0 Samsung Galaxy Note10+ Battery Replacement, Remove the battery: crwdns2935265:018crwdnd2935265:03crwdnd2935265:03crwdne2935265:0
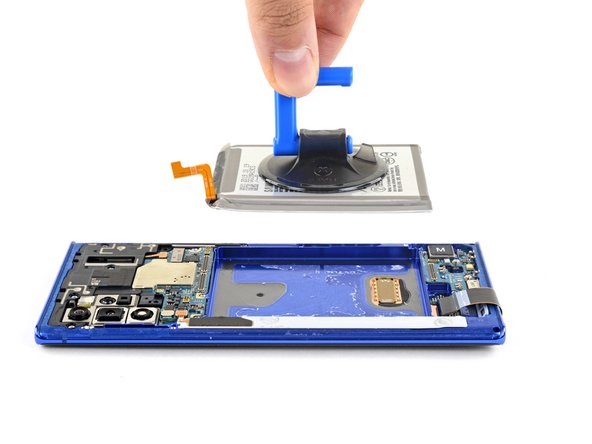
    • Apply a suction cup to the back of the battery.

    • Pull up on the suction cup with strong, steady force to begin to separate the battery from the frame.

    • If this is difficult, apply a few more drops of isopropyl alcohol underneath the battery, let it sit for two minutes, and try again.

    • Insert the point of an opening pick into the gap created between the battery and frame.

    • Don't insert the opening pick more than halfway or you risk damaging the fingerprint sensor underneath.

    • Pull up on the suction cup to remove the battery.

    • The battery will come out without much force once the isopropyl alcohol has adequately penetrated the battery adhesive.

    • When you're reassembling your phone, remove the old adhesive and apply stretch release adhesive strips, double sided adhesive tape, or pre-cut adhesive to secure the new battery.

crwdns2915888:0crwdne2915888:0

For optimal performance, calibrate your newly installed battery after completing this guide.

Compare your new replacement part to the original part—you may need to transfer remaining components or remove adhesive backings from the new part before installing.

To reassemble your device, follow the above steps in reverse order.

Take your e-waste to an R2 or e-Stewards certified recycler.

Repair didn’t go as planned? Try some basic troubleshooting, or ask our Answers community for help.

crwdns2935229:020crwdne2935229:0

Carsten Frauenheim

crwdns2935283:003/10/20crwdne2935283:0

112,654 crwdns2915208:0crwdne2915208:0

crwdns2935297:0338crwdne2935297:0

crwdns2915084:0crwdne2915084:0

iFixit crwdns2935289:0iFixitcrwdne2935289:0

Staff

crwdns2931471:0135crwdne2931471:0

crwdns2935297:016,731crwdne2935297:0

crwdns2944067:012crwdne2944067:0

What kind of adhesive would you recommend to adhere the back glass to the phone after repair?

Andrew Johnson - crwdns2934203:0crwdne2934203:0

Hey! Here’s a link to the rear cover adhesive!

Carsten Frauenheim -

Thank you! I have all my stuff ordered now. I can’t wait to follow this guide and get my battery back to new!

Andrew Johnson -

Do I only need the rear cover adhesive or the perimeter adhesive as well?

Martin Schulz -

Hi,

I would like to replace my note 10 plus battery, wireless charging n nfc, please advise on what to buy from you.

Thanks

Alex

Alex Wong - crwdns2934203:0crwdne2934203:0

I performed the battery replacement following instructions to the letter, but now I'm stuck in a custom OS warning screen loop and nothing I do seems to get me out of it.

PDADoc - crwdns2934203:0crwdne2934203:0

It finally came out of it on its own. When I started up, however, I quickly discovered why it happened in the first place: my volume buttons aren't working, so perhaps the adhesive is blocking them. Also, NFC and camera aren't working, so I have to figure it all out.

PDADoc -

Switch worked really good ACCEPT that my fingerprint reader is now broken (it doesnt readout anymore).
I think it got something to do with the alcohol getting under it (i used premium 99%)

Philipp Karmann - crwdns2934203:0crwdne2934203:0

Update: after several restarts and a slight heatbed treatment the sensor managed to store a fingerprint. It seems to work just fine, although i get a feeling, that the sensor definitely isnt working as reliable as before .... i keep you updated

Philipp Karmann -

Last Update: after working just fine the whole day the display randomly stopped working and is now completely dead. Phone is therefore destroyed.

Philipp Karmann -

Screen destroyed itself shortly after the repair. Phone was working just fine, than began to reject inputs, followed by ghost touches. Shortly after that the screen turned black and is unfunctional since.
Like I said, the phone was working just fine after the repair, so I can pretty much foreclose a installtion error.
Ifixit support sadly wasnt helping at all.

Philipp Karmann - crwdns2934203:0crwdne2934203:0

Fingerprint sensor didn't work until I move a small grey sticker from the original battery carefully placing it in the same spot on the new battery

Anthony Butler - crwdns2934203:0crwdne2934203:0

crwdns2917038:0crwdne2917038:0

crwdns2936625:0crwdne2936625:0:

crwdns2936751:024crwdne2936751:0 27

crwdns2936753:07crwdne2936753:0 184

crwdns2936753:030crwdne2936753:0 943

crwdns2942667:0crwdne2942667:0 28,865