crwdns2915892:0crwdne2915892:0
The screen digitizer is the clear glass like protection for the LCD. The screen digitizer is also what registers your touch inputs. The LCD is located underneath the screen digitizer and is the component that displays the images. These steps can be used to replace just the screen if it is cracked or damaged or just the LCD if you have no display at all.
crwdns2942213:0crwdne2942213:0
-
-
Remove the Samsung S-Pen stylus.
-
Remove the micro SD storage card.
-
-
-
Using the plastic opening tool, start where the S-pen was located and carefully pry up the corner.
-
-
-
Work your way around the entire device by carefully prying and sliding the plastic opening tool.
Nicht nur die Micro SD Karte… auch die SIM Karte sollte entfernt werden.
-
-
-
Remove the 8 Phillips#00 3-mm screws holding the battery in place.
The photo highlighting the screws is incorrect, the highlight in the upper right side is a plastic tab, whereas the actual 8th screw to remove is on the bottom (but that's fairly easy to identify when performing the fix).
Can’t loosen screws on battery
-
-
-
Lift the top left corner of the battery up by the black tab.
-
-
-
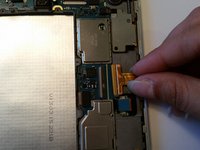
Gently grasp and lift up the white connector located at the bottom right corner of the battery. It is connected to the battery by two blue and two red wires.
the white battery connectory also has 2 black wires, so 2 blue/2red/2black
There is some sort of safe unit in the upper left corner. It is a connector that opens when you lift off the backside. The safe was not in properly fit when I closed the back. In fact, the most difficult step was to get the safe unit properly in place while closing the backside.
Thanks @henriknaslund for note on the "Safe Unit" I succesfully managed to hold it in pace with a little basic sticky tape. Did the job.
Piece of cake. Entire procedure took just 15 minutes. Thank you, Joel & Co., for making this so easy!
why is this under galaxy note 8? the note 8 is not a tablet??? Please respond to my comment as I will check back. I need to fix my NOTE 8 POWER BUTTON…does not work properly. Makes a “short” sound…as in electrical.
HELP!!
The Galaxy Note 8 was the designation for the 8 inch WiFi tablet long before Samsung confused everyone with the Note 8 phone. When Im looking for items for the tablet I usually only get things for the phone.
’
”
”
When the Galaxy Note 8 Battery is replaced is all data, contact info,
downloads, photos etc lost ??
-
-
-
-
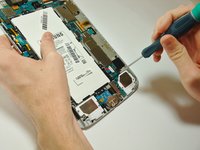
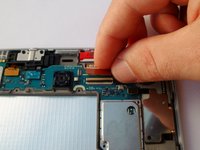
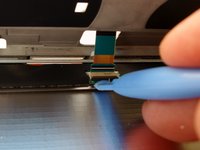
Gently pull the tan part of the digitizer connector up.
-
Carefully slide the orange ribbon out from connector.
-
-
-
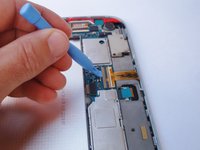
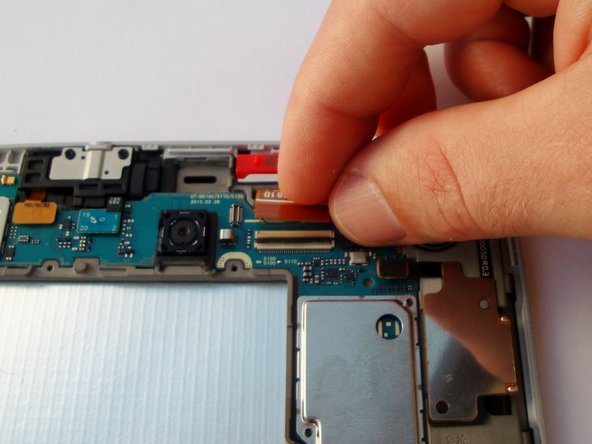
Gently pull up the black part of the LCD connector.
-
Carefully slide orange ribbon out from connector.
This is not the LCD connector.
It is the back camera connector.
-
-
-
Turn the tablet over screen up. Set your heat gun or blow dryer to the medium heat setting.
-
Sweep the heat gun over the white edge of the tablet screen. Apply heat for 30 seconds on each side before moving to the next side.
-
You will repeat a circular pattern bottom, left, top and then right. Repeat this pattern 3 times spending 30 seconds on each side.
-
-
-
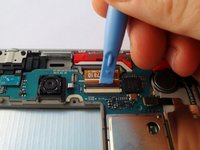
Insert your plastic opening tool between the silver surround and the screen, starting at the top of the tablet.
Hi, I’ve tried to do this and just end up cracking / breaking the silver grey plastic surrounding the screen. Can you please elaborate here a little? How exactly should I insert my opening tool so as not to break the silver grey plastic surrounding the screen?
I managed to get it open but with a whole lot of effort. The glass was cracked all over from a drop, so I stuck tape over the glass and heated up the device, then stuck a small flat screwdriver into and under the glass, cracking and breaking it as I went along. The tape helped prevent glass shards from shooting into my eye. Note that it’s best to get the whole Screen Digitizer assembly as a replacement for just the Glass screen at the top would be quite difficult to do without breaking or bending the LCD panel as well.
-
-
-
Slide your opening tool down the side of the device with the volume and power buttons. Continue sliding down the side toward the home button until the glue is free on this side.
-
-
-
Slide your opening tool down the home button edge until the glue is free on this side.
-
-
-
Turn the tablet over and carefully press out the LCD panel from the back along the power button edge only. Push gently on the back of the LCD in the battery opening.
-
Disconnect ribbon that is connecting the screen assembly to the motherboard
Can I buy the ribbon that connects the screen assembly too mother board??
-
-
-
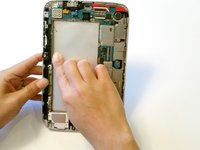
Turn the tablet over and completely remove the LCD and screen assembly from the tablet by sliding a plastic opening tool down the final edge until the adhesive is free.
-
If you are replacing the screen by itself, continue to the next step. If you are replacing the screen digitizer only, simply follow the procedures in reverse to complete the replacement.
-
-
-
To separate the screen from the LCD you will need to heat the adhesive holding the two together.
-
Holding the heat gun, set to medium, approximately 6 inches from the screen, sweep from left to right as you move the heat gun across the tablet from top to bottom.
-
Continue heating the screen from top to bottom as you sweep from left to right for 5 minutes.
-
-
-
Find a plastic card you no longer need.
-
Slide the card between the screen and digitizer working around the edges toward the center.
-


To reassemble your device, follow these instructions in reverse order.
To reassemble your device, follow these instructions in reverse order.
crwdns2935221:0crwdne2935221:0
crwdns2935229:047crwdne2935229:0
crwdns2915084:0crwdne2915084:0

USF Tampa, Team 12-2, Blackwell Fall 2014 crwdns2935289:0USF Tampa, Team 12-2, Blackwell Fall 2014crwdne2935289:0
USFT-BLACKWELL-F14S12G2
crwdns2931471:04crwdne2931471:0
crwdns2935297:016crwdne2935297:0
crwdns2947412:020crwdne2947412:0
For steps 15 and 16, removing just the glass digitizer from the lcd, does this step happen after you completely remove the lcd from the tablet? It is hard to tell because it looks like the silver from the tablet is present but it takes place in the instructions after the lcd should already be removed and no silver should be present. Any help on this would be appreciated. I have one where the digitizer screen is broken but the lcd has no damage at all.
No you dont need to remove the lcd you hav to unplug the toch connector n heat the glass like in the steps
For step 13, I ripped this motherboard connector trying to get the new lcd in. Anyone have any idea what I have actually damaged? And where I could find out how to fix it?
yes replacements are on ebay
Pantalla Flex Cable LCD Conector Display Screen Ribbon Samsung Galaxy Note 8.0.
My Samsung note 8 model N5110 has a broken screen glass. It still work very good. Question ..must I changed the digitaliser and screen . Please advice.
thanks in advance
I have the Samsung note 8, model Model N5110, the glass got broken, the unit still work very good. Question. . Most I change the glass and digitaliser, or gust the glass can be change
thanks in advanced for help
my advice would be keep using it with the glass broken if it still works because changing it is a nightmare.
Everything was going well until Step 16. Sliding the the plastic card between the digitizer screen and LCD totally messed up the glue on the surface of the LCD. Wished I had watched that one Youtube video before attempting this part. Might have to buy a digitizer screen/LCD combo now.
All looks good except I don't quite understand this part
"If you are replacing the screen by itself, continue to the next step. If you are replacing the screen digitizer only, simply follow the procedures in reverse to complete the replacement."
I'm sure it will be clear when I actually get to do the job. Thanks, good work instruction and care points. If you need a job these instructions are better than what we write at work:)
When you just remove the digitiser, you dont have to remove the battery (step 4 to 6) or detach the LCD cable (step 8). Also it is easier to use credit cards or even buisiness cards for removing the digitiser. Look on Youtube first as this is a great instruction how to replace the lcd, but less so for removing the digitiser only....
Does anyone know what substance to use to remove the glue on the LCD. It looks like silicon so nailpolish remover might help (etylacetate)?
Alcohol. try some hand sanitiser , nail polish remover may be a bit rough, too abrasive. I used hand sanitiser and it rolled off in sausages.
I have replaced the glass digitizer and LCD (a set together) but sadly it is black screen afterwards. Touch screen is working, I can still hear the screen being unlocked sound. I shined light onto the screen but can't see anything which I thought backlight not working, it's just totally black. What could be the problem here?
I'm having the same issue, and was told to try the following:
"1. Clean the digitizer flex cable with alcohol and carefully attempt to reattach the cables; make sure all cables and connections are secure.
2. There may be a "metal tape" on the original LCD Flex. Please remove it and put on the new assembly.This tape is for grounding purpose and without it, the LCD will not work correctly
3. Make sure your device is charged.
4. Do a soft reset of your device. "
About to try it on mine; if it still doesn't work it is either a damaged cable or defective replacement part.
Yoron -
I just received my replacement screen, and same issue is happening. Disconnected all of the cables to double-check, and found the mainboard to LCD cable has a partial tear where it doubles over. Just ordered a replacement on eBay; awaiting arrival. Will post results.
Board comes off with 4 screws (1 on the board, 1 on the metal tab covering a connection to the charging module, and the 2 holding the speaker on that side). Obviously disconnect all connections (I count 7 on the GT-N5100, not including those already disconnected for screen removal). The cable is just below the mainboard, and is held in place with a small amount of adhesive.
Yoron -
It worked! Replaced the LCD to motherboard cable in Step 13; replaced the screen--100% functioning now.
Yoron -
How do I know if this is what I need. Mine fell of the arm rest of my chair and hit stone tile floor. The screen lights up and goes through all the motions and animations but they are nothing but lines across the screen. Nothing is legible.
Hello, the screen of my Samsung Galaxy Note 8 broke. Can I use the same steps below to replace it??? And how I can place the new one back???
Can I buy a replacement screen on e-bay???
I purchased the glass only.. Can't find a video on just the glass
Anyone ever do glass only? I purchased the glass online came with tools. However, can't find a video on just
Hi, anyone know which adhesive to use for this? tape? uv glue? Just prepping for when the digitalizer arrives (glass replacement only)