crwdns2933423:0crwdne2933423:0

Samsung Galaxy Note 10.1 Rear Facing Camera Replacement

crwdns2942213:0crwdne2942213:0

  1. Samsung Galaxy Note 10.1 Rear Facing Camera Replacement, Removing the Top Piece: crwdns2935265:01crwdnd2935265:01crwdnd2935265:03crwdne2935265:0 Samsung Galaxy Note 10.1 Rear Facing Camera Replacement, Removing the Top Piece: crwdns2935265:01crwdnd2935265:02crwdnd2935265:03crwdne2935265:0 Samsung Galaxy Note 10.1 Rear Facing Camera Replacement, Removing the Top Piece: crwdns2935265:01crwdnd2935265:03crwdnd2935265:03crwdne2935265:0
    • This is the back of the device and where you willl begin to take it apart

    • It is necessary to remove the silver piece covering the camera first before removing the bigger back piece.

    • Use the plastic opening tools to pry along the indicated box.

    • Lift up the silver piece to reveal the rest of the back cover.

  2. Samsung Galaxy Note 10.1 Rear Facing Camera Replacement, Removing the Back Cover: crwdns2935265:02crwdnd2935265:01crwdnd2935265:03crwdne2935265:0 Samsung Galaxy Note 10.1 Rear Facing Camera Replacement, Removing the Back Cover: crwdns2935265:02crwdnd2935265:02crwdnd2935265:03crwdne2935265:0 Samsung Galaxy Note 10.1 Rear Facing Camera Replacement, Removing the Back Cover: crwdns2935265:02crwdnd2935265:03crwdnd2935265:03crwdne2935265:0
    • Unscrew the three screws indicated by the red circles with the Philips #00 screwdriver.

    • Using the plastic opening tools pry along the bottom of the device, moving to the sides of the cover to the top.

    • Remove the back cover.

    • At this point use anti-static gloves or do NOT take it apart on carpet.

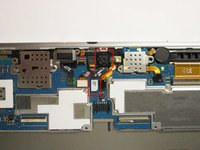
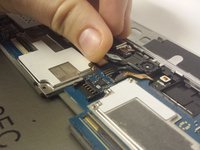
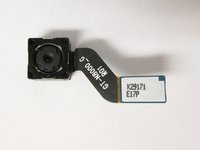
  3. Samsung Galaxy Note 10.1 Rear Facing Camera Replacement, Removing the Camera: crwdns2935265:03crwdnd2935265:01crwdnd2935265:03crwdne2935265:0 Samsung Galaxy Note 10.1 Rear Facing Camera Replacement, Removing the Camera: crwdns2935265:03crwdnd2935265:02crwdnd2935265:03crwdne2935265:0 Samsung Galaxy Note 10.1 Rear Facing Camera Replacement, Removing the Camera: crwdns2935265:03crwdnd2935265:03crwdnd2935265:03crwdne2935265:0
    • Start by lifting the white connector to remove the part indicated by the red polygon.

    • Gently pry along the camera hub to lift it out of its location.

    • This is your camera. Replace it with the new part.

crwdns2915888:0crwdne2915888:0

To reassemble your device, follow these instructions in reverse order.

crwdns2935229:03crwdne2935229:0

Bryan Fernandez

crwdns2935283:009/22/14crwdne2935283:0

241 crwdns2915208:0crwdne2915208:0

crwdns2935297:02crwdne2935297:0

crwdns2915084:0crwdne2915084:0

USF Tampa, Team 3-7, Brown Fall 2014 crwdns2935289:0USF Tampa, Team 3-7, Brown Fall 2014crwdne2935289:0

USFT-BROWN-F14S3G7

crwdns2931471:03crwdne2931471:0

crwdns2935297:09crwdne2935297:0

crwdns2944067:00crwdne2944067:0

crwdns2917038:0crwdne2917038:0

crwdns2936625:0crwdne2936625:0:

crwdns2936751:024crwdne2936751:0 0

crwdns2936753:07crwdne2936753:0 1

crwdns2936753:030crwdne2936753:0 1

crwdns2942667:0crwdne2942667:0 2,167