crwdns2933423:0crwdne2933423:0

crwdns2931315:0crwdnd2931315:0crwdne2931315:0

crwdns2942213:0crwdne2942213:0

  1. crwdns2935201:0crwdne2935201:0 crwdns2935203:0crwdne2935203:0

    : crwdns2935265:01crwdnd2935265:01crwdnd2935265:01crwdne2935265:0
    • You must open the back of the phone to access the battery. To do this use the plastic opening tools or your fingernail and insert it into the divot.

  2. crwdns2935201:0crwdne2935201:0 crwdns2935203:0crwdne2935203:0

    : crwdns2935265:02crwdnd2935265:01crwdnd2935265:03crwdne2935265:0 : crwdns2935265:02crwdnd2935265:02crwdnd2935265:03crwdne2935265:0 : crwdns2935265:02crwdnd2935265:03crwdnd2935265:03crwdne2935265:0
    • Remove the back cover of the phone by moving the prying tool or your fingernail away from the phone while it is still in the divot.

  3. crwdns2935201:0crwdne2935201:0 crwdns2935203:0crwdne2935203:0

    : crwdns2935265:03crwdnd2935265:01crwdnd2935265:03crwdne2935265:0 : crwdns2935265:03crwdnd2935265:02crwdnd2935265:03crwdne2935265:0 : crwdns2935265:03crwdnd2935265:03crwdnd2935265:03crwdne2935265:0
    • Insert your finger into the divot of the battery and pull the battery towards yourself to remove.

    • This is when a new battery will be inserted.

  4. crwdns2935201:0crwdne2935201:0 crwdns2935203:0crwdne2935203:0

    : crwdns2935265:04crwdnd2935265:01crwdnd2935265:03crwdne2935265:0 : crwdns2935265:04crwdnd2935265:02crwdnd2935265:03crwdne2935265:0 : crwdns2935265:04crwdnd2935265:03crwdnd2935265:03crwdne2935265:0
    • Remove 4.4 mm screws using a PH # 000 as indicated on the picture.

  5. crwdns2935201:0crwdne2935201:0 crwdns2935203:0crwdne2935203:0

    : crwdns2935265:05crwdnd2935265:01crwdnd2935265:03crwdne2935265:0 : crwdns2935265:05crwdnd2935265:02crwdnd2935265:03crwdne2935265:0 : crwdns2935265:05crwdnd2935265:03crwdnd2935265:03crwdne2935265:0
    • After removing the screws be sure to turn the phone right side up.

    • Insert your plastic opening tool between the screen and the outer case. Move the opening tool around the phone without removing it from in between the screen and the shell of the phone.

    • Pop the screen out of the outer shell. Be cautious not to damage the control board or the screen.

  6. crwdns2935201:0crwdne2935201:0 crwdns2935203:0crwdne2935203:0

    : crwdns2935265:06crwdnd2935265:01crwdnd2935265:02crwdne2935265:0 : crwdns2935265:06crwdnd2935265:02crwdnd2935265:02crwdne2935265:0
    • Unscrew 4.4mm with a PH #000 marked screw.

  7. crwdns2935201:0crwdne2935201:0 crwdns2935203:0crwdne2935203:0

    : crwdns2935265:07crwdnd2935265:01crwdnd2935265:02crwdne2935265:0 : crwdns2935265:07crwdnd2935265:02crwdnd2935265:02crwdne2935265:0
    • With the flat head screw driver pull up the blue connector.

  8. crwdns2935201:0crwdne2935201:0 crwdns2935203:0crwdne2935203:0

    : crwdns2935265:08crwdnd2935265:01crwdnd2935265:03crwdne2935265:0 : crwdns2935265:08crwdnd2935265:02crwdnd2935265:03crwdne2935265:0 : crwdns2935265:08crwdnd2935265:03crwdnd2935265:03crwdne2935265:0
    • With you finger or prying tool pull back bottom module.

  9. crwdns2935201:0crwdne2935201:0 crwdns2935203:0crwdne2935203:0

    : crwdns2935265:09crwdnd2935265:01crwdnd2935265:03crwdne2935265:0 : crwdns2935265:09crwdnd2935265:02crwdnd2935265:03crwdne2935265:0 : crwdns2935265:09crwdnd2935265:03crwdnd2935265:03crwdne2935265:0
    • Remove the internal battery using tweezers or your flat head screw driver.

    • There is glue at the bottom keeping battery and chassis stuck together.

  10. crwdns2935201:0crwdne2935201:0 crwdns2935203:0crwdne2935203:0

    : crwdns2935265:010crwdnd2935265:01crwdnd2935265:02crwdne2935265:0 : crwdns2935265:010crwdnd2935265:02crwdnd2935265:02crwdne2935265:0
    • Peel the display connector strip off the main circuit board using the tweezers.

    • Peel the USB connector strip off the main circuit board using the tweezers.

  11. crwdns2935201:0crwdne2935201:0 crwdns2935203:0crwdne2935203:0

    : crwdns2935265:011crwdnd2935265:01crwdnd2935265:03crwdne2935265:0 : crwdns2935265:011crwdnd2935265:02crwdnd2935265:03crwdne2935265:0 : crwdns2935265:011crwdnd2935265:03crwdnd2935265:03crwdne2935265:0
    • Remove the antenna using either your fingers or tweezers.

  12. crwdns2935201:0crwdne2935201:0 crwdns2935203:0crwdne2935203:0

    : crwdns2935265:012crwdnd2935265:01crwdnd2935265:03crwdne2935265:0 : crwdns2935265:012crwdnd2935265:02crwdnd2935265:03crwdne2935265:0 : crwdns2935265:012crwdnd2935265:03crwdnd2935265:03crwdne2935265:0
    • Using tweezers, pull the top circuit board off.

    • Depending on your model, there may be ribbon cable connectors attached to the underside of the board. Be careful not to rip them out of the sockets when removing the board.

  13. crwdns2935201:0crwdne2935201:0 crwdns2935203:0crwdne2935203:0

    : crwdns2935265:013crwdnd2935265:01crwdnd2935265:02crwdne2935265:0 : crwdns2935265:013crwdnd2935265:02crwdnd2935265:02crwdne2935265:0
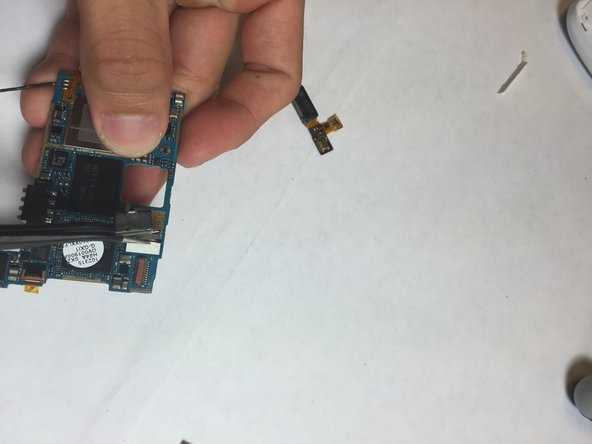
    • Using tweezers pull out the back camera lens from the circuit board.

crwdns2935217:0crwdne2935217:0

crwdns2935229:04crwdne2935229:0

Stephan Williams

crwdns2935283:009/22/14crwdne2935283:0

1,482 crwdns2915208:0crwdne2915208:0

crwdns2935297:07crwdne2935297:0

crwdns2917034:0crwdne2917034:0

Main picture of camera is off center.

Dan Brown - crwdns2934203:0crwdne2934203:0

crwdns2917038:0crwdne2917038:0

crwdns2936625:0crwdne2936625:0:

crwdns2936751:024crwdne2936751:0 1

crwdns2936753:07crwdne2936753:0 1

crwdns2936753:030crwdne2936753:0 1

crwdns2942667:0crwdne2942667:0 1,022