crwdns2942213:0crwdne2942213:0
-
-
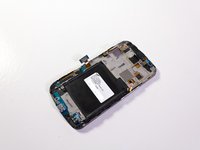
So your Verizon Galaxy Nexus won't charge, charges sometimes, or thinks it's charging when it's not plugged in? It might be time to replace the micro USB connector board.
-
For this repair you'll need:
-
An opening tool.
-
Small Phillips screwdriver.
-
A replacement micro USB board. I found mine here.
-
-
-
Start by removing the battery and SIM card.
-
Once the battery and SIM are out, remove all six screws from the back.
-
-
-
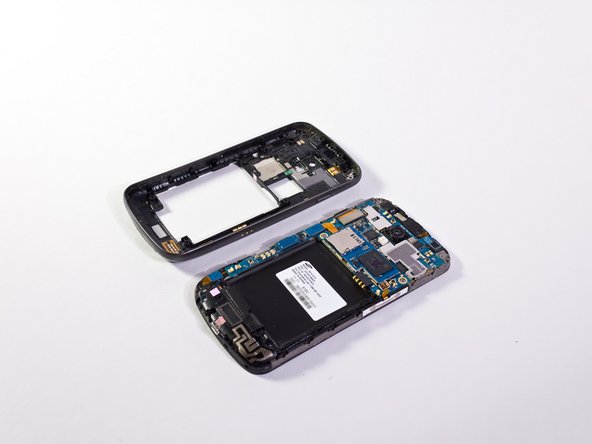
The next step is to remove the back from the phone.
-
Using the plastic opening tool gently pry around the edge of the screen. It should come off without too much fuss.
-
-
-
-
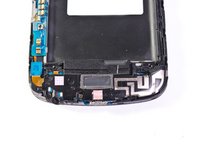
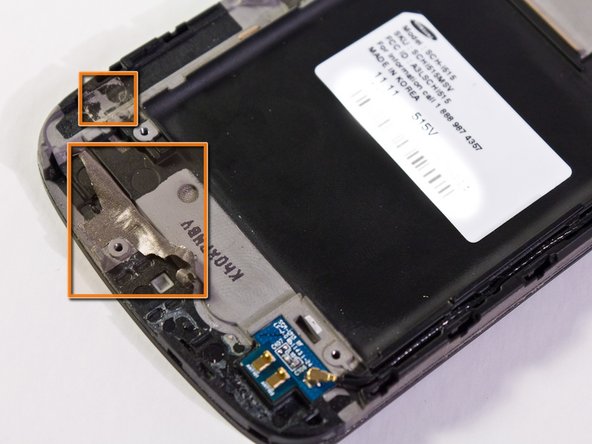
Next we need to remove the antenna, speaker, and vibrator assembly from the bottom.
-
Start by removing the screw.
-
Then use the opening tool to disconnect the ribbon cable.
-
-
-
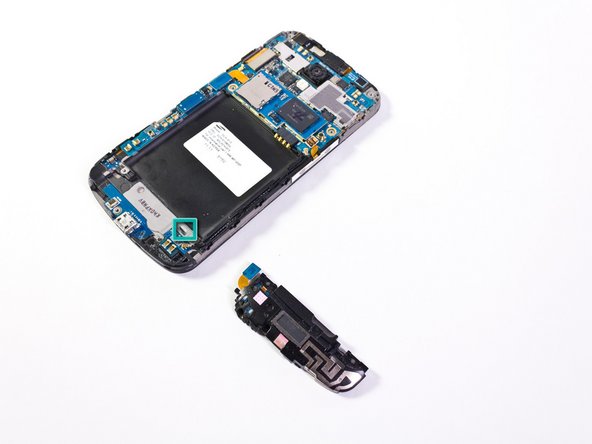
The assembly is clipped to the magnesium body of the phone. It's not very easy to unclip, unless you have a Google GSM phone.
-
GSM: For my Google GSM phone, you just needed to push the clip away from the assembly.
-
The clip used to be here.
I had problems removing it too, though I didn't try to force anything so I fortunately did not break mine. After playing with it for many minutes I eventually figured out that that you can safely remove it by twisting it counter clockwise (i.e. pushing the left side down)
I've got a Verizon CDMA Nexus and had no problem at all getting the speaker bar off, didn't break the clip or anything. Just lifted up from the left side with the pry tool and it popped off easy.
There is a clip just under the screw. I pushed this in and the assembly popped off easily. The clip used in the image was the pivot.
-
-
-
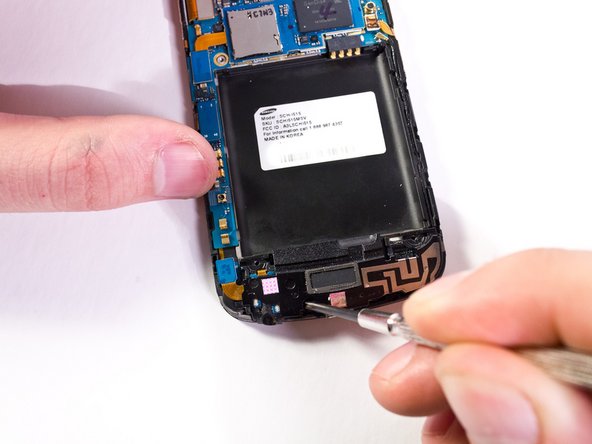
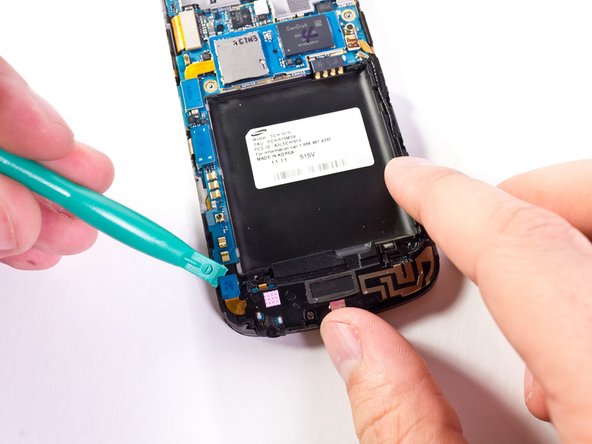
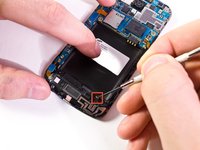
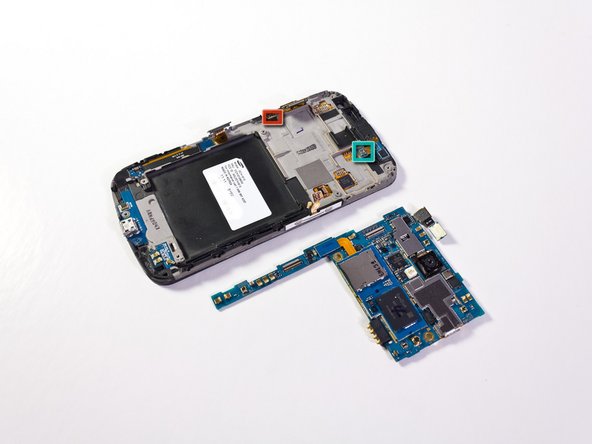
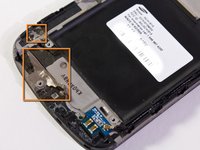
Next we need to detach some ribbon cables and an antenna cable from the main circuit board.
-
Micro USB board. Also has the front notification LED and the main microphone.
-
Screen connector.
-
Volume rocker. Some phones have this soldered to the mainboard - not CDMA.
-
GSM/Soldered: One user was able leave the volume rocker alone, and instead focus on the power button. You can gently separate the power button from the case - held in place only by glue - without remove detaching it from the circuit board. You can then rotate the circuit board out of your way.
-
Antenna.
-
Gently detach with the plastic opening tool.
!! IMPORTANT !! On the GSM version, the Volume connector on the Main Board is definitely soldered. This makes lifting the main board much trickier (I snapped the soldered connection on mine, @*%^!!!!). DO NOT TRY TO REMOVE THE MAIN BOARD from the case all the way as explained in this teardown if you own the GSM version. Instead, just disconnect the "left" side and lift that, keeping the right side (where the volume rocker is) close to/attached to the case.
Wish I had noticed the Step 7 user comment pertaining to prying the battery up off of the usb board and then only lifting the main board (as I have suggested) to preserve the connection of the soldered volume cable. Now I have to adjust sound levels with the gui, no more volume buttons. :( :(
!@#$ IT, just wanted to change the micro-usb plug from one working mobile to another (not working) and broke both volume rocker cables.
ATTENTION for GSM phones!!!!!!! Don't try to move the board completely away!!!!! Otherwise u may destroy volume rocker cable...
-
-
-
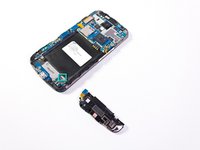
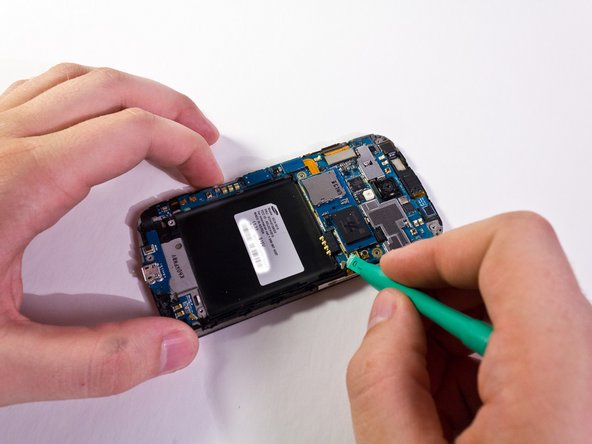
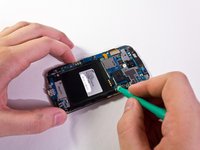
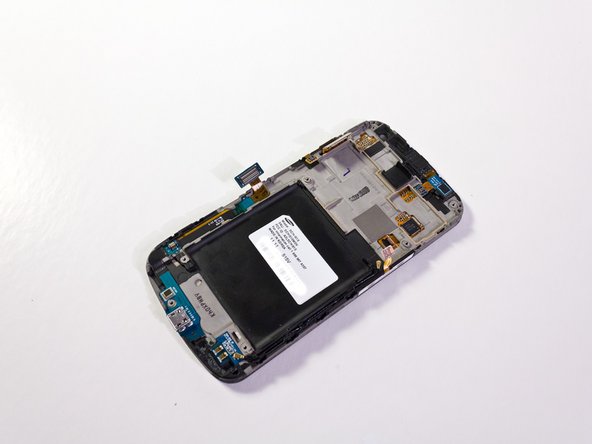
Gently remove the main circuit board.
-
Power button cable.
-
Earphone cable.
On the GT-I9250 (GSM version), the power button ribbon appears to be soldered to the mainboard, and hence the board is very tricky to remove.
However if you gently prise out out what appears to be a coin battery, then gently prise the main board up so it's 'unclipped', there will be just enough room underneath the 'tail' of mainboard to allow the USB cable to be pulled out, and the new one slipped back underneath.
It will ruin the old USB cable, but as it's being replaced it doesn't matter.
With the European models you might be able to just lift up the main board enough to slide the old micro USB board out and the new one in. This worked for me after I was unable to detach the ribbon cables which are underneath the main board and I feared damaging them. This way you can also leave the antenna cable connected at the top end of the phone. Essentially what @CannonFodder is describing above...
The boxed teal connecter is lightly glued down. If it comes up with the main board everything is still OK. Hence, you can pry it off to connect it to the main board before laying it in for final assembly.
Like the original writeup, there was no glue on my volume rocker on LTE Toro.
Took maybe 20 min. This is easier than ipod/iphone repair IMO, less little clips that break.
I found it was easiest to separate the bottom half of the main board and slip the USB board out, rather than completely removing it. Just be careful to not crack anything, if using this method. Which pretty much "thirds" what CannonFodder and Johannes la Poutre already said.
I found the power button for CDMA versions, while easy to disconnect, did not reconnect as expected when the mainboard was placed back in place. I had to go back, pull up the mainboard a bit and, using the flat side of a spudger, reconnect the power button to the mainboard.
Agree that main board on CDMA version need not come out. You can leave the volume rocker & antenna connectors on. Remove screen connector and gently lift mainboard end up just enough to slide USB board out. Saves dealing with a few cables.
I agree with CannonFodders comment on step 7. The circular battery on the GSM version is glued down to the USB charge port so be very careful as two wires are connected to it. Once you've got the battery off you can then pry the charge port off as described but without removing the entire mainboard to replace in the new port.
I was able to do as described with the GSM version, is not as tricky as it appears to be at first sight.
Just to add a couple of advices that might be helpful: as said, the volume rocker ribbon in the right is soldered to the main board but the power button is quite glued to the phone side too, and its ribbon cannot be removed fom the main board (or I wasn't able to remove) So, better than unglueing that power button, the main board can be lifted up a little from both sides, keeping both ribbons connected, then enabling space to remove the USB. When having enough space under the main board, the circular battery mentioned in other comments has to be unglued from the USB charge port, is necessary to remove it carefully (2 cables are connected to the main board) and the USB piece is also glued to the phone case, necessary to unglue carefully zone by zone, then is possible to remove and replace with the new one.
-
-
-
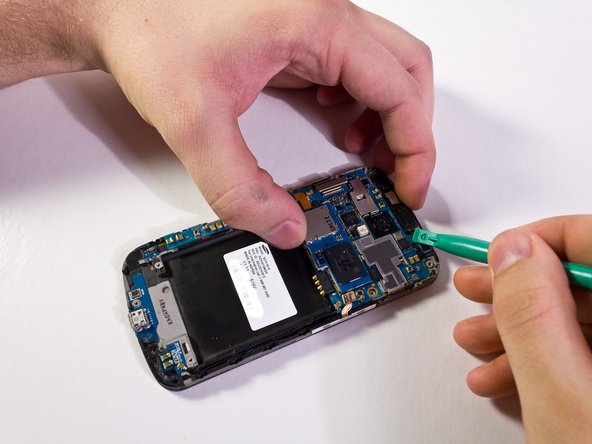
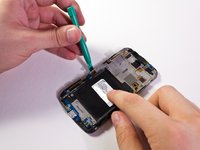
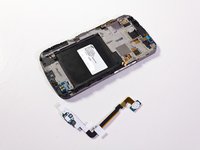
Now we can finally replace the micro USB board.
-
It has some light adhesive holding it on. Some work with they pry tool and your fingers should free it easily.
-
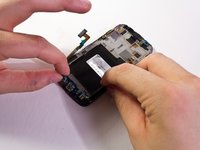
The board left behind some of its adhesive. Make sure to remove it.
-
-
-
With the broken USB board gone we can install the new one!
-
Peel off the adhesive backing and install the new board.
-
There are a number of pins and guides that make accurate installation easy.
Which revision of USB flex did you originally have and what revision did you install? I mean the LF-A G 11xx number.
My original was LF-A G 1145. The new one was LF-A G 1150 23-3. I'll add an image of that to the beginning of the guide.
Thanks!
In the GSM version there is a little circular piece that is affixed by light adhesive to the plastic body on the bottom left. Make sure you use a opening tool to pry it open, I busted a soldering point to it not knowing it was attached because it was missing from the steps in this tutorial.
Didn't see this until AFTER I did mine, and I snapped my volume off! Even worse, the new USB isn't really working. It says it's charging when the phone is off, but not when it's on. And it doesn't really charger properly when on either, but sometimes seems to get SOME life back. I'm not sure if it's a bad port, or I missed something...
-


To reassemble your device, follow these instructions in reverse order.
To reassemble your device, follow these instructions in reverse order.
crwdns2935221:0crwdne2935221:0
crwdns2935229:0151crwdne2935229:0

crwdns2947412:012crwdne2947412:0
These guys figured out the GSM version:
http://www.japanmobiletech.com/2012/07/r...
I didn't need to break the orignal part as cannonfodder described.
Fantastic. I could use this and fix my Galaxy Nexus. What a relief!
Few suggestions though -
My Galaxy Nexus is of a GSM model - so the build inside is little different than what was depicted here for the CDMA one. I gathered some information from http://www.japanmobiletech.com/2012/07/r... on the GSM aspects. I also watched the Galaxy Nexus Disassembly and Asssembly video during the repair process - http://www.youtube.com/watch?v=B5fZzZANL....
It took me an hour roughly to successfully finish the job. Thank you Sam.
GSM OWNERS
Read the comments before you proceed with this guide. There are some notable differences between CDMA and GSM, including:
* Volume and power buttons are probably soldered to the mainboard
* The vibrator is separate from the bottom speaker assembly and should be carefully removed using a spudger (but be careful not to tear the soldered wires
* The screws are located in different positions, all on top of the back plastic cover
** Step 4: I didn't have an additional screw below the plastic back
* Comments on Step 7 are great - to replace the USB ribbon, you must gently lift the bottom of the mainboard up, slide out the old USB ribbon, and slide the new one in. Don't take the mainboard completely out, or you'll break the soldered power and volume connections.
Good luck and happy fixing!
Was super easy for CDMA, I broke the clip in Step 5 but it still works!
Thanks for the great guide. I've dropped my phone a couple times with the USB cord plugged in and the port had gotten stretched a little bigger. I was able to get to the port and used a pair of needlenose pliers to make the port a little smaller. Now my USB cord stays in like its supposed to. Thanks so much!
I was able to do this with my GSM GNex - thanks! As others have said, the volume/power ribbon cables are the main difference compared to CDMA. I left the volume switch attached to the case, so I chose to detach the power button -- I left the power button switch attached to the case (it's glued on), and I was able to gently pull out the brown ribbon cable that goes from the power switch to the main board (it's underneath, near the edge, but you can wiggle it out without too much work). Once that's done you can lever out the main board while keeping the volume ribbon cable attached. Then it's easy to do the rest. Reattaching the power ribbon cable took some care but I didn't damage mine. I was done easily in under an hour.
Just a +1 here. I detached the power button from the case, cutting the glue with a sharp and thin knife. There was also a vibrator/speaker (?) glued onto the USB board, not featured in the photos, which I simply unglued with my fingers.
All of this was easy and took me 20mn, my GSM Nexus (Google edition) is now happily charging.
I used the video Chandra linked (disassembly of i515) to help me replace the Micro USB board with a replacement I got on eBay for $7. There were some differences from my Galaxy Nexus i9250 from the video, but I was able to do it by removing the vibration unit and prying off the power and volume buttons with a flat head screwdriver (it was glued on to the frame really tight, not soldered). Everything works fine now. I found the hardest step was taking off the edge casing from the screen (Step 3). It was stuck on really tight and would not come off easily. A guitar pick actually worked better than plastic prying tools which was scraping up the sides of my screen protector.
After I did it all, I found a disassembly video for my i9250, LOL. I figured I'd add it here for somebody else: http://www.youtube.com/watch?v=WIAM5pxdU...
Thanks a Lot. Works fine with me !
Very helpful guide, used it to fix O2 UK gt-i9250 .
I had previously done a temporary repair simply by very slightly bending the tab inside the USB port towards the contact side. This lasted for some months until charging became unreliable again the friend I'd done it for tried to repeat this with a knife and mashed up the connector.
As previous commenters I'd recommend not removing the main board, just raising the long tail on the left very slightly and gently to slide out the old usb port assembly and insert the new. It certainly wasn't necessary to detach anything on the right of the main board (antenna or rocker) or probably to prize it up at the top (near earphone connector). There was also no need to do anything with the power button for me. In step 6 I did have to prize off the round vibrator at bottom left (not shown in diagrams) with a small electrical screwdriver (rigid one worked better than twiddly one) and detach the two ribbon cables on the left (usb connector and display connector).
Be careful when you buy the replacement flex cable. My replacement cable (for i9250) didn't fit in my Sprint Galaxy Nexus (SPH-L700). I made the assumption that they would be the same, and paid for my mistake. I had to put the old flex cable back in, because I wasn't in the mood to grind off magnesium from the case to make it fit. It also appears that I broke the antenna connector when attempting to clip the antenna back onto the mainboard. So, watch out for that.
On step 7 my main circuit board was loose enough for me to remove the usb wiithout removing the main circuit board. i didnt have to worry about the ribbon cables underneath. this only worked because it was super easy to get the old usb board out and my $5 replacement part had no adhesive. if it would have been any harder I'd've taken the main board off - I'd be worried about snapping it if i was prying the usb board off and it popped off.
The USB part linked to here was too expensive for my liking ($43, ack), so I took my chances on this one. Was only $10. Add a full set of Samsung-ready tools for $7, plus $5 in shipping, and it's a steal.
Anyway, this took me about 10-15 minutes and was 100% successful. Thanks for the guide Sam Thompson. Saved me hundreds of dollars and hours of aggravation tied to replacing my phone because of a few bent microUSB connectors.
Dave Mosher - crwdns2934203:0crwdne2934203:0
I followed Dave Mosher's advice. I am happy to report that the part Dave mentioned worked for me as well. Super guide. Thanks.
JustinM - crwdns2934203:0crwdne2934203:0