crwdns2933423:0crwdne2933423:0

Samsung Galaxy Express 3 Motherboard Replacement

crwdns2942213:0crwdne2942213:0

  1. Samsung Galaxy Express 3 Motherboard Replacement, Battery: crwdns2935265:01crwdnd2935265:01crwdnd2935265:02crwdne2935265:0 Samsung Galaxy Express 3 Motherboard Replacement, Battery: crwdns2935265:01crwdnd2935265:02crwdnd2935265:02crwdne2935265:0
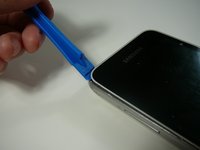
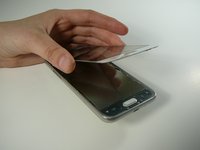
    • Locate the indent area highlighted in red and use either your fingernail or a Prying Tool (such as a guitar pick) to separate the back from the body of the phone.

  2. Samsung Galaxy Express 3 Motherboard Replacement: crwdns2935265:02crwdnd2935265:01crwdnd2935265:03crwdne2935265:0 Samsung Galaxy Express 3 Motherboard Replacement: crwdns2935265:02crwdnd2935265:02crwdnd2935265:03crwdne2935265:0 Samsung Galaxy Express 3 Motherboard Replacement: crwdns2935265:02crwdnd2935265:03crwdnd2935265:03crwdne2935265:0
    • Once the cover is removed, locate the battery that reads "SAMSUNG."

    • Use either your fingernail or a Plastic Prying Tool (such as a guitar pick) to lift up the bottom indent of the battery.

    • Do not use a metal tool, as it can cause injury.

  3. Samsung Galaxy Express 3 Motherboard Replacement, Screen: crwdns2935265:03crwdnd2935265:01crwdnd2935265:02crwdne2935265:0 Samsung Galaxy Express 3 Motherboard Replacement, Screen: crwdns2935265:03crwdnd2935265:02crwdnd2935265:02crwdne2935265:0
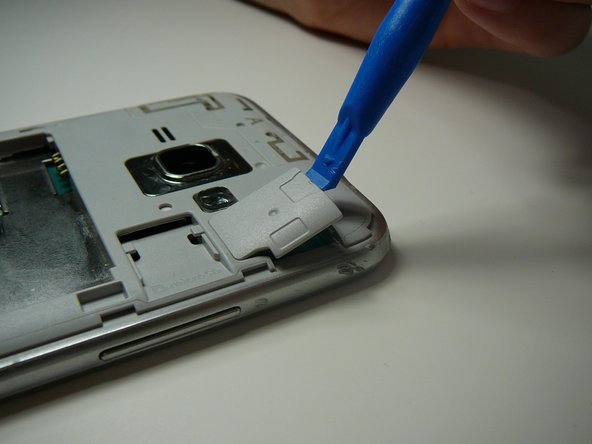
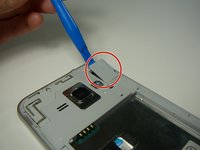
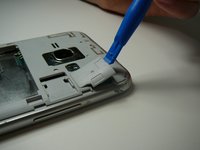
    • Use a Plastic Prying Tool (such as a spudger) to pop out piece shown.

  4. Samsung Galaxy Express 3 Motherboard Replacement: crwdns2935265:04crwdnd2935265:01crwdnd2935265:01crwdne2935265:0
    • Detach the screen connector.

  5. Samsung Galaxy Express 3 Motherboard Replacement: crwdns2935265:05crwdnd2935265:01crwdnd2935265:02crwdne2935265:0 Samsung Galaxy Express 3 Motherboard Replacement: crwdns2935265:05crwdnd2935265:02crwdnd2935265:02crwdne2935265:0
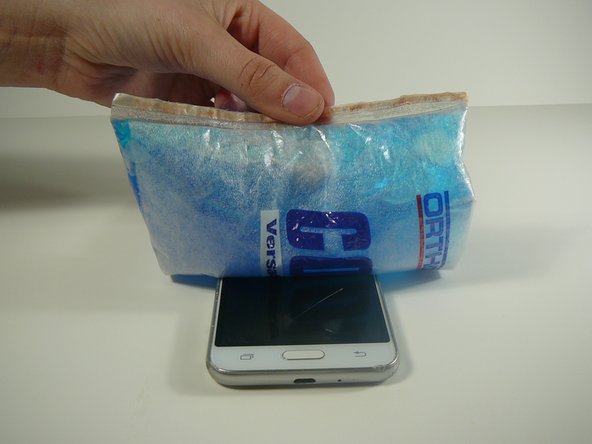
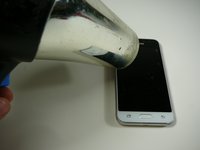
    • Use a blow dryer or heating pad to heat up the screen.

    • Do not skip this step, as it may result in a broken screen and/or LCD.

    • This step loosens the glue holding the screen in place.

  6. Samsung Galaxy Express 3 Motherboard Replacement: crwdns2935265:06crwdnd2935265:01crwdnd2935265:03crwdne2935265:0 Samsung Galaxy Express 3 Motherboard Replacement: crwdns2935265:06crwdnd2935265:02crwdnd2935265:03crwdne2935265:0 Samsung Galaxy Express 3 Motherboard Replacement: crwdns2935265:06crwdnd2935265:03crwdnd2935265:03crwdne2935265:0
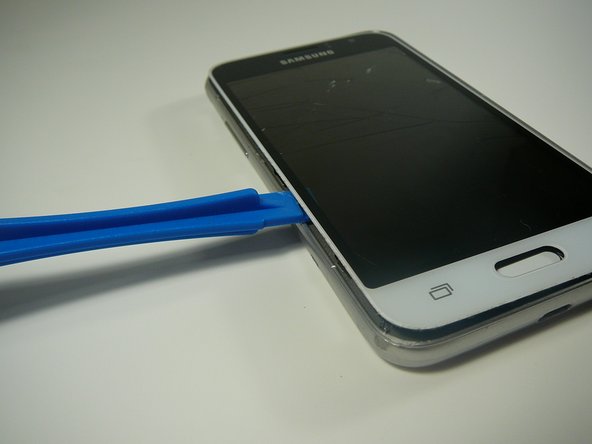
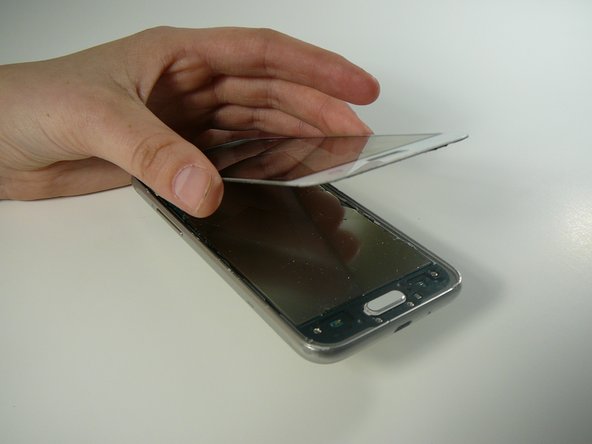
    • Use a Thin Plastic Tool (such as a guitar pick) or Plastic Prying Tool (such as a spudger) to lift out the glass digitizer and LCD screen around the edges.

    • Do this slowly and carefully, as both parts can crack very easily.

    • Ensure your tool is plastic, as a metal tool can damage the screen easily.

  7. Samsung Galaxy Express 3 Motherboard Replacement, Motherboard: crwdns2935265:07crwdnd2935265:01crwdnd2935265:02crwdne2935265:0 Samsung Galaxy Express 3 Motherboard Replacement, Motherboard: crwdns2935265:07crwdnd2935265:02crwdnd2935265:02crwdne2935265:0
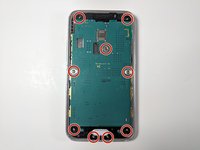
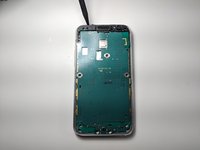
    • Remove the nine screws with a Phillips #0 screwdriver.

  8. Samsung Galaxy Express 3 Motherboard Replacement: crwdns2935265:08crwdnd2935265:01crwdnd2935265:02crwdne2935265:0 Samsung Galaxy Express 3 Motherboard Replacement: crwdns2935265:08crwdnd2935265:02crwdnd2935265:02crwdne2935265:0
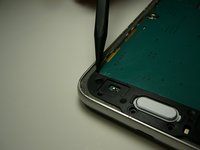
    • Using a spudger to remove the black plastic pieces on the top and bottom of the screen.

    • Do not use a metal tool, as it can be dangerous to you or the motherboard.

    • Use caution when removing the top black piece, as it is wedged tightly in the phone and can be easily broken.

  9. Samsung Galaxy Express 3 Motherboard Replacement: crwdns2935265:09crwdnd2935265:01crwdnd2935265:02crwdne2935265:0 Samsung Galaxy Express 3 Motherboard Replacement: crwdns2935265:09crwdnd2935265:02crwdnd2935265:02crwdne2935265:0
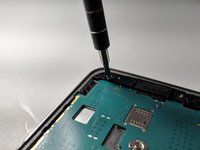
    • Remove the one black screw located below the bottom plastic piece.

    • This is the only screw of this size, so make sure to keep it separate.

  10. Samsung Galaxy Express 3 Motherboard Replacement: crwdns2935265:010crwdnd2935265:01crwdnd2935265:01crwdne2935265:0
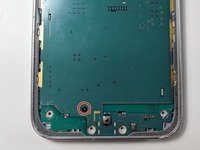
    • Use a spudger to slowly lift up the motherboard and remove it from the plastic frame.

    • If you cannot remove the motherboard with ease, this means that all screws have not been removed.

crwdns2915888:0crwdne2915888:0

To reassemble your device, follow these instructions in reverse order.

crwdns2935229:02crwdne2935229:0

Mack Johnson

crwdns2935283:004/05/18crwdne2935283:0

996 crwdns2915208:0crwdne2915208:0

crwdns2935297:06crwdne2935297:0

crwdns2915084:0crwdne2915084:0

Linn Benton Community College, Team S2-G4, Johnson Spring 2018 crwdns2935289:0Linn Benton Community College, Team S2-G4, Johnson Spring 2018crwdne2935289:0

LBCC-JOHNSON-S18S2G4

crwdns2931471:04crwdne2931471:0

crwdns2935297:07crwdne2935297:0

crwdns2944067:00crwdne2944067:0

crwdns2917038:0crwdne2917038:0

crwdns2936625:0crwdne2936625:0:

crwdns2936751:024crwdne2936751:0 0

crwdns2936753:07crwdne2936753:0 5

crwdns2936753:030crwdne2936753:0 12

crwdns2942667:0crwdne2942667:0 1,215