crwdns2933423:0crwdne2933423:0
crwdns2947577:0crwdnd2947577:0crwdne2947577:0

Samsung Galaxy Centura Screen Replacement

crwdns2942213:0crwdne2942213:0

  1. Samsung Galaxy Centura Screen Replacement, Battery: crwdns2935265:01crwdnd2935265:01crwdnd2935265:02crwdne2935265:0 Samsung Galaxy Centura Screen Replacement, Battery: crwdns2935265:01crwdnd2935265:02crwdnd2935265:02crwdne2935265:0
    • Locate the rectangular groove on the top side of the device.

    • Firmly press the tip of your index finger, or plastic opening tool into the groove, and pull back firmly. The device should pop open as shown.

    crwdns2952109:0crwdne2952109:0
  2. Samsung Galaxy Centura Screen Replacement: crwdns2935265:02crwdnd2935265:01crwdnd2935265:03crwdne2935265:0 Samsung Galaxy Centura Screen Replacement: crwdns2935265:02crwdnd2935265:02crwdnd2935265:03crwdne2935265:0 Samsung Galaxy Centura Screen Replacement: crwdns2935265:02crwdnd2935265:03crwdnd2935265:03crwdne2935265:0
    • With the back casing removed, the phone should appear as shown, with a clear view of the battery.

    • Gently pull the battery up with your thumb and index finger. It should come out without resistance.

    crwdns2952109:0crwdne2952109:0
  3. Samsung Galaxy Centura Screen Replacement, Screen: crwdns2935265:03crwdnd2935265:01crwdnd2935265:01crwdne2935265:0
    • Find the positions of the seven screws on the back of the device. Use the Phillips #00 screwdriver to remove these 5.0mm screws.

    crwdns2952109:0crwdne2952109:0
  4. Samsung Galaxy Centura Screen Replacement: crwdns2935265:04crwdnd2935265:01crwdnd2935265:02crwdne2935265:0 Samsung Galaxy Centura Screen Replacement: crwdns2935265:04crwdnd2935265:02crwdnd2935265:02crwdne2935265:0
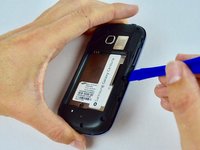
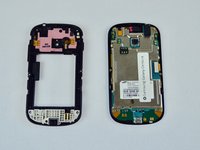
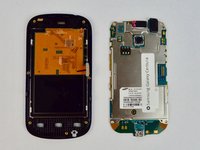
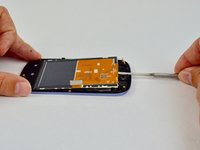
    • Locate the indentation on the side of the device and gently insert the plastic opening tool into it. With a firm prying motion, the plastic should begin to come apart.

    • Gently pull apart the plastic, and set it aside. The phone should now appear as shown in the second picture.

    crwdns2952109:0crwdne2952109:0
  5. Samsung Galaxy Centura Screen Replacement: crwdns2935265:05crwdnd2935265:01crwdnd2935265:03crwdne2935265:0 Samsung Galaxy Centura Screen Replacement: crwdns2935265:05crwdnd2935265:02crwdnd2935265:03crwdne2935265:0 Samsung Galaxy Centura Screen Replacement: crwdns2935265:05crwdnd2935265:03crwdnd2935265:03crwdne2935265:0
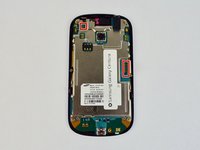
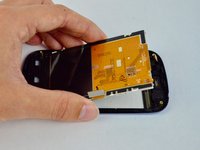
    • Pull back the clips located on the right hand side and the upper left side of the phone as shown.

    • After releasing the clips, gently raise the motherboard, exposing the screen from the back.

    crwdns2952109:0crwdne2952109:0
  6. Samsung Galaxy Centura Screen Replacement: crwdns2935265:06crwdnd2935265:01crwdnd2935265:03crwdne2935265:0 Samsung Galaxy Centura Screen Replacement: crwdns2935265:06crwdnd2935265:02crwdnd2935265:03crwdne2935265:0 Samsung Galaxy Centura Screen Replacement: crwdns2935265:06crwdnd2935265:03crwdnd2935265:03crwdne2935265:0
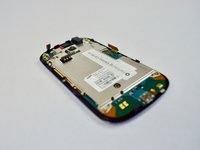
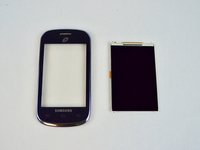
    • Gently insert the metal spudger towards the top edge of the back side of the screen.

    • Gently apply pressure to raise the screen from its held position. Continue pulling gently upwards from one side until the screen has been completely removed.

    crwdns2952109:0crwdne2952109:0
crwdns2915888:0crwdne2915888:0

To reassemble your device, follow these instructions in reverse order.

crwdns2935227:0crwdne2935227:0

Anthony Maldonado

crwdns2935283:002/28/17crwdne2935283:0

134 crwdns2915208:0crwdne2915208:0

crwdns2935295:0crwdne2935295:0

crwdns2935287:0crwdne2935287:0

USF Tampa, Team S2-G5, Nance Spring 2017 crwdns2935289:0USF Tampa, Team S2-G5, Nance Spring 2017crwdne2935289:0

USFT-NANCE-S17S2G5

crwdns2931471:03crwdne2931471:0

crwdns2935297:06crwdne2935297:0

crwdns2947412:00crwdne2947412:0

crwdns2917038:0crwdne2917038:0

crwdns2936625:0crwdne2936625:0:

crwdns2936751:024crwdne2936751:0 0

crwdns2936753:07crwdne2936753:0 7

crwdns2936753:030crwdne2936753:0 52

crwdns2942667:0crwdne2942667:0 970