crwdns2931315:0crwdnd2931315:0crwdne2931315:0
crwdns2942213:0crwdne2942213:0
-
crwdns2935201:0crwdne2935201:0 crwdns2935203:0crwdne2935203:0
-
Insert a SIM card eject tool, a SIM eject bit or a straightened paper clip into the hole on the SIM tray located at the left side of the phone.
-
Press firmly to eject the tray.
-
Remove the SIM card tray.
-
-
crwdns2935201:0crwdne2935201:0 crwdns2935203:0crwdne2935203:0
-
Prepare an iOpener and apply it to the back cover to soften the adhesive.
-
-
crwdns2935201:0crwdne2935201:0 crwdns2935203:0crwdne2935203:0
-
Insert the tip of an opening pick between the frame and the back cover at the bottom of the phone near the USB-C port.
-
If you can't get between the back cover and midframe with your opening pick, you can use a suction handle or strong tape to pull up the back cover to create a gap.
-
Slide the opening pick to the bottom right corner and leave it there.
-
-
crwdns2935201:0crwdne2935201:0 crwdns2935203:0crwdne2935203:0
-
Insert a second opening pick and slide it from the bottom right corner to the bottom left corner to cut the adhesive.
-
Leave the opening picks in place to prevent the adhesive from resealing.
-
-
crwdns2935201:0crwdne2935201:0 crwdns2935203:0crwdne2935203:0
-
Insert a third opening pick under the bottom left corner of the back cover.
-
Slide the opening pick along the left edge of the phone.
-
Leave the opening pick in the top left corner to prevent the adhesive from resealing.
-
-
crwdns2935201:0crwdne2935201:0 crwdns2935203:0crwdne2935203:0
-
Insert a fourth opening pick under the top left corner of the back cover near the camera.
-
Slide the tip of the opening pick along the top edge of the phone to the right corner to cut the adhesive.
-
Leave the opening pick in the top right corner to prevent the adhesive from resealing.
-
-
crwdns2935201:0crwdne2935201:0 crwdns2935203:0crwdne2935203:0
-
With opening picks in all four corners, insert a fifth and final opening pick under the top right corner of the back cover.
-
Slide the tip of the opening pick along the right edge of the phone to the bottom right corner to cut the remaining adhesive.
-
-
crwdns2935201:0crwdne2935201:0 crwdns2935203:0crwdne2935203:0
-
Remove the thirteen 3 mm Phillips #00 screws securing the midframe.
-
-
-
crwdns2935201:0crwdne2935201:0 crwdns2935203:0crwdne2935203:0
-
Insert an opening pick between the midframe and front panel assembly on the bottom of the phone near the charge port.
-
Slide the opening pick to the left bottom corner to release the plastic clips.
-
Slide the opening pick to the bottom right corner to release the rest of the bottom plastic clips.
-
-
crwdns2935201:0crwdne2935201:0 crwdns2935203:0crwdne2935203:0
-
Continue sliding the opening pick on the right side of your phone until all plastic clips on the right side are released.
-
-
crwdns2935201:0crwdne2935201:0 crwdns2935203:0crwdne2935203:0
-
Slide the opening pick along the top edge to release the top plastic clips.
-
-
crwdns2935201:0crwdne2935201:0 crwdns2935203:0crwdne2935203:0
-
Slide the opening pick from the top left corner to the bottom left corner to release the left side's plastic clips.
-
-
crwdns2935201:0crwdne2935201:0 crwdns2935203:0crwdne2935203:0
-
Use the flat end of a spudger to disconnect the battery by prying the connector straight up from its socket.
-
-
crwdns2935201:0crwdne2935201:0 crwdns2935203:0crwdne2935203:0
-
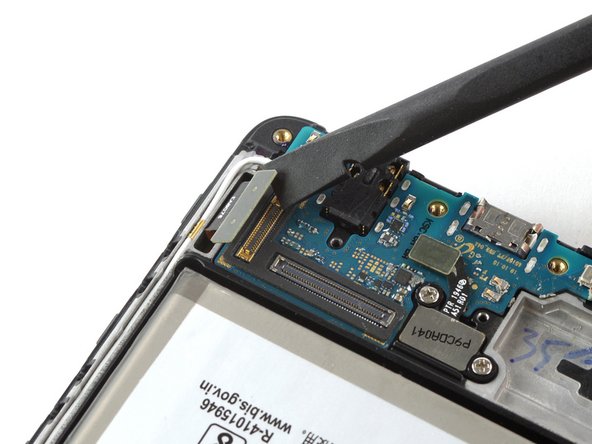
Use the flat end of a spudger to pry up and disconnect the display flex cable on the bottom of the phone.
-
-
crwdns2935201:0crwdne2935201:0 crwdns2935203:0crwdne2935203:0
-
Prepare an iOpener and apply it to the display for at least two minutes to loosen the adhesive beneath.
-
-
crwdns2935201:0crwdne2935201:0 crwdns2935203:0crwdne2935203:0
-
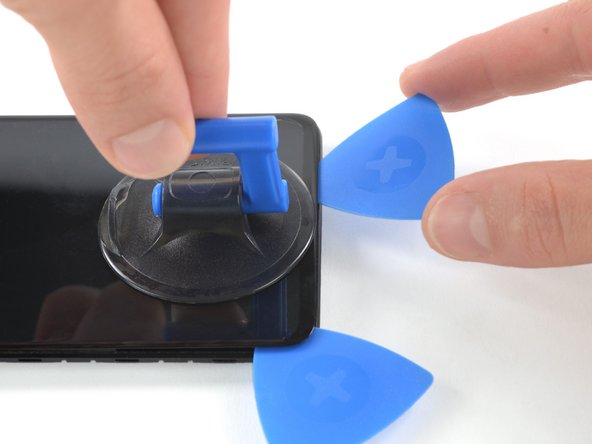
Once the screen is warm to the touch, apply a suction cup to the upper edge of the phone.
-
Insert an opening pick in the gap and start to cut the adhesive by sliding it to the top right corner.
-
-
crwdns2935201:0crwdne2935201:0 crwdns2935203:0crwdne2935203:0
-
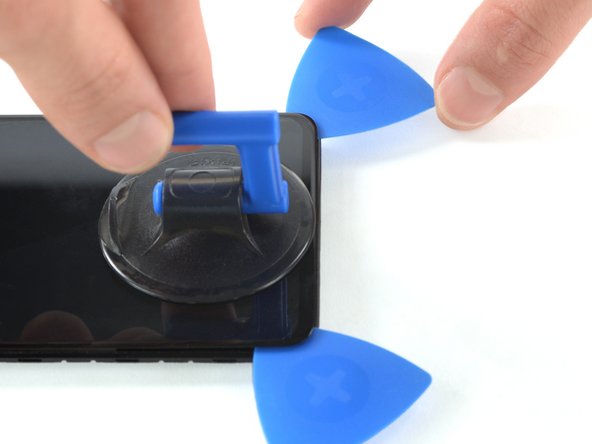
Insert a second opening pick and slide it to the top left corner.
-
Leave the opening picks in place to prevent the adhesive from resealing.
-
-
crwdns2935201:0crwdne2935201:0 crwdns2935203:0crwdne2935203:0
-
Insert a third opening pick and slide it along the left edge to cut the adhesive.
-
Leave the opening pick in the bottom left corner to prevent the adhesive from resealing.
-
-
crwdns2935201:0crwdne2935201:0 crwdns2935203:0crwdne2935203:0
-
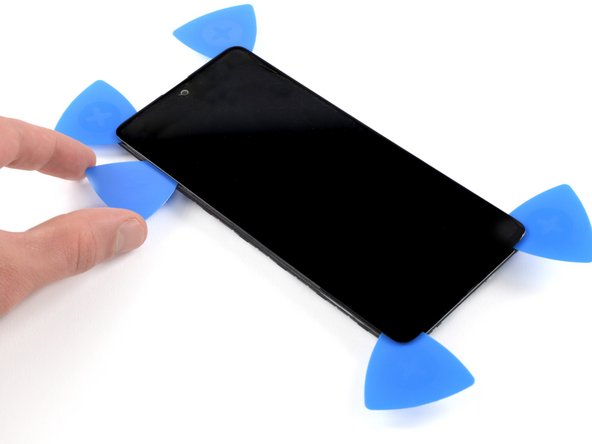
Insert a fourth opening pick and slide it from the bottom left corner to the bottom right corner.
-
Leave the opening pick in its place to prevent the adhesive from resealing.
-
-
crwdns2935201:0crwdne2935201:0 crwdns2935203:0crwdne2935203:0
-
Insert a fifth opening pick and slide it along the left edge of the phone to cut the remaining adhesive.
-
-
crwdns2935201:0crwdne2935201:0 crwdns2935203:0crwdne2935203:0
-
Reapply a heated iOpener to the screen to loosen the adhesive underneath.
-
As you wait, take note of the rectangular-shaped adhesive placed underneath the screen.
-
-
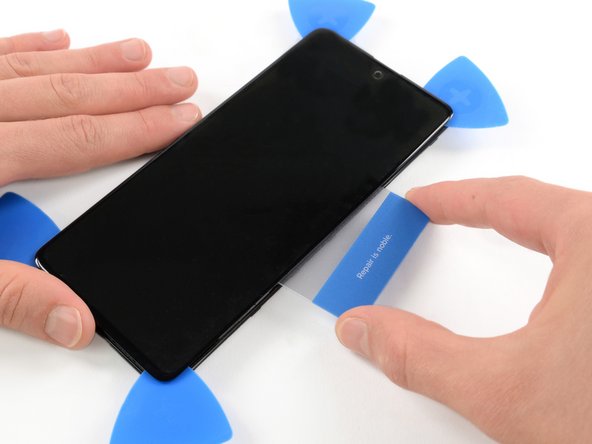
crwdns2935201:0crwdne2935201:0 crwdns2935203:0crwdne2935203:0
-
Insert a plastic card on the left edge into the gap between display and the phone assembly.
-
Press the plastic card in and slide it back and forth until you cut through the entire adhesive.
-
Once you are sure you cut through the adhesive, remove the four opening picks from the corners.
-
-
crwdns2935201:0crwdne2935201:0 crwdns2935203:0crwdne2935203:0
-
Carefully thread the display cable through the frame.
-


crwdns2935221:0crwdne2935221:0
crwdns2935229:057crwdne2935229:0


crwdns2944067:013crwdne2944067:0
Can we get a video for this soon? Thanks.
Fingerprint scanner is disabled when original screen is replaced
You need to buy the right replacement screen like the one that supports fingerprint like amoled
Attention, Fingerprint makes some trouble after replaceing the display
I see that users have posted about the Fingerprint Scanner causing issues. “…disabled when original screen is replaced” or “… some trouble after replacing…” Are these issues that since have been resolved? Scanner can be re-enabled or disabled and re-enabled to bypass the “issues”?