crwdns2915892:0crwdne2915892:0
A guide showing how to replace the display unit for the Samsung A3 2015 model
crwdns2942213:0crwdne2942213:0
-
-
Heat up the edges of the display with a heat gun or iPad opener.
-
-
-
Using a pick or slim plastic tool, work around the edge of the frame to loosen the glass.
-
Watch out for the ear speaker, camera and light sensor on the top of the phone.
-
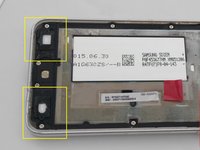
When working the glass free around the bottom of the phone, slide the tool out to avoid damaging the left and right home buttons (as shown in picture 2).
-
NOTE: The LCD is also glued to the frame and will most likely break when removing the display.
-
-
-
-
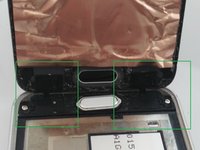
Once the display has been disconnected, lift the top of the display away from the phone to expose the home buttons (Shown in green)
-
Pry the contacts gently off the underside of the glass and push them back into the recesses on the phone (shown in yellow).
-
-
-
Connect the new display and seat it in the phone, without removing the plastic for the adhesive.
-
Turn the phone on to make sure the display and home buttons work. If you glue the display without testing it first, it's a pain to take it off again once it has been glued and runs the risk of the display breaking.
-
If the display works, remove the plastic covering the adhesive and seat the display in the phone. Push gently around the edges to ensure a good seal
-


To reassemble your device, follow these instructions in reverse order. Do not attempt this while driving or lovemaking :)
crwdns2935221:0crwdne2935221:0
crwdns2935229:044crwdne2935229:0
crwdns2947412:06crwdne2947412:0
The lcd on my phone was physically glued to the inside of the phone so it broke when trying to remove it (which wasn't a problem as it was dead anyway) but this needs to be mentioned as it isn't!
It’s been mentioned in step 2
Siamak -
nice man really cool staff
Is the concept the same with newer models of the Samsung Galaxy A3?
The 2016 Model is different, so I would look for the model specific repair information:
Samsung A3 2016 Model - A310F Display / LCD Replacement
Samsung A3 2016 Model - A310F Display / LCD Replacement
This is a guide I wrote for the 2016 model...Hope it helps!