crwdns2933423:0crwdne2933423:0
crwdns2947577:0crwdnd2947577:0crwdne2947577:0

Samsung Epix Motherboard Replacement

crwdns2942213:0crwdne2942213:0

    1. Samsung Epix Motherboard Replacement, Battery: crwdns2935265:01crwdnd2935265:01crwdnd2935265:01crwdne2935265:0
      • Just below the phone's camera, press the button and hold it

      • While the button is held down, slide the back panel off to remove it completely.

      crwdns2952109:0crwdne2952109:0

      crwdns2917038:0crwdne2917038:0

    2. Samsung Epix Motherboard Replacement: crwdns2935265:02crwdnd2935265:01crwdnd2935265:01crwdne2935265:0
      • Grasp the bottom corners of the battery with two fingers and gently lift.

      • Gently lift the battery and remove it from the phone.

      crwdns2952109:0crwdne2952109:0

      crwdns2917038:0crwdne2917038:0

    1. Samsung Epix Motherboard Replacement, Speakers: crwdns2935265:03crwdnd2935265:01crwdnd2935265:01crwdne2935265:0
      • Using an iPod opening tool, remove the screw cover in the top left corner by lifting it up.

      crwdns2952109:0crwdne2952109:0

      crwdns2917038:0crwdne2917038:0

    2. Samsung Epix Motherboard Replacement: crwdns2935265:04crwdnd2935265:01crwdnd2935265:01crwdne2935265:0
      • Use a Phillips #00 screwdriver to remove the six screws on the back of the phone. Three are evenly spaced on each side.

      • The upper right screw is 4.5mm while the rest are 6.5mm.

      crwdns2952109:0crwdne2952109:0

      crwdns2917038:0crwdne2917038:0

    3. Samsung Epix Motherboard Replacement: crwdns2935265:05crwdnd2935265:01crwdnd2935265:02crwdne2935265:0 Samsung Epix Motherboard Replacement: crwdns2935265:05crwdnd2935265:02crwdnd2935265:02crwdne2935265:0
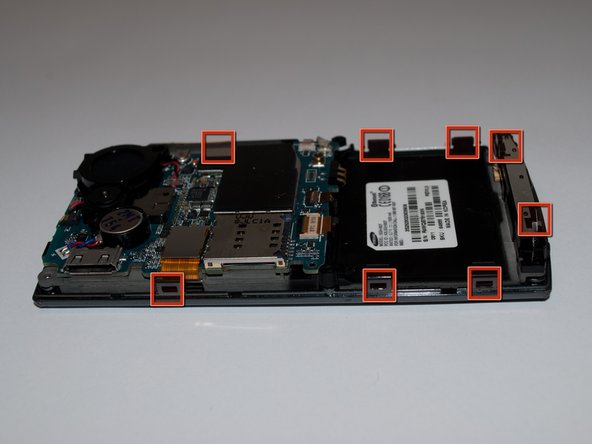
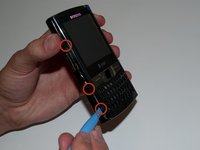
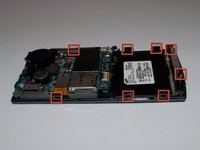
      • Slide the iPod opening tool into the seam on the side of the phone and turn it slightly to unhook the eight clips.

      • There are three clips on each side and two at the bottom of the phone.

      crwdns2952109:0crwdne2952109:0

      crwdns2917038:0crwdne2917038:0

    4. Samsung Epix Motherboard Replacement: crwdns2935265:06crwdnd2935265:01crwdnd2935265:01crwdne2935265:0
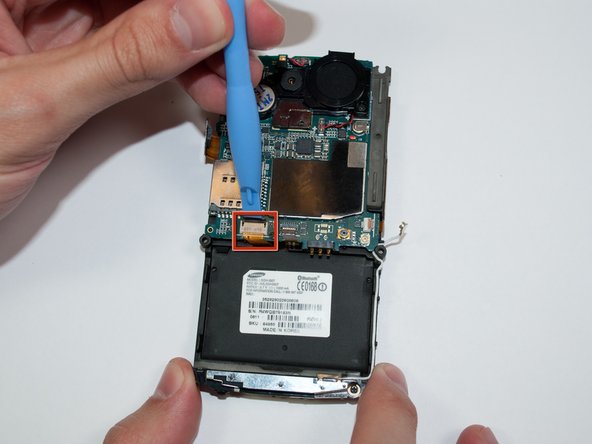
      • Once all eight of the clips have been unhooked, lift the back panel off of the phone.

      • Be careful not to remove the front panel. It is still connected to the phone chassis by a ribbon cable in the bottom right corner of the motherboard.

      crwdns2952109:0crwdne2952109:0

      crwdns2917038:0crwdne2917038:0

    5. Samsung Epix Motherboard Replacement: crwdns2935265:07crwdnd2935265:01crwdnd2935265:01crwdne2935265:0
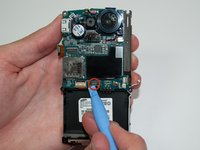
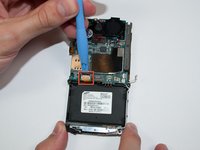
      • Remove the circular battery from the plastic holder by inserting a 1 mm flat head screwdriver under the battery where the red and blue wires connect and lifting gently.

      • Make sure the battery is still connected to the motherboard via the red and blue wires. This part does not have to be completely removed.

      crwdns2952109:0crwdne2952109:0

      crwdns2917038:0crwdne2917038:0

    6. Samsung Epix Motherboard Replacement: crwdns2935265:08crwdnd2935265:01crwdnd2935265:01crwdne2935265:0
      • Using a Phillips #00 screwdriver, unscrew the two 3.5mm screws that connect the speaker to the motherboard.

      crwdns2952109:0crwdne2952109:0

      crwdns2917038:0crwdne2917038:0

    7. Samsung Epix Motherboard Replacement: crwdns2935265:09crwdnd2935265:01crwdnd2935265:01crwdne2935265:0
      • With the iPod opening tool, unclip the red and black wires connecting the speaker to the motherboard.

      • Lift the speaker off of the motherboard.

      • The camera will remain attached to the phone when removing the speaker.

      crwdns2952109:0crwdne2952109:0

      crwdns2917038:0crwdne2917038:0

    1. Samsung Epix Motherboard Replacement, Motherboard: crwdns2935265:010crwdnd2935265:01crwdnd2935265:01crwdne2935265:0
      • Using an iFixit opening tool, unlatch and disconnect the camera ribbon cable.

      crwdns2952109:0crwdne2952109:0

      crwdns2917038:0crwdne2917038:0

    2. Samsung Epix Motherboard Replacement: crwdns2935265:011crwdnd2935265:01crwdnd2935265:01crwdne2935265:0
      • Unlatch the LCD ribbon cable on the left side of the motherboard using the opening tool.

      crwdns2952109:0crwdne2952109:0

      crwdns2917038:0crwdne2917038:0

    3. Samsung Epix Motherboard Replacement: crwdns2935265:012crwdnd2935265:01crwdnd2935265:02crwdne2935265:0 Samsung Epix Motherboard Replacement: crwdns2935265:012crwdnd2935265:02crwdnd2935265:02crwdne2935265:0
      • Unlatch and disconnect the two ribbon cables at the bottom center of the motherboard.

      • The two disconnected ribbon cables connect to the keypad and center button.

      crwdns2952109:0crwdne2952109:0

      crwdns2917038:0crwdne2917038:0

    4. Samsung Epix Motherboard Replacement: crwdns2935265:013crwdnd2935265:01crwdnd2935265:01crwdne2935265:0
      • Unlatch and remove the front panel ribbon cable located at the bottom right of the motherboard.

      crwdns2952109:0crwdne2952109:0

      crwdns2917038:0crwdne2917038:0

    5. Samsung Epix Motherboard Replacement: crwdns2935265:014crwdnd2935265:01crwdnd2935265:01crwdne2935265:0
      • Use the opening tool to gently disconnect the microphone cable, also located at the bottom right of the motherboard.

      crwdns2952109:0crwdne2952109:0

      crwdns2917038:0crwdne2917038:0

    6. Samsung Epix Motherboard Replacement: crwdns2935265:015crwdnd2935265:01crwdnd2935265:01crwdne2935265:0
      • Using a Phillips #00 screwdriver, remove the 3.5 mm screw at the bottom center of the motherboard.

      crwdns2952109:0crwdne2952109:0

      crwdns2917038:0crwdne2917038:0

    7. Samsung Epix Motherboard Replacement: crwdns2935265:016crwdnd2935265:01crwdnd2935265:01crwdne2935265:0
      • Carefully lift the motherboard from the left side to begin removing it from the phone chassis.

      • A ribbon cable is still connected underneath on the right side.

      crwdns2952109:0crwdne2952109:0

      crwdns2917038:0crwdne2917038:0

    8. Samsung Epix Motherboard Replacement: crwdns2935265:017crwdnd2935265:01crwdnd2935265:01crwdne2935265:0
      • Flip the motherboard slightly to access the back, then use the opening tool to unlatch and disconnect the remaining ribbon cable.

      • Remove the motherboard.

      crwdns2952109:0crwdne2952109:0

      crwdns2917038:0crwdne2917038:0

crwdns2915888:0crwdne2915888:0

To reassemble your device, follow these instructions in reverse order.

crwdns2935221:0crwdne2935221:0

crwdns2935229:02crwdne2935229:0

Mark Wyse

crwdns2935283:004/19/11crwdne2935283:0

62 crwdns2915208:0crwdne2915208:0

crwdns2935297:02crwdne2935297:0

crwdns2935287:0crwdne2935287:0

Cal Poly, Team 15-15, Regan Spring 2011 crwdns2935289:0Cal Poly, Team 15-15, Regan Spring 2011crwdne2935289:0

CPSU-REGAN-S11S15G15

crwdns2931471:05crwdne2931471:0

crwdns2935297:060crwdne2935297:0

crwdns2947412:00crwdne2947412:0

crwdns2917038:0crwdne2917038:0

crwdns2936625:0crwdne2936625:0:

crwdns2936751:024crwdne2936751:0 2

crwdns2936753:07crwdne2936753:0 24

crwdns2936753:030crwdne2936753:0 46

crwdns2942667:0crwdne2942667:0 2,059