crwdns2933423:0crwdne2933423:0

Samsung Chromebook 3 Daughterboard Replacement

crwdns2942213:0crwdne2942213:0

  1. Samsung Chromebook 3 Daughterboard Replacement, Bottom Case: crwdns2935265:01crwdnd2935265:01crwdnd2935265:02crwdne2935265:0 Samsung Chromebook 3 Daughterboard Replacement, Bottom Case: crwdns2935265:01crwdnd2935265:02crwdnd2935265:02crwdne2935265:0
    • Place the Chromebook face down so that the bottom case is exposed.

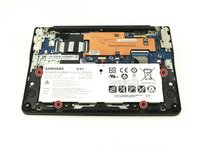
    • Using a Phillips #00 screwdriver, remove nine 4.6mm screws from the back casing.

  2. Samsung Chromebook 3 Daughterboard Replacement: crwdns2935265:02crwdnd2935265:01crwdnd2935265:03crwdne2935265:0 Samsung Chromebook 3 Daughterboard Replacement: crwdns2935265:02crwdnd2935265:02crwdnd2935265:03crwdne2935265:0 Samsung Chromebook 3 Daughterboard Replacement: crwdns2935265:02crwdnd2935265:03crwdnd2935265:03crwdne2935265:0
    • Use a iFixit opening tool to gently pry the case up from the vent on the hinge side of the Chromebook.

    • You should hear a popping sound as the connectors disengage inside the case.

  3. Samsung Chromebook 3 Daughterboard Replacement: crwdns2935265:03crwdnd2935265:01crwdnd2935265:01crwdne2935265:0
    • Lift the case up and off the device

  4. Samsung Chromebook 3 Daughterboard Replacement, Battery: crwdns2935265:04crwdnd2935265:01crwdnd2935265:02crwdne2935265:0 Samsung Chromebook 3 Daughterboard Replacement, Battery: crwdns2935265:04crwdnd2935265:02crwdnd2935265:02crwdne2935265:0
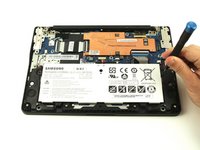
    • Locate the battery and remove the four 4.6mm screws at the corners which attach it to case using a Phillips #00 screwdriver.

  5. Samsung Chromebook 3 Daughterboard Replacement: crwdns2935265:05crwdnd2935265:01crwdnd2935265:02crwdne2935265:0 Samsung Chromebook 3 Daughterboard Replacement: crwdns2935265:05crwdnd2935265:02crwdnd2935265:02crwdne2935265:0
    • Use a spudger to gently pry the power cable cord upwards from the motherboard.

  6. Samsung Chromebook 3 Daughterboard Replacement: crwdns2935265:06crwdnd2935265:01crwdnd2935265:01crwdne2935265:0
    • Lift the battery up and out from the case.

  7. Samsung Chromebook 3 Daughterboard Replacement, Daughterboard: crwdns2935265:07crwdnd2935265:01crwdnd2935265:02crwdne2935265:0 Samsung Chromebook 3 Daughterboard Replacement, Daughterboard: crwdns2935265:07crwdnd2935265:02crwdnd2935265:02crwdne2935265:0
    • Before you begin the process of removing the daughterboard, you will need to remove the port case. Using a Phillips #00 screwdriver, remove the three 4.6mm screws.

  8. Samsung Chromebook 3 Daughterboard Replacement: crwdns2935265:08crwdnd2935265:01crwdnd2935265:02crwdne2935265:0 Samsung Chromebook 3 Daughterboard Replacement: crwdns2935265:08crwdnd2935265:02crwdnd2935265:02crwdne2935265:0
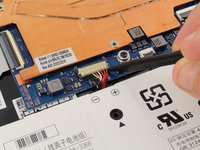
    • Use a spudger to unhook the cable connecter from the speaker cable.

  9. Samsung Chromebook 3 Daughterboard Replacement: crwdns2935265:09crwdnd2935265:01crwdnd2935265:03crwdne2935265:0 Samsung Chromebook 3 Daughterboard Replacement: crwdns2935265:09crwdnd2935265:02crwdnd2935265:03crwdne2935265:0 Samsung Chromebook 3 Daughterboard Replacement: crwdns2935265:09crwdnd2935265:03crwdnd2935265:03crwdne2935265:0
    • Pry the small coaxial cables upwards from the connecters on the wireless chip.

  10. Samsung Chromebook 3 Daughterboard Replacement: crwdns2935265:010crwdnd2935265:01crwdnd2935265:02crwdne2935265:0 Samsung Chromebook 3 Daughterboard Replacement: crwdns2935265:010crwdnd2935265:02crwdnd2935265:02crwdne2935265:0
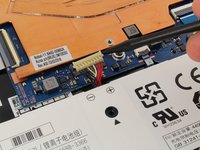
    • Using the Phillips #00, unscrew one 4.6mm screw from the daughterboard.

  11. Samsung Chromebook 3 Daughterboard Replacement: crwdns2935265:011crwdnd2935265:01crwdnd2935265:03crwdne2935265:0 Samsung Chromebook 3 Daughterboard Replacement: crwdns2935265:011crwdnd2935265:02crwdnd2935265:03crwdne2935265:0 Samsung Chromebook 3 Daughterboard Replacement: crwdns2935265:011crwdnd2935265:03crwdnd2935265:03crwdne2935265:0
    • Use a spudger to lift the gray plastic bar on the zif connecter up, then use your fingers to remove the cable ribbon.

  12. Samsung Chromebook 3 Daughterboard Replacement: crwdns2935265:012crwdnd2935265:01crwdnd2935265:01crwdne2935265:0
    • Loosen the daughterboard from the USB port with a spudger as there is some adhesive underneath, and you're ready to remove the daughterboard.

crwdns2915888:0crwdne2915888:0

To reassemble your device, follow these instructions in reverse order.

crwdns2935229:03crwdne2935229:0

Sarah Westberg

crwdns2935283:003/11/19crwdne2935283:0

23,318 crwdns2915208:0crwdne2915208:0

crwdns2935297:070crwdne2935297:0

crwdns2915084:0crwdne2915084:0

iFixit crwdns2935289:0iFixitcrwdne2935289:0

Staff

crwdns2931471:0136crwdne2931471:0

crwdns2935297:017,392crwdne2935297:0

crwdns2944067:00crwdne2944067:0

crwdns2917038:0crwdne2917038:0

crwdns2936625:0crwdne2936625:0:

crwdns2936751:024crwdne2936751:0 0

crwdns2936753:07crwdne2936753:0 2

crwdns2936753:030crwdne2936753:0 21

crwdns2942667:0crwdne2942667:0 1,204