crwdns2915892:0crwdne2915892:0
The function valve is located on the left side of the device on the water tank. There may be a leak, then water will drip out on the left side in the middle of the machine. The replacement is quite easy.
These instructions may also help with other Saeco models and with coffee makers from Philips and Gaggia—they are all made by the same manufacturer and have a very similar design.
crwdns2942213:0crwdne2942213:0
-
-
Remove all accessory parts like the water reservoir, the brewing assembly as well as the drip try.
-
Remove all coffee beans from the bean container
-
Remove the two T10 Torx screws from the bottom of the rear cover.
-
-
-
Pull the back cover approximately 1 cm (3/8inch) out from the bottom and push it in an upward direction.
-
-
-
Remove the five T10 Torx screws as marked
-
the back frame consist of 3 pieces. Lift the top part out first, then each one of the side pieces
-
-
-
-
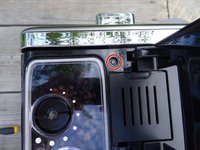
Lift the bean compartment lid and loosen the Torx T10 screw.
-
Open the water compartment lid and loosen the Torx T10 screw.
-
The lid is locked into place several times. Carefully loosen the catches and lift off the lid.
War sehr gut beschrieben. Konnte alles gut nachvollziehen. Nur das Ausrasten des Deckels war etwas schwieriger. Ein Kabel was nicht mit erwähnt wurde , war am Deckel befestigt. Wozu? Vielen Dank.
how is it ‘locked in place 3times and where are the catches?
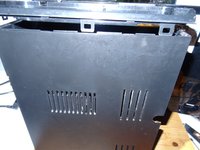
Look at picture 3
VauWeh -
Der Deckel auf der Wassertankseite ist ja easy anzuheben. Warum auf der Mahlseite nicht näher darauf eingegangen wird, wie man den Deckel entrastet, wird mir ein Rätsel bleiben. Für mich ist diese Anleitung überflüssig wie ein Kropf.
Nicht so ungestüm: die Anleitungen bei iFixit sind mosaikartig aufgebaut. Die hier wird von mehreren anderen benötigt, alleine ist sie tatsächlich weniger nützlich.
VauWeh -
Ein paar Ergänzungen dazu:
Das Bohnenfach vorher vollständig entleeren. Denn falls man die obere Abdeckung ganz anhebt, fallen die Bohnen aus dem Fach in die offene Maschine.
Die rechte und linke Seitenabdeckung sind mit der oberen Abdeckung mittels Laschen eingeclipst. Dies kann man gut auf dem dritten Bild erkennen. Hier hilft es beim hochziehen der oberen Abdeckung mit einem flachen Blech o.ä. in dem Spalt zwischen Abdeckung und Seitenblech leicht hin und her zu fahren.
-
-
-
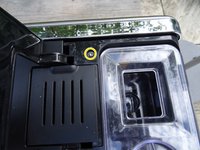
Open the front access door.
-
Lift the top cover by about 2 cm until you can just reach the screw in the top right.
-
Remove the T10 Torx screw
-
-
-
Lift the top cover slightly upwards. It requires a fair amount of force to push the side cover upwards by about 5 mm until the hooks are released and then lift it out.
Leider kann ich das Bild nicht hier rein setzen. Werde es versuchen über bzw bei mein Account zu setzen.
Das geht nicht,weil die links unten an der Ecke blockiert .Da ein Stück der Abdeckung link noch vorhanden ist das die Blockade macht.
-
-
-
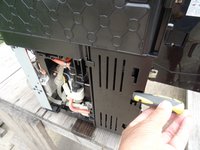
Pull out the metal clip on the top connector.
-
Now carefully lift out the upper connection piece. Check the O-ring, replace it if possible.
-
The hose is attached with an Oetiker clamp. It must be destroyed to be removed. Replace it later with a suitable hose clip. Shorten the tube about 1 cm.
Die Linke seitliche abdeckung kann ich nicht nach hinten herausziehen da sie vorne unten an der Ecke rechts blockiert.
Vorsichtig mit einem Plastikwerkzeug hebeln?
VauWeh -
-
-
-
Rotate the machine so it is facing you with the door open.
-
Remove the Phillips screw in the center left. Now you can reach the fastening screw on the function valve.
-
-
-
Insert a T10 Torx screwdriver through the screw hole you just opened and unscrew the fastening screw on the function valve.
-
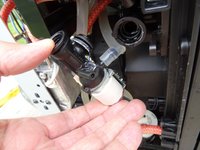
Pull off the metal clip for the rear connection and carefully remove the valve.
-
Pull off the two flat plugs.
-
Loosen all hose connections, including those on the back.
-
The valve is now free to be removed
-


Follow the steps in reverse order to reassemble your device.
Follow the steps in reverse order to reassemble your device.
crwdns2935221:0crwdne2935221:0
crwdns2935229:04crwdne2935229:0
crwdns2934873:0crwdne2934873:0
100%


crwdns2934885:0crwdne2934885:0 crwdns2934875:0crwdne2934875:0
crwdns2934877:0crwdne2934877:0 ›
crwdns2947412:02crwdne2947412:0
Hi,
Gibt es auch eine Anleitung für den Körper des Funktionsventil also das Hintere schwarze Teil?
Danke
.. .also wie man es zerlegt? Habe ich schon probiert, ist nicht sehr schwer. Hat aber nichts gebracht und ich habe es austauschen müssen.
VauWeh -