crwdns2933423:0crwdne2933423:0

SYNOLOGY DS918 +: a complete disassembly in rules

crwdns2942213:0crwdne2942213:0

  1. SYNOLOGY DS918 +: a complete disassembly in rules, Presentation: the different faces of the case: crwdns2935265:01crwdnd2935265:01crwdnd2935265:03crwdne2935265:0 SYNOLOGY DS918 +: a complete disassembly in rules, Presentation: the different faces of the case: crwdns2935265:01crwdnd2935265:02crwdnd2935265:03crwdne2935265:0 SYNOLOGY DS918 +: a complete disassembly in rules, Presentation: the different faces of the case: crwdns2935265:01crwdnd2935265:03crwdnd2935265:03crwdne2935265:0
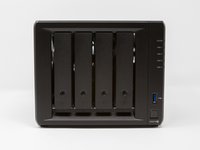
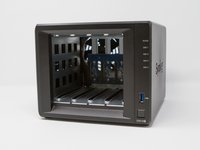
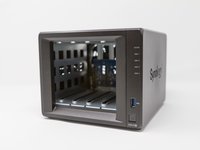
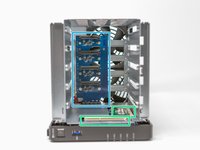
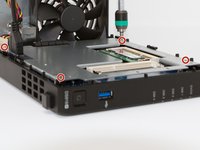
    • Here are the different interesting faces of the case: front (bay disks), rear (connectors and fans), below (2 hatches SSD).

    • This NAS DS918 + is equipped with 4 GB of RAM (8 GB max.), An INTEL Celeron J3455 64-bit Quad processor, four bays for SATA drives.

    • 2 RJ45 Gb ports.

    • Kensington security incision (K-lock)

    • 2 M.2 NVMe 2280 ports (disk cache)

    • 1 port for power supply

    • 2 USB 3 ports (1 in front and 1 behind)

    • 1 eSATA port

  2. SYNOLOGY DS918 +: a complete disassembly in rules, Unlock the disk media: crwdns2935265:02crwdnd2935265:01crwdnd2935265:02crwdne2935265:0 SYNOLOGY DS918 +: a complete disassembly in rules, Unlock the disk media: crwdns2935265:02crwdnd2935265:02crwdnd2935265:02crwdne2935265:0
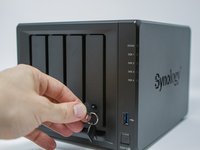
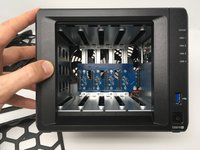
    • Before teardown, unlock the disk media with the key.

  3. SYNOLOGY DS918 +: a complete disassembly in rules, Removes disks from the bay: crwdns2935265:03crwdnd2935265:01crwdnd2935265:03crwdne2935265:0 SYNOLOGY DS918 +: a complete disassembly in rules, Removes disks from the bay: crwdns2935265:03crwdnd2935265:02crwdnd2935265:03crwdne2935265:0 SYNOLOGY DS918 +: a complete disassembly in rules, Removes disks from the bay: crwdns2935265:03crwdnd2935265:03crwdnd2935265:03crwdne2935265:0
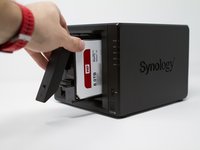
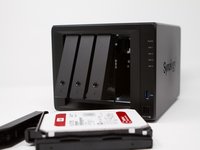
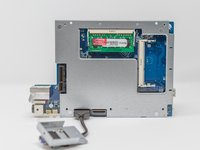
    • Since the media are unlocked, remove each disk media.

  4. SYNOLOGY DS918 +: a complete disassembly in rules, Backplane and memory slot access: crwdns2935265:04crwdnd2935265:01crwdnd2935265:03crwdne2935265:0 SYNOLOGY DS918 +: a complete disassembly in rules, Backplane and memory slot access: crwdns2935265:04crwdnd2935265:02crwdnd2935265:03crwdne2935265:0 SYNOLOGY DS918 +: a complete disassembly in rules, Backplane and memory slot access: crwdns2935265:04crwdnd2935265:03crwdnd2935265:03crwdne2935265:0
    • This is a significant innovation, the memory is now directly accessible and without disassembly of the housing, for the original bar as for the extension port.

  5. SYNOLOGY DS918 +: a complete disassembly in rules, Case: removing the cover 1/2: crwdns2935265:05crwdnd2935265:01crwdnd2935265:01crwdne2935265:0
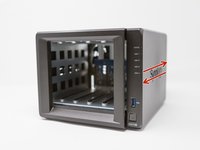
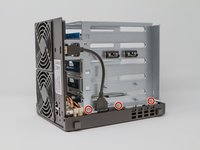
    • Remove the 2 screws on the back of the case at the top and bottom (not the one above the USB port)

  6. SYNOLOGY DS918 +: a complete disassembly in rules, Housing: hood removal 2/2: crwdns2935265:06crwdnd2935265:01crwdnd2935265:03crwdne2935265:0 SYNOLOGY DS918 +: a complete disassembly in rules, Housing: hood removal 2/2: crwdns2935265:06crwdnd2935265:02crwdnd2935265:03crwdne2935265:0 SYNOLOGY DS918 +: a complete disassembly in rules, Housing: hood removal 2/2: crwdns2935265:06crwdnd2935265:03crwdnd2935265:03crwdne2935265:0
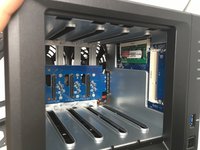
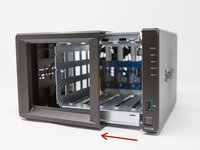
    • Slide the cover forward, then slide it out (here, to the left).

  7. SYNOLOGY DS918 +: a complete disassembly in rules, Internal parts: presentation: crwdns2935265:07crwdnd2935265:01crwdnd2935265:03crwdne2935265:0 SYNOLOGY DS918 +: a complete disassembly in rules, Internal parts: presentation: crwdns2935265:07crwdnd2935265:02crwdnd2935265:03crwdne2935265:0 SYNOLOGY DS918 +: a complete disassembly in rules, Internal parts: presentation: crwdns2935265:07crwdnd2935265:03crwdnd2935265:03crwdne2935265:0
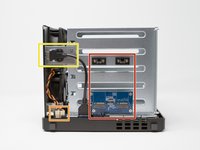
    • in red: SSD M.2 expansion card 2280

    • in yellow: USB port 3

    • in orange: internal connectors of the 2 fans

    • in green: 2 slots of RAM

    • in blue: SATA III backplane (4 hard drive bays)

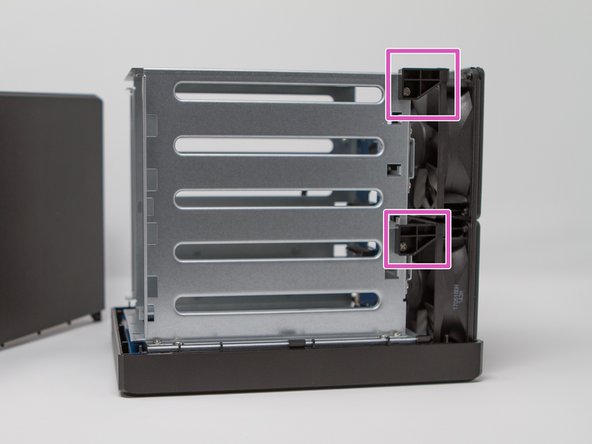
    • in pink: fixing the fans on the chassis

  8. SYNOLOGY DS918 +: a complete disassembly in rules, Removing M.2 SSD expansion card: crwdns2935265:08crwdnd2935265:01crwdnd2935265:03crwdne2935265:0 SYNOLOGY DS918 +: a complete disassembly in rules, Removing M.2 SSD expansion card: crwdns2935265:08crwdnd2935265:02crwdnd2935265:03crwdne2935265:0 SYNOLOGY DS918 +: a complete disassembly in rules, Removing M.2 SSD expansion card: crwdns2935265:08crwdnd2935265:03crwdnd2935265:03crwdne2935265:0
    •   Remove the 4 screws located on the blue electronic board.  

    • You can remove the M.2 expansion board now.

  9. SYNOLOGY DS918 +: a complete disassembly in rules, USB3 port: removal of connectivity: crwdns2935265:09crwdnd2935265:01crwdnd2935265:01crwdne2935265:0
    • Remove the screw from the holding plate of the USB connector 3.

    • Also remove the USB 3 connector screw on the rear side (this can be done later).

    • Do not remove the USB connector 3 on the motherboard, it is glued. It does not interfere with disassembly!

  10. SYNOLOGY DS918 +: a complete disassembly in rules, Removing fan clips: crwdns2935265:010crwdnd2935265:01crwdnd2935265:01crwdne2935265:0
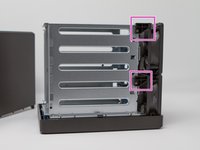
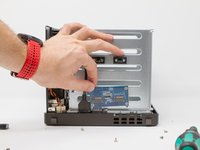
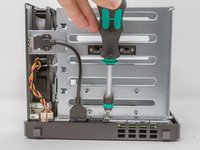
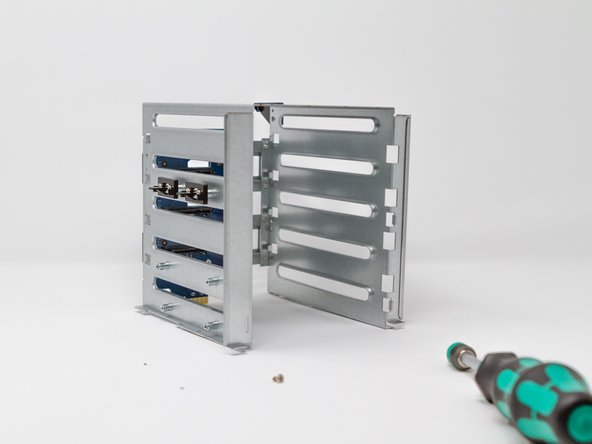
    • Remove the screws from the two shims to secure the disc cage and the two fans.

  11. SYNOLOGY DS918 +: a complete disassembly in rules, Cage disks: removal of cradle 1/3: crwdns2935265:011crwdnd2935265:01crwdnd2935265:02crwdne2935265:0 SYNOLOGY DS918 +: a complete disassembly in rules, Cage disks: removal of cradle 1/3: crwdns2935265:011crwdnd2935265:02crwdnd2935265:02crwdne2935265:0
    • 5 Phillips screws must be removed.

    • First 3 screws on SSD expansion board, on the bottom (bottom).

  12. SYNOLOGY DS918 +: a complete disassembly in rules, Cage disks: removal of cradle 2/3: crwdns2935265:012crwdnd2935265:01crwdnd2935265:01crwdne2935265:0
    • Then 2 screws on the upper face of the device (top).

  13. SYNOLOGY DS918 +: a complete disassembly in rules, Cage disks: removal of cradle 3/3: crwdns2935265:013crwdnd2935265:01crwdnd2935265:03crwdne2935265:0 SYNOLOGY DS918 +: a complete disassembly in rules, Cage disks: removal of cradle 3/3: crwdns2935265:013crwdnd2935265:02crwdnd2935265:03crwdne2935265:0 SYNOLOGY DS918 +: a complete disassembly in rules, Cage disks: removal of cradle 3/3: crwdns2935265:013crwdnd2935265:03crwdnd2935265:03crwdne2935265:0
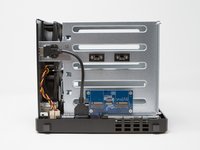
    • Now that the screws have been removed, you can (after verification) remove the cage drives.

    • Attention to the backplane and its connector (the electronic card). Check and check again, without forcing! The cradle discs must come alone.

  14. SYNOLOGY DS918 +: a complete disassembly in rules, Fans: removal of hardware 1/2: crwdns2935265:014crwdnd2935265:01crwdnd2935265:03crwdne2935265:0 SYNOLOGY DS918 +: a complete disassembly in rules, Fans: removal of hardware 1/2: crwdns2935265:014crwdnd2935265:02crwdnd2935265:03crwdne2935265:0 SYNOLOGY DS918 +: a complete disassembly in rules, Fans: removal of hardware 1/2: crwdns2935265:014crwdnd2935265:03crwdnd2935265:03crwdne2935265:0
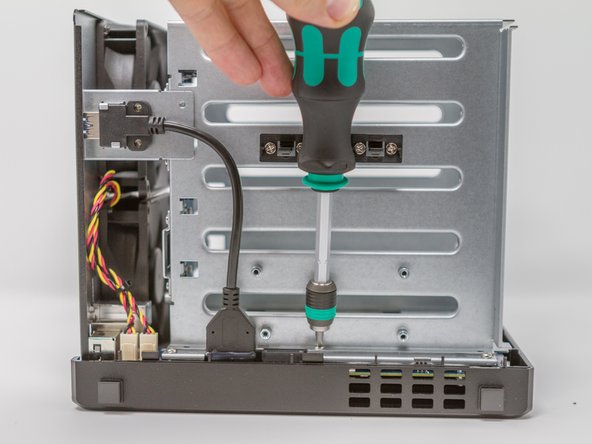
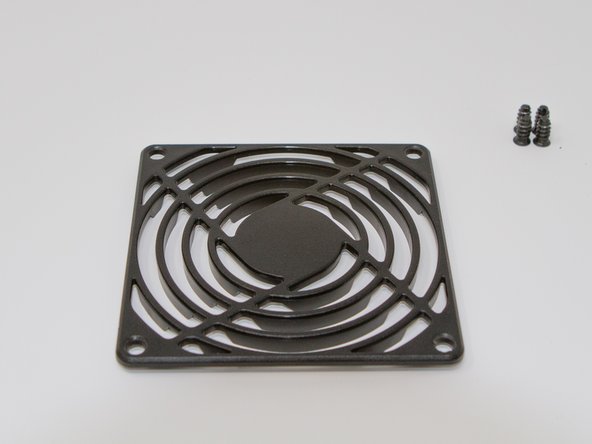
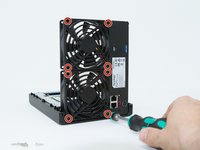
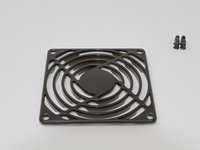
    • Remove the 8 screws from the fan grilles. They make it possible to maintain both the grilles and the fans.

    • Removing the fans does not seem necessary (not taken the time to check) to remove the motherboard.

    • Attention, when it comes to reassemble the grids, it will be necessary to make sure to align the 2 very small lugs in relief on the back of the plastic grates with the 2 small holes between the screws of the bottom of the fans!

  15. SYNOLOGY DS918 +: a complete disassembly in rules, Fans References: crwdns2935265:015crwdnd2935265:01crwdnd2935265:01crwdne2935265:0
    • According to the technical documentation of Y.S. TECH:

    • Voltage: 12 Vdc (7 to 13.2 range) for 100 mA (consumption)

    • Life time @ 40 ° C L10: 50000 h

    • Noise level: 23 dB

    • Max airflow: 36.3 cubic feet / minute

    • Rotation speed: 1900 rpm

    • Weight: 100 g

  16. SYNOLOGY DS918 +: a complete disassembly in rules, Fans: removal of fans 2/2: crwdns2935265:016crwdnd2935265:01crwdnd2935265:02crwdne2935265:0 SYNOLOGY DS918 +: a complete disassembly in rules, Fans: removal of fans 2/2: crwdns2935265:016crwdnd2935265:02crwdnd2935265:02crwdne2935265:0
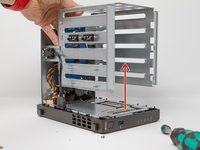
    • Remove the power cables from the fans, being careful to locate them (you never know) located on the motherboard.

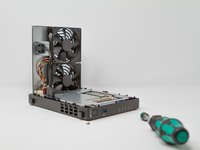
    • Then remove the fans.

    • You will also be careful to unscrew the USB 3 connector fixing screw on the rear panel (if this has not been done previously).

  17. SYNOLOGY DS918 +: a complete disassembly in rules, Motherboard: remove the board from the case: crwdns2935265:017crwdnd2935265:01crwdnd2935265:03crwdne2935265:0 SYNOLOGY DS918 +: a complete disassembly in rules, Motherboard: remove the board from the case: crwdns2935265:017crwdnd2935265:02crwdnd2935265:03crwdne2935265:0 SYNOLOGY DS918 +: a complete disassembly in rules, Motherboard: remove the board from the case: crwdns2935265:017crwdnd2935265:03crwdnd2935265:03crwdne2935265:0
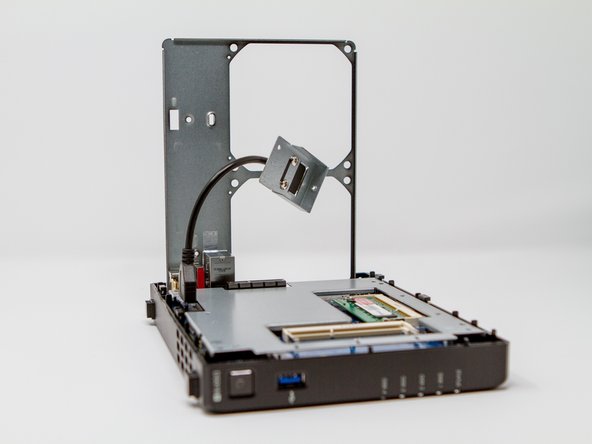
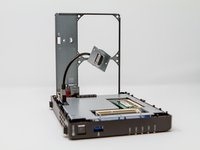
    • Remove the 4 screws that secure the motherboard to the case.

    • Remove the motherboard from the case paying attention to the USB 3 connector on the front and the power button. To do this, move the front panel a little and lift the motherboard upwards (outside).

    • Once the motherboard is out, unscrew the 4 screws of the metal protective cover (metal plate).

  18. SYNOLOGY DS918 +: a complete disassembly in rules, Motherboard: processor: crwdns2935265:018crwdnd2935265:01crwdnd2935265:01crwdne2935265:0
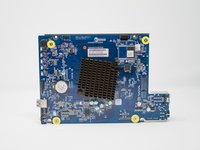
    • Motherboard processor face

    • INTEL Celeron J3455 / 64-bit / Quad core 1.5 burst up to 2.3 GHz

    • Memory battery

    • Internal Beep

    • USB connector 3

    • Power button (power-on)

    • Flash memory with pre-loaded DSM 6.1 kernel to allow the NAS to boot before full installation of the OS

    • UEFI Insyde H2O BY56 chip ??

  19. SYNOLOGY DS918 +: a complete disassembly in rules, Motherboard: memory side and connectors: crwdns2935265:019crwdnd2935265:01crwdnd2935265:02crwdne2935265:0 SYNOLOGY DS918 +: a complete disassembly in rules, Motherboard: memory side and connectors: crwdns2935265:019crwdnd2935265:02crwdnd2935265:02crwdne2935265:0
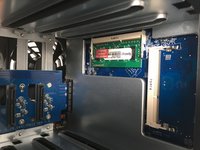
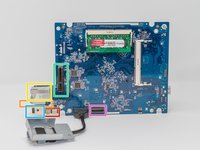
    • Memory side of the motherboard (pre-equipped with 4 GB of RAM)

    • NVMe M.2 SSD expansion card connector

    • Connector (PCIe ??) for SATA disk expansion card

    • Fan connector (x2)

    • Power connector

    • RJ45 LAN Connector (8P8C) x2

    • ESATA connector

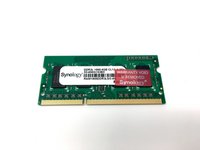
    • Original 4GB DDR3L RAM Memory Stick 1866

crwdns2915888:0crwdne2915888:0

To reassemble your device, follow the instructions in reverse order.

Be careful however, for the grilles of the fans it will be necessary to make sure to align the 2 small raised lugs on the back of the plastic grilles with the 2 small holes between the screws of the bottom of the fans!

crwdns2935229:036crwdne2935229:0

crwdns2934873:0crwdne2934873:0

fr en

100%

crwdns2934885:0crwdne2934885:0 crwdns2934875:0crwdne2934875:0
crwdns2934877:0crwdne2934877:0 ›

Sébastien

crwdns2935283:012/14/15crwdne2935283:0

4 060 crwdns2915208:0crwdne2915208:0

crwdns2935297:06crwdne2935297:0

crwdns2915084:0crwdne2915084:0

AEM (ANIMA EX MACHINA) crwdns2935289:0AEM (ANIMA EX MACHINA)crwdne2935289:0

Business

crwdns2934841:01crwdne2934841:0

crwdns2935297:014crwdne2935297:0

crwdns2944067:015crwdne2944067:0

Un tutoriel complet, avec de bonnes photos, lecture claire et concise.

Bravo et merci pour ton travail.

Jordi Chavarria - crwdns2934203:0crwdne2934203:0

merci pour ces encouragements !

Sébastien -

Hi

Is the cpu upgradable or soldered directly to the bord ?

Thanks

safeburn - crwdns2934203:0crwdne2934203:0

Hi,

soldered. But i haven’t removed the thermal dissipator.

Sébastien -

can you try it to upgrade it? :)

peto01 -

crwdns2917038:0crwdne2917038:0

crwdns2936625:0crwdne2936625:0:

crwdns2936751:024crwdne2936751:0 12

crwdns2936753:07crwdne2936753:0 73

crwdns2936753:030crwdne2936753:0 385

crwdns2942667:0crwdne2942667:0 42,066