crwdns2933423:0crwdne2933423:0

SAMSUNG ATIV Book 9 Plus NP930X5J-S01US Screen Replacement

crwdns2942213:0crwdne2942213:0

  1. SAMSUNG ATIV Book 9 Plus NP930X5J-S01US Screen Replacement, Battery: crwdns2935265:01crwdnd2935265:01crwdnd2935265:02crwdne2935265:0 SAMSUNG ATIV Book 9 Plus NP930X5J-S01US Screen Replacement, Battery: crwdns2935265:01crwdnd2935265:02crwdnd2935265:02crwdne2935265:0
    • Remove the ten 4.3mm Phillips #00 screws from the bottom cover of the laptop.

  2. SAMSUNG ATIV Book 9 Plus NP930X5J-S01US Screen Replacement: crwdns2935265:02crwdnd2935265:01crwdnd2935265:03crwdne2935265:0 SAMSUNG ATIV Book 9 Plus NP930X5J-S01US Screen Replacement: crwdns2935265:02crwdnd2935265:02crwdnd2935265:03crwdne2935265:0 SAMSUNG ATIV Book 9 Plus NP930X5J-S01US Screen Replacement: crwdns2935265:02crwdnd2935265:03crwdnd2935265:03crwdne2935265:0
    • Press the button to release the bottom cover.

  3. SAMSUNG ATIV Book 9 Plus NP930X5J-S01US Screen Replacement: crwdns2935265:03crwdnd2935265:01crwdnd2935265:02crwdne2935265:0 SAMSUNG ATIV Book 9 Plus NP930X5J-S01US Screen Replacement: crwdns2935265:03crwdnd2935265:02crwdnd2935265:02crwdne2935265:0
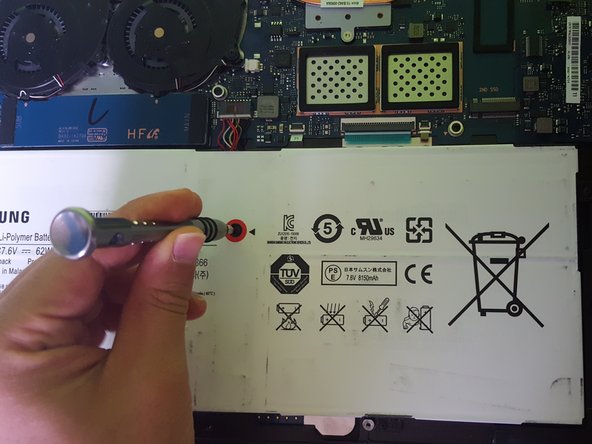
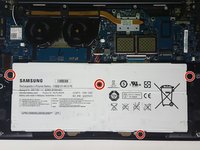
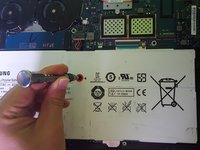
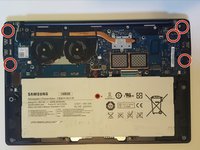
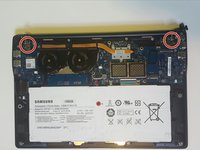
    • Remove the five 4.3mm Phillips #00 screws from the battery.

  4. SAMSUNG ATIV Book 9 Plus NP930X5J-S01US Screen Replacement: crwdns2935265:04crwdnd2935265:01crwdnd2935265:02crwdne2935265:0 SAMSUNG ATIV Book 9 Plus NP930X5J-S01US Screen Replacement: crwdns2935265:04crwdnd2935265:02crwdnd2935265:02crwdne2935265:0
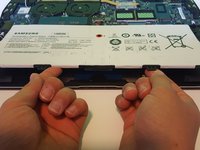
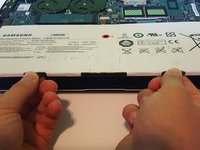
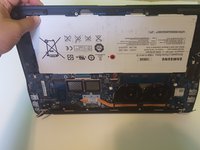
    • Lift the battery with both hands and remove.

  5. SAMSUNG ATIV Book 9 Plus NP930X5J-S01US Screen Replacement, Screen: crwdns2935265:05crwdnd2935265:01crwdnd2935265:03crwdne2935265:0 SAMSUNG ATIV Book 9 Plus NP930X5J-S01US Screen Replacement, Screen: crwdns2935265:05crwdnd2935265:02crwdnd2935265:03crwdne2935265:0 SAMSUNG ATIV Book 9 Plus NP930X5J-S01US Screen Replacement, Screen: crwdns2935265:05crwdnd2935265:03crwdnd2935265:03crwdne2935265:0
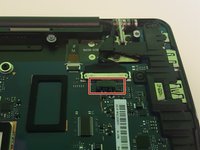
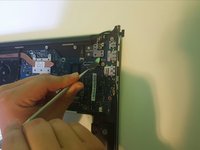
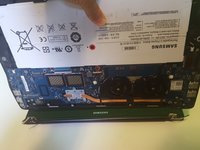
    • Disconnect the display cable from the motherboard.

  6. SAMSUNG ATIV Book 9 Plus NP930X5J-S01US Screen Replacement: crwdns2935265:06crwdnd2935265:01crwdnd2935265:02crwdne2935265:0 SAMSUNG ATIV Book 9 Plus NP930X5J-S01US Screen Replacement: crwdns2935265:06crwdnd2935265:02crwdnd2935265:02crwdne2935265:0
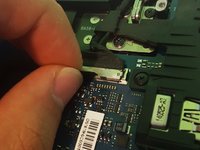
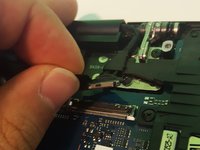
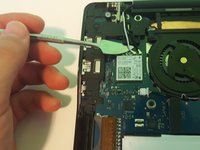
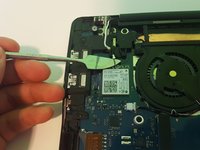
    • Disconnect the black and white antenna cables from the Wi-Fi card.

  7. SAMSUNG ATIV Book 9 Plus NP930X5J-S01US Screen Replacement: crwdns2935265:07crwdnd2935265:01crwdnd2935265:02crwdne2935265:0 SAMSUNG ATIV Book 9 Plus NP930X5J-S01US Screen Replacement: crwdns2935265:07crwdnd2935265:02crwdnd2935265:02crwdne2935265:0
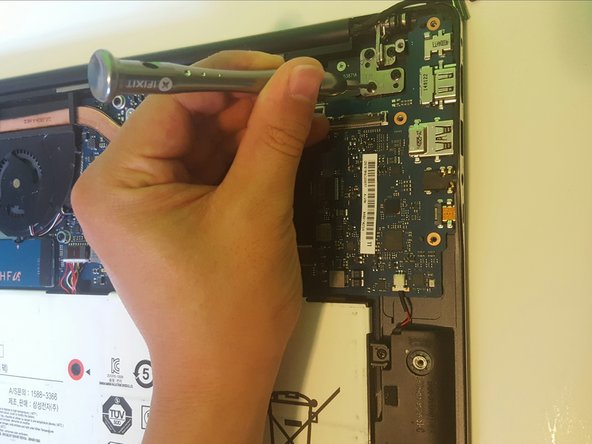
    • Remove the five 4mm Phillips #00 screws from the motherboard retaining brackets.

  8. SAMSUNG ATIV Book 9 Plus NP930X5J-S01US Screen Replacement: crwdns2935265:08crwdnd2935265:01crwdnd2935265:02crwdne2935265:0 SAMSUNG ATIV Book 9 Plus NP930X5J-S01US Screen Replacement: crwdns2935265:08crwdnd2935265:02crwdnd2935265:02crwdne2935265:0
    • Remove the eight silver 4.2mm Phillips #00 screws from the corner.

  9. SAMSUNG ATIV Book 9 Plus NP930X5J-S01US Screen Replacement: crwdns2935265:09crwdnd2935265:01crwdnd2935265:03crwdne2935265:0 SAMSUNG ATIV Book 9 Plus NP930X5J-S01US Screen Replacement: crwdns2935265:09crwdnd2935265:02crwdnd2935265:03crwdne2935265:0 SAMSUNG ATIV Book 9 Plus NP930X5J-S01US Screen Replacement: crwdns2935265:09crwdnd2935265:03crwdnd2935265:03crwdne2935265:0
    • Pry up the metal hinges from the laptop.

  10. SAMSUNG ATIV Book 9 Plus NP930X5J-S01US Screen Replacement: crwdns2935265:010crwdnd2935265:01crwdnd2935265:03crwdne2935265:0 SAMSUNG ATIV Book 9 Plus NP930X5J-S01US Screen Replacement: crwdns2935265:010crwdnd2935265:02crwdnd2935265:03crwdne2935265:0 SAMSUNG ATIV Book 9 Plus NP930X5J-S01US Screen Replacement: crwdns2935265:010crwdnd2935265:03crwdnd2935265:03crwdne2935265:0
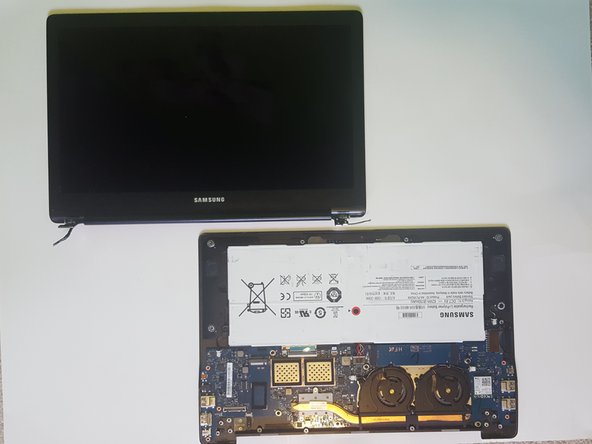
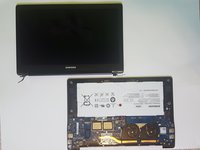
    • Place the screen on its back side and hold the battery-side of the laptop. In an upward motion, remove the back set off and set it aside.

crwdns2915888:0crwdne2915888:0

To reassemble your device, follow these instructions in reverse order.

crwdns2935227:0crwdne2935227:0

Sean Kim

crwdns2935283:004/12/18crwdne2935283:0

640 crwdns2915208:0crwdne2915208:0

crwdns2935297:04crwdne2935297:0

crwdns2915084:0crwdne2915084:0

UW Tacoma, Team S1-G2, Liner Spring 2018 crwdns2935289:0UW Tacoma, Team S1-G2, Liner Spring 2018crwdne2935289:0

UWT-LINER-S18S1G2

crwdns2931471:05crwdne2931471:0

crwdns2935297:04crwdne2935297:0

crwdns2917034:0crwdne2917034:0

There’s no need to remove the battery. Just disconnect its power socket if you want to be ‘careful’.

Steerpike - crwdns2934203:0crwdne2934203:0

crwdns2917038:0crwdne2917038:0

crwdns2936625:0crwdne2936625:0:

crwdns2936751:024crwdne2936751:0 2

crwdns2936753:07crwdne2936753:0 3

crwdns2936753:030crwdne2936753:0 12

crwdns2942667:0crwdne2942667:0 597