crwdns2933423:0crwdne2933423:0
crwdns2947577:0crwdnd2947577:0crwdne2947577:0

Ryobi P235 Trigger Replacement

crwdns2869540:0crwdne2869540:0: 2.9K

crwdns2959988:0crwdne2959988:0

crwdns2959990:0crwdne2959990:0
2
crwdns2959992:0crwdne2959992:0
18
crwdns2959994:0crwdne2959994:0
95
crwdns2959996:0crwdne2959996:0
2,865
crwdns2955950:0crwdne2955950:0: 2

crwdns2960002:01crwdne2960002:0, crwdns2960006:01crwdne2960006:0

crwdns2960000:0crwdne2960000:0
crwdns2959984:0crwdne2959984:0: 3

crwdns2959974:03crwdne2959974:0

crwdns2959986:0crwdne2959986:0: 0

crwdns2959958:0crwdne2959958:0

crwdns2955944:0crwdne2955944:0: crwdns2931287:030crwdne2931287:0 - crwdns2931289:01crwdne2931289:0
crwdns2955970:0crwdne2955970:0: crwdns2937803:0crwdne2937803:0
Ryobi P235 Trigger Replacement

crwdns2915892:0crwdne2915892:0

crwdns2959928:0crwdne2959928:0 ↓

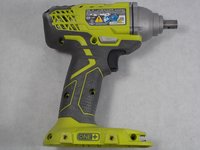
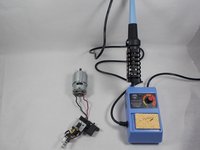
Use this guide to replace the trigger assembly in your Ryobi P235 Impact driver if power isn’t getting to the motor while using a fully charged battery.

The trigger assembly is what regulates how much power gets to the motor and what direction the motor spins.

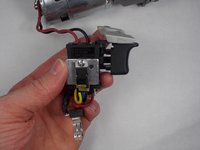
When you reach step 7 and 8, the wires are soldered to the motor so a soldering iron will need to be used to disconnect them from the old trigger assembly and then reattach them to the new one.

crwdns2959930:0crwdne2959930:0

crwdns2943213:0crwdne2943213:0

crwdns2943215:0crwdne2943215:0

    1. Ryobi P235 Trigger Replacement, Battery: crwdns2935265:01crwdnd2935265:01crwdnd2935265:02crwdne2935265:0 Ryobi P235 Trigger Replacement, Battery: crwdns2935265:01crwdnd2935265:02crwdnd2935265:02crwdne2935265:0
      • Push in both push tabs on the battery at the same time.

      • They are located below the green housing and are in the middle on both sides of the battery.

      crwdns2952109:0crwdne2952109:0

      crwdns2917038:0crwdne2917038:0

    2. Ryobi P235 Trigger Replacement: crwdns2935265:02crwdnd2935265:01crwdnd2935265:02crwdne2935265:0 Ryobi P235 Trigger Replacement: crwdns2935265:02crwdnd2935265:02crwdnd2935265:02crwdne2935265:0
      • Pull the battery away from the drill housing while holding in both tabs.

      crwdns2952109:0crwdne2952109:0

      crwdns2917038:0crwdne2917038:0

    1. Ryobi P235 Trigger Replacement, Trigger: crwdns2935265:03crwdnd2935265:01crwdnd2935265:02crwdne2935265:0 Ryobi P235 Trigger Replacement, Trigger: crwdns2935265:03crwdnd2935265:02crwdnd2935265:02crwdne2935265:0
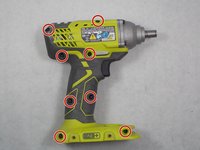
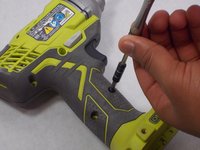
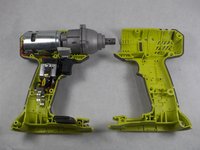
      • Use a Phillips #2 screwdriver to remove the eight 16 mm screws that secure the housing.

      crwdns2952109:0crwdne2952109:0

      crwdns2917038:0crwdne2917038:0

    2. Ryobi P235 Trigger Replacement: crwdns2935265:04crwdnd2935265:01crwdnd2935265:02crwdne2935265:0 Ryobi P235 Trigger Replacement: crwdns2935265:04crwdnd2935265:02crwdnd2935265:02crwdne2935265:0
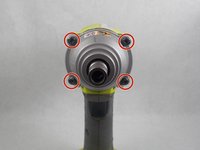
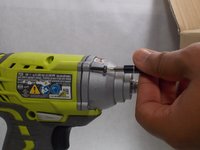
      • Use a T20 Torx screwdriver to remove the four 25.4 mm screws that secure the front of the housing.

      crwdns2952109:0crwdne2952109:0

      crwdns2917038:0crwdne2917038:0

    3. Ryobi P235 Trigger Replacement: crwdns2935265:05crwdnd2935265:01crwdnd2935265:02crwdne2935265:0 Ryobi P235 Trigger Replacement: crwdns2935265:05crwdnd2935265:02crwdnd2935265:02crwdne2935265:0
      • Open the housing with the data label facing up.

      crwdns2952109:0crwdne2952109:0

      crwdns2917038:0crwdne2917038:0

    4. Ryobi P235 Trigger Replacement: crwdns2935265:06crwdnd2935265:01crwdnd2935265:02crwdne2935265:0 Ryobi P235 Trigger Replacement: crwdns2935265:06crwdnd2935265:02crwdnd2935265:02crwdne2935265:0
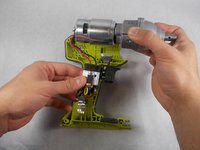
      • Lift the trigger mechanism and other internal components out of the housing assembly.

      crwdns2952109:0crwdne2952109:0

      crwdns2917038:0crwdne2917038:0

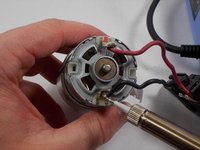
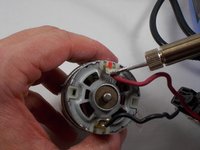
    5. Ryobi P235 Trigger Replacement: crwdns2935265:07crwdnd2935265:01crwdnd2935265:03crwdne2935265:0 Ryobi P235 Trigger Replacement: crwdns2935265:07crwdnd2935265:02crwdnd2935265:03crwdne2935265:0 Ryobi P235 Trigger Replacement: crwdns2935265:07crwdnd2935265:03crwdnd2935265:03crwdne2935265:0
      • Use a soldering iron to remove the black and red wires connecting the trigger assembly to the motor.

      • Use the soldering iron to connect the new trigger assembly to the motor.

      • Make sure the red wire connects to the lead with the red mark on it.

      crwdns2952109:0crwdne2952109:0

      crwdns2917038:0crwdne2917038:0

crwdns2915888:0crwdne2915888:0

To reassemble your device, follow these instructions in reverse order starting at step 6.

crwdns2935221:0crwdne2935221:0

crwdns2935229:03crwdne2935229:0

crwdns2862417:0crwdne2862417:0

crwdns2935293:0crwdne2935293:0

Paul Sousa

crwdns2935283:010/29/19crwdne2935283:0

817 crwdns2915208:0crwdne2915208:0

crwdns2935297:05crwdne2935297:0

crwdns2935287:0crwdne2935287:0

UMass Dartmouth, Team S4-G2, Saloman Fall 2019 crwdns2935289:0UMass Dartmouth, Team S4-G2, Saloman Fall 2019crwdne2935289:0

UMASSD-SALOMAN-F19S4G2

crwdns2931471:03crwdne2931471:0

crwdns2935297:072crwdne2935297:0

crwdns2947410:01crwdne2947410:0

Is the trigger what makes this a brushless motor? Is it possible for the trigger to cause the battery to drain down completely overnight?

Netgazer - crwdns2934203:0crwdne2934203:0 crwdns2950251:0crwdne2950251:0

crwdns2917038:0crwdne2917038:0

crwdns2936625:0crwdne2936625:0:

crwdns2936751:024crwdne2936751:0 2

crwdns2936753:07crwdne2936753:0 18

crwdns2936753:030crwdne2936753:0 95

crwdns2959996:0crwdne2959996:0 2,865