crwdns2933423:0crwdne2933423:0

Roku 4 Remote Control Motherboard Replacement

crwdns2942213:0crwdne2942213:0

  1. Roku 4 Remote Control Motherboard Replacement, Remote Control Motherboard: crwdns2935265:01crwdnd2935265:01crwdnd2935265:01crwdne2935265:0
    • Place the remote control facing down on the table, so that the buttons are facing downwards.

  2. Roku 4 Remote Control Motherboard Replacement: crwdns2935265:02crwdnd2935265:01crwdnd2935265:02crwdne2935265:0 Roku 4 Remote Control Motherboard Replacement: crwdns2935265:02crwdnd2935265:02crwdnd2935265:02crwdne2935265:0
    • Remove the battery compartment cover from the back of the remote by sliding it outwards. This should reveal the batteries.

  3. Roku 4 Remote Control Motherboard Replacement: crwdns2935265:03crwdnd2935265:01crwdnd2935265:02crwdne2935265:0 Roku 4 Remote Control Motherboard Replacement: crwdns2935265:03crwdnd2935265:02crwdnd2935265:02crwdne2935265:0
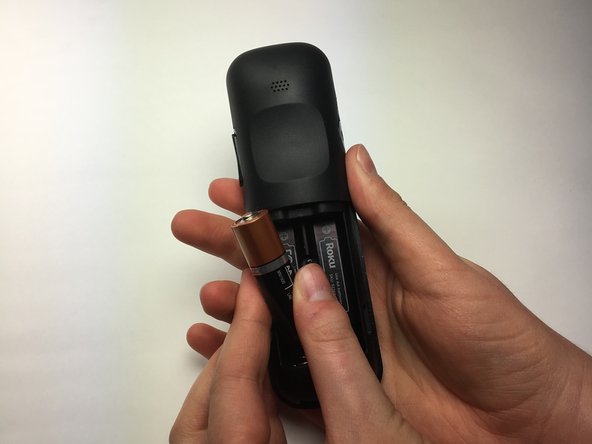
    • Remove the batteries from the battery compartment.

  4. Roku 4 Remote Control Motherboard Replacement: crwdns2935265:04crwdnd2935265:01crwdnd2935265:01crwdne2935265:0
    • Turn the Phillips PH0 screwdriver counterclockwise to carefully remove the 6.9 mm screw located between both battery compartments .

  5. Roku 4 Remote Control Motherboard Replacement: crwdns2935265:05crwdnd2935265:01crwdnd2935265:01crwdne2935265:0
    • Wedge a plastic opening tool into the seam between the top cover and bottom casing of the device to create a gap.

    • Prying open the remote is quite difficult and requires a large amount of force. Use caution to avoid breaking the device or hurting yourself.

    • Once you have created a gap large enough for your fingers to fit between, separate the top cover from the bottom plastic casing by pulling them apart gently.

  6. Roku 4 Remote Control Motherboard Replacement: crwdns2935265:06crwdnd2935265:01crwdnd2935265:03crwdne2935265:0 Roku 4 Remote Control Motherboard Replacement: crwdns2935265:06crwdnd2935265:02crwdnd2935265:03crwdne2935265:0 Roku 4 Remote Control Motherboard Replacement: crwdns2935265:06crwdnd2935265:03crwdnd2935265:03crwdne2935265:0
    • Using your right thumb, lift up on the left side of the motherboard to remove it from the bottom plastic casing.

crwdns2915888:0crwdne2915888:0

To reassemble your device, follow these instructions in reverse order.

crwdns2935229:02crwdne2935229:0

Hank Harrison

crwdns2935283:003/26/17crwdne2935283:0

449 crwdns2915208:0crwdne2915208:0

crwdns2935297:03crwdne2935297:0

crwdns2915084:0crwdne2915084:0

Baylor, Team S5-G4, Williams Spring 2017 crwdns2935289:0Baylor, Team S5-G4, Williams Spring 2017crwdne2935289:0

BU-WILLIAMS-S17S5G4

crwdns2931471:03crwdne2931471:0

crwdns2935297:04crwdne2935297:0

crwdns2944067:00crwdne2944067:0

crwdns2917038:0crwdne2917038:0

crwdns2936625:0crwdne2936625:0:

crwdns2936751:024crwdne2936751:0 1

crwdns2936753:07crwdne2936753:0 3

crwdns2936753:030crwdne2936753:0 18

crwdns2942667:0crwdne2942667:0 1,605