crwdns2933423:0crwdne2933423:0

Roku 3 Ethernet Port Replacement

crwdns2942213:0crwdne2942213:0

  1. Roku 3 Ethernet Port Replacement, Motherboard: crwdns2935265:01crwdnd2935265:01crwdnd2935265:01crwdne2935265:0
    • Place the Roku 3 on the table face down and orient it so you can correctly read the writing.

  2. Roku 3 Ethernet Port Replacement: crwdns2935265:02crwdnd2935265:01crwdnd2935265:03crwdne2935265:0 Roku 3 Ethernet Port Replacement: crwdns2935265:02crwdnd2935265:02crwdnd2935265:03crwdne2935265:0 Roku 3 Ethernet Port Replacement: crwdns2935265:02crwdnd2935265:03crwdnd2935265:03crwdne2935265:0
    • Pull back the rubber protection in the top right corner to locate the screw.

    • Repeat with the bottom right corner and bottom left corner.

  3. Roku 3 Ethernet Port Replacement: crwdns2935265:03crwdnd2935265:01crwdnd2935265:01crwdne2935265:0
    • Remove the 9 mm screws from the three corners with a Hex 1.3 Screwdriver.

  4. Roku 3 Ethernet Port Replacement: crwdns2935265:04crwdnd2935265:01crwdnd2935265:02crwdne2935265:0 Roku 3 Ethernet Port Replacement: crwdns2935265:04crwdnd2935265:02crwdnd2935265:02crwdne2935265:0
    • Open the device by gently lifting the bottom half away from the top half of the device.

  5. Roku 3 Ethernet Port Replacement: crwdns2935265:05crwdnd2935265:01crwdnd2935265:01crwdne2935265:0
    • Use your fingers to carefully lift the motherboard from the top half of the device.

  6. Roku 3 Ethernet Port Replacement: crwdns2935265:06crwdnd2935265:01crwdnd2935265:02crwdne2935265:0 Roku 3 Ethernet Port Replacement: crwdns2935265:06crwdnd2935265:02crwdnd2935265:02crwdne2935265:0
    • Pull away the IO shield from the motherboard using your hands.

  7. Roku 3 Ethernet Port Replacement, Ethernet Port: crwdns2935265:07crwdnd2935265:01crwdnd2935265:02crwdne2935265:0 Roku 3 Ethernet Port Replacement, Ethernet Port: crwdns2935265:07crwdnd2935265:02crwdnd2935265:02crwdne2935265:0
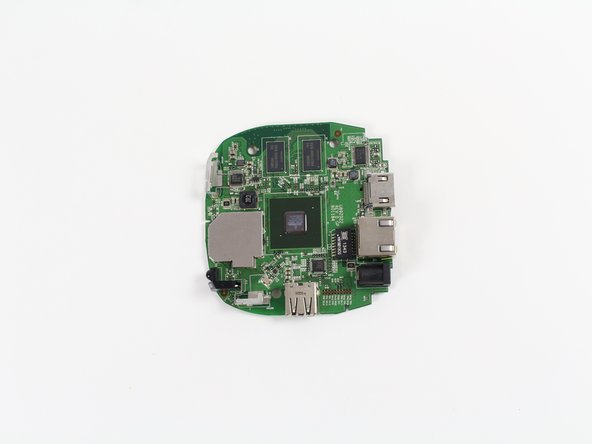
    • Turn over the motherboard so the back is face up and almost all large silver components are resting facedown on the table.

    • Orient it such that the backside of the HDMI port is in your upper right corner.

  8. Roku 3 Ethernet Port Replacement: crwdns2935265:08crwdnd2935265:01crwdnd2935265:01crwdne2935265:0
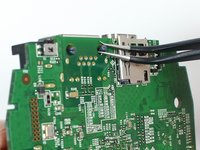
    • Desolder all of the port's connections with a soldering iron.

    • For more information on soldering, check out iFixit's Soldering Guide.

  9. Roku 3 Ethernet Port Replacement: crwdns2935265:09crwdnd2935265:01crwdnd2935265:02crwdne2935265:0 Roku 3 Ethernet Port Replacement: crwdns2935265:09crwdnd2935265:02crwdnd2935265:02crwdne2935265:0
    • Locate the plastic push-throughs just to the left of the backside of the USB port.

    • Pinch the plastic push-throughs. The port should now be able to be removed.

crwdns2915888:0crwdne2915888:0

To reassemble your device, follow these instructions in reverse order.

Andy Hak

crwdns2935283:010/07/16crwdne2935283:0

268 crwdns2915208:0crwdne2915208:0

crwdns2935297:02crwdne2935297:0

crwdns2915084:0crwdne2915084:0

Cal Poly, Team 15-2, Livingston Fall 2016 crwdns2935289:0Cal Poly, Team 15-2, Livingston Fall 2016crwdne2935289:0

CPSU-LIVINGSTON-F16S15G2

crwdns2931471:03crwdne2931471:0

crwdns2935297:06crwdne2935297:0

crwdns2947412:00crwdne2947412:0

crwdns2917038:0crwdne2917038:0

crwdns2936625:0crwdne2936625:0:

crwdns2936751:024crwdne2936751:0 1

crwdns2936753:07crwdne2936753:0 1

crwdns2936753:030crwdne2936753:0 5

crwdns2942667:0crwdne2942667:0 1,678