crwdns2933423:0crwdne2933423:0

Rival Mini Chopper MC-67BL Safety Latch Replacement

crwdns2942213:0crwdne2942213:0

  1. Rival Mini Chopper MC-67BL Safety Latch Replacement, Turning Gears: crwdns2935265:01crwdnd2935265:01crwdnd2935265:02crwdne2935265:0 Rival Mini Chopper MC-67BL Safety Latch Replacement, Turning Gears: crwdns2935265:01crwdnd2935265:02crwdnd2935265:02crwdne2935265:0
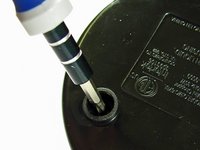
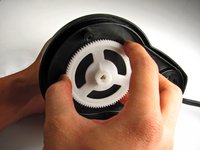
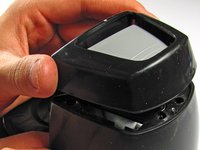
    • Twist the plastic lid counterclockwise to unlock it.

    • Lift the lid to remove it from the container.

  2. Rival Mini Chopper MC-67BL Safety Latch Replacement: crwdns2935265:02crwdnd2935265:01crwdnd2935265:01crwdne2935265:0
    • Carefully remove the blade from the container.

    • For reassembly, the teeth on the metal shaft line up with slots on the inside of the plastic hole.

  3. Rival Mini Chopper MC-67BL Safety Latch Replacement: crwdns2935265:03crwdnd2935265:01crwdnd2935265:01crwdne2935265:0
    • With your hand, twist the container counter-clockwise until it unlocks from the base. Remove the container by lifting it straight up.

  4. Rival Mini Chopper MC-67BL Safety Latch Replacement: crwdns2935265:04crwdnd2935265:01crwdnd2935265:01crwdne2935265:0
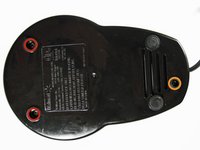
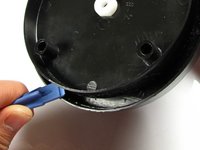
    • Use your fingers to pry out the two rubber feet from the bottom cover of the base.

    • The two feet furthest from the button tower contain screws. The other two feet do not.

  5. Rival Mini Chopper MC-67BL Safety Latch Replacement: crwdns2935265:05crwdnd2935265:01crwdnd2935265:02crwdne2935265:0 Rival Mini Chopper MC-67BL Safety Latch Replacement: crwdns2935265:05crwdnd2935265:02crwdnd2935265:02crwdne2935265:0
    • Use the Phillips #2 screwdriver to unscrew the two 12.7-mm screws underneath the rubber feet.

    • Use the same screwdriver to unscrew the 15.88-mm screw from the back of the chopper.

  6. Rival Mini Chopper MC-67BL Safety Latch Replacement: crwdns2935265:06crwdnd2935265:01crwdnd2935265:01crwdne2935265:0
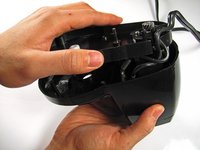
    • Firmly lift the bottom cover off of the base.

  7. Rival Mini Chopper MC-67BL Safety Latch Replacement: crwdns2935265:07crwdnd2935265:01crwdnd2935265:01crwdne2935265:0
    • Remove the smaller white gear by lifting it up with your hand.

  8. Rival Mini Chopper MC-67BL Safety Latch Replacement: crwdns2935265:08crwdnd2935265:01crwdnd2935265:03crwdne2935265:0 Rival Mini Chopper MC-67BL Safety Latch Replacement: crwdns2935265:08crwdnd2935265:02crwdnd2935265:03crwdne2935265:0 Rival Mini Chopper MC-67BL Safety Latch Replacement: crwdns2935265:08crwdnd2935265:03crwdnd2935265:03crwdne2935265:0
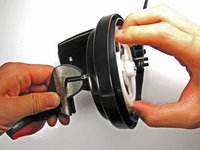
    • Use a pair of pliers or any other clamping tool to securely hold the blade-shaft that sits above the base.

    • Grab the gear with your other hand and turn CLOCKWISE. Unlike most screws, the gear is reverse-threaded to allow the blade to spin.

    • Continue turning the gear until completely removed from the blade-shaft.

  9. Rival Mini Chopper MC-67BL Safety Latch Replacement, Power Button: crwdns2935265:09crwdnd2935265:01crwdnd2935265:01crwdne2935265:0
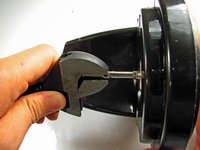
    • Use your hand to firmly pull the blade-shaft from the base.

  10. Rival Mini Chopper MC-67BL Safety Latch Replacement: crwdns2935265:010crwdnd2935265:01crwdnd2935265:01crwdne2935265:0
    • Using Phillips #2 screwdriver, unscrew two 12.7-mm screws in the middle of the base.

  11. Rival Mini Chopper MC-67BL Safety Latch Replacement: crwdns2935265:011crwdnd2935265:01crwdnd2935265:01crwdne2935265:0
    • Unwind power cord from the base pegs.

  12. Rival Mini Chopper MC-67BL Safety Latch Replacement: crwdns2935265:012crwdnd2935265:01crwdnd2935265:02crwdne2935265:0 Rival Mini Chopper MC-67BL Safety Latch Replacement: crwdns2935265:012crwdnd2935265:02crwdnd2935265:02crwdne2935265:0
    • Use the plastic opening tool to pry open the base from the main body.

    • These two plastic prongs are pressed fit into the base. It may take some effort to pry the base completely off.

    • Once freed, lift the base panel from the main body and set it aside.

  13. Rival Mini Chopper MC-67BL Safety Latch Replacement: crwdns2935265:013crwdnd2935265:01crwdnd2935265:02crwdne2935265:0 Rival Mini Chopper MC-67BL Safety Latch Replacement: crwdns2935265:013crwdnd2935265:02crwdnd2935265:02crwdne2935265:0
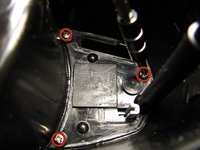
    • Use a Phillips #2 screwdriver to remove the three 9.53-mm screws from inside the main body.

    • Next, turn the device upright and lift the upper casing from around the button gently.

  14. Rival Mini Chopper MC-67BL Safety Latch Replacement: crwdns2935265:014crwdnd2935265:01crwdnd2935265:01crwdne2935265:0
    • Remove the button by simply pulling it up.

    • Don't lose the spring under the button! Without it, the blender will not function.

  15. Rival Mini Chopper MC-67BL Safety Latch Replacement, Safety Latch: crwdns2935265:015crwdnd2935265:01crwdnd2935265:01crwdne2935265:0
    • Use the Phillips #2 screwdriver to remove one 9.53-mm screw.

  16. Rival Mini Chopper MC-67BL Safety Latch Replacement: crwdns2935265:016crwdnd2935265:01crwdnd2935265:01crwdne2935265:0
    • Remove the white latch by unhooking it from the spring wire and gently lifting straight up.

crwdns2915888:0crwdne2915888:0

To reassemble your device, follow these instructions in reverse order.

Roxanne

crwdns2935283:010/17/13crwdne2935283:0

522 crwdns2915208:0crwdne2915208:0

crwdns2935297:04crwdne2935297:0

crwdns2915084:0crwdne2915084:0

Cal Poly, Team 4-29, Amido Fall 2013 crwdns2935289:0Cal Poly, Team 4-29, Amido Fall 2013crwdne2935289:0

CPSU-AMIDO-F13S4G29

crwdns2931471:04crwdne2931471:0

crwdns2935297:05crwdne2935297:0

crwdns2947412:00crwdne2947412:0

crwdns2917038:0crwdne2917038:0

crwdns2936625:0crwdne2936625:0:

crwdns2936751:024crwdne2936751:0 0

crwdns2936753:07crwdne2936753:0 1

crwdns2936753:030crwdne2936753:0 3

crwdns2942667:0crwdne2942667:0 1,498