crwdns2933423:0crwdne2933423:0

Nintendo Switch Right Joy-Con SL/SR Button Board Replacement

crwdns2942213:0crwdne2942213:0

  1. Nintendo Switch Right Joy-Con SL/SR Button Board Replacement, SL/SR Button Board: crwdns2935265:01crwdnd2935265:01crwdnd2935265:03crwdne2935265:0 Nintendo Switch Right Joy-Con SL/SR Button Board Replacement, SL/SR Button Board: crwdns2935265:01crwdnd2935265:02crwdnd2935265:03crwdne2935265:0 Nintendo Switch Right Joy-Con SL/SR Button Board Replacement, SL/SR Button Board: crwdns2935265:01crwdnd2935265:03crwdnd2935265:03crwdne2935265:0
    • Remove the four 6 mm screws visible on the back of the Joy-Con using the Tri-point Y00 screwdriver.

    • During the entire procedure, place the small screws somewhere you won't lose them and keep them organized.

  2. Nintendo Switch Right Joy-Con SL/SR Button Board Replacement: crwdns2935265:02crwdnd2935265:01crwdnd2935265:03crwdne2935265:0 Nintendo Switch Right Joy-Con SL/SR Button Board Replacement: crwdns2935265:02crwdnd2935265:02crwdnd2935265:03crwdne2935265:0 Nintendo Switch Right Joy-Con SL/SR Button Board Replacement: crwdns2935265:02crwdnd2935265:03crwdnd2935265:03crwdne2935265:0
    • Open the Joy-Con by inserting the opening pick tool into the bottom corner and sliding it upwards.

    • When opening, be careful not to 'yank' the two halves of the Joy-Con far apart, as they are still attached by cables.

    • The ribbon cables are fragile. Forceful pulling may lead to device damage.

  3. Nintendo Switch Right Joy-Con SL/SR Button Board Replacement: crwdns2935265:03crwdnd2935265:01crwdnd2935265:03crwdne2935265:0 Nintendo Switch Right Joy-Con SL/SR Button Board Replacement: crwdns2935265:03crwdnd2935265:02crwdnd2935265:03crwdne2935265:0 Nintendo Switch Right Joy-Con SL/SR Button Board Replacement: crwdns2935265:03crwdnd2935265:03crwdnd2935265:03crwdne2935265:0
    • Remove the two 3 mm screws on the charging rail using the Phillips #00 screwdriver.

    • The part that needs to be replaced is the button board directly under these two screws.

  4. Nintendo Switch Right Joy-Con SL/SR Button Board Replacement: crwdns2935265:04crwdnd2935265:01crwdnd2935265:03crwdne2935265:0 Nintendo Switch Right Joy-Con SL/SR Button Board Replacement: crwdns2935265:04crwdnd2935265:02crwdnd2935265:03crwdne2935265:0 Nintendo Switch Right Joy-Con SL/SR Button Board Replacement: crwdns2935265:04crwdnd2935265:03crwdnd2935265:03crwdne2935265:0
    • Remove the three 3 mm screw on the battery compartment using the Phillips #00 screwdriver.

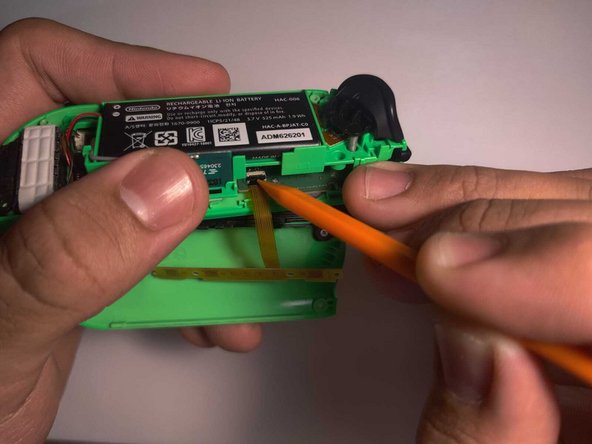
    • With the battery compartment loosened, the locking tab holding the cable in place will be easy to access.

  5. Nintendo Switch Right Joy-Con SL/SR Button Board Replacement: crwdns2935265:05crwdnd2935265:01crwdnd2935265:03crwdne2935265:0 Nintendo Switch Right Joy-Con SL/SR Button Board Replacement: crwdns2935265:05crwdnd2935265:02crwdnd2935265:03crwdne2935265:0 Nintendo Switch Right Joy-Con SL/SR Button Board Replacement: crwdns2935265:05crwdnd2935265:03crwdnd2935265:03crwdne2935265:0
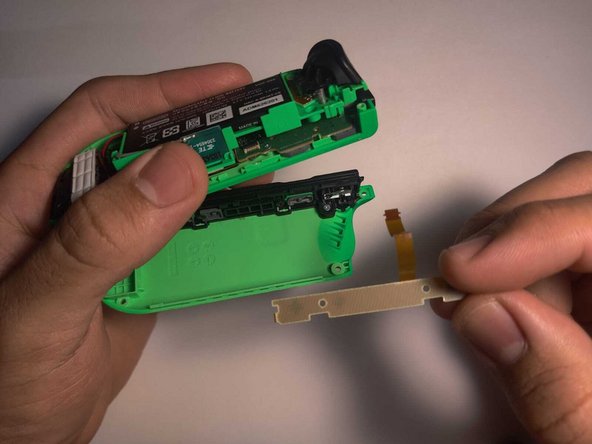
    • Use the plastic spudger tool to lift the tab lock holding the bent button board cable. Lightly lift the battery compartment to have more space while doing so.

    • Once the tab is unlocked, remove the bent cable.

  6. Nintendo Switch Right Joy-Con SL/SR Button Board Replacement: crwdns2935265:06crwdnd2935265:01crwdnd2935265:03crwdne2935265:0 Nintendo Switch Right Joy-Con SL/SR Button Board Replacement: crwdns2935265:06crwdnd2935265:02crwdnd2935265:03crwdne2935265:0 Nintendo Switch Right Joy-Con SL/SR Button Board Replacement: crwdns2935265:06crwdnd2935265:03crwdnd2935265:03crwdne2935265:0
    • Insert the new replacement button board cable into the tab.

    • Use the spudger to re-lock the tab to hold the new part in its place.

  7. Nintendo Switch Right Joy-Con SL/SR Button Board Replacement: crwdns2935265:07crwdnd2935265:01crwdnd2935265:03crwdne2935265:0 Nintendo Switch Right Joy-Con SL/SR Button Board Replacement: crwdns2935265:07crwdnd2935265:02crwdnd2935265:03crwdne2935265:0 Nintendo Switch Right Joy-Con SL/SR Button Board Replacement: crwdns2935265:07crwdnd2935265:03crwdnd2935265:03crwdne2935265:0
    • To avoid having the same problem in the future, make sure the new cable is bent under the battery compartment after reassembly.

    • Lightly lift the battery compartment to make it easier to bend the new button board cable under it.

    • The space between the battery and the back shell of the Joy-Con is very tight, which caused the original cable to bend and malfunction. Inserting the new cable under the battery will give it more space.

crwdns2915888:0crwdne2915888:0

To reassemble your device, follow these instructions in reverse order, starting from Step 4.

crwdns2935229:043crwdne2935229:0

Javier Cora

crwdns2935283:003/18/22crwdne2935283:0

1,351 crwdns2915208:0crwdne2915208:0

crwdns2935295:0crwdne2935295:0

crwdns2915084:0crwdne2915084:0

University of Puerto Rico Mayagüez, Team 2-4, Cools Stephens Spring 2022 crwdns2935289:0University of Puerto Rico Mayagüez, Team 2-4, Cools Stephens Spring 2022crwdne2935289:0

UPRM-COOLS STEPHENS-S22S2G4

crwdns2934841:01crwdne2934841:0

crwdns2935297:07crwdne2935297:0

crwdns2944067:011crwdne2944067:0

Valuable step-by-step guide plus pictorial samples. Keep writing your good stuff, Javier!

Rudi Lim - crwdns2934203:0crwdne2934203:0

Nice guide. To loosen the battery compartment on my controller I had to remove te battery first. I couldn't see te top 2 screws in step 4. The battery was sticked to the bracket with some tape but removes easily. Underneath the battery were two screws.

Edit: maybe its different because I had to change the button board on the left JoyCon.

Stefan Haarman - crwdns2934203:0crwdne2934203:0

Yes! This Guide above shows the right Joycon. As for the left one there are two screws below the battery as you said!

Paul Stachowiak -

Very helpful step-by-step guide. Thank you.

Had to change the Button Board on the left Joy-con. The screws were also located under the battery in my case. Attention: there 4 screws under the battery, two of which diagonal to each other that hold the battery compartment in place. No need to unscrew all 4.

Tone - crwdns2934203:0crwdne2934203:0

I’ve replaced the board, but SL and SR still not working, also two lights not working. What to do?

Mike - crwdns2934203:0crwdne2934203:0

crwdns2917038:0crwdne2917038:0

crwdns2936625:0crwdne2936625:0:

crwdns2936751:024crwdne2936751:0 98

crwdns2936753:07crwdne2936753:0 735

crwdns2936753:030crwdne2936753:0 3,715

crwdns2942667:0crwdne2942667:0 66,399