crwdns2933423:0crwdne2933423:0

Ricoh Super 8 800z Handle Assembly Replacement

crwdns2942213:0crwdne2942213:0

  1. Ricoh Super 8 800z Handle Assembly Replacement, Handle Assembly: crwdns2935265:01crwdnd2935265:01crwdnd2935265:03crwdne2935265:0 Ricoh Super 8 800z Handle Assembly Replacement, Handle Assembly: crwdns2935265:01crwdnd2935265:02crwdnd2935265:03crwdne2935265:0 Ricoh Super 8 800z Handle Assembly Replacement, Handle Assembly: crwdns2935265:01crwdnd2935265:03crwdnd2935265:03crwdne2935265:0
    • Open the handle's battery compartment and remove the batteries from the handle.

  2. Ricoh Super 8 800z Handle Assembly Replacement: crwdns2935265:02crwdnd2935265:01crwdnd2935265:03crwdne2935265:0 Ricoh Super 8 800z Handle Assembly Replacement: crwdns2935265:02crwdnd2935265:02crwdnd2935265:03crwdne2935265:0 Ricoh Super 8 800z Handle Assembly Replacement: crwdns2935265:02crwdnd2935265:03crwdnd2935265:03crwdne2935265:0
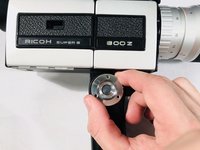
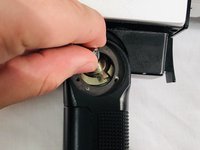
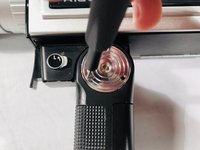
    • Using the Phillips #000 screwdriver, remove the three screws on the round plate on the right side of the camera handle. This is the side with the handle lock release button.

  3. Ricoh Super 8 800z Handle Assembly Replacement: crwdns2935265:03crwdnd2935265:01crwdnd2935265:03crwdne2935265:0 Ricoh Super 8 800z Handle Assembly Replacement: crwdns2935265:03crwdnd2935265:02crwdnd2935265:03crwdne2935265:0 Ricoh Super 8 800z Handle Assembly Replacement: crwdns2935265:03crwdnd2935265:03crwdnd2935265:03crwdne2935265:0
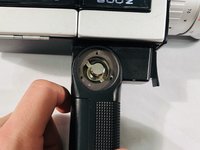
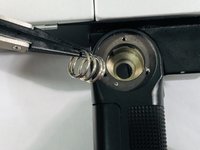
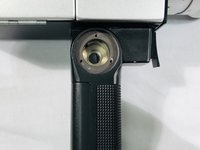
    • Remove the round metal plate.

    • Then, shift the handle so you have clearance to pass one of the legs of the button through the opening.

  4. Ricoh Super 8 800z Handle Assembly Replacement: crwdns2935265:04crwdnd2935265:01crwdnd2935265:03crwdne2935265:0 Ricoh Super 8 800z Handle Assembly Replacement: crwdns2935265:04crwdnd2935265:02crwdnd2935265:03crwdne2935265:0 Ricoh Super 8 800z Handle Assembly Replacement: crwdns2935265:04crwdnd2935265:03crwdnd2935265:03crwdne2935265:0
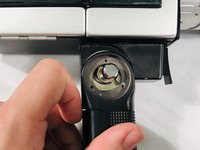
    • Pull the button out at an angle.

    • Remove the spring beneath it with a pair of tweezers.

  5. Ricoh Super 8 800z Handle Assembly Replacement: crwdns2935265:05crwdnd2935265:01crwdnd2935265:03crwdne2935265:0 Ricoh Super 8 800z Handle Assembly Replacement: crwdns2935265:05crwdnd2935265:02crwdnd2935265:03crwdne2935265:0 Ricoh Super 8 800z Handle Assembly Replacement: crwdns2935265:05crwdnd2935265:03crwdnd2935265:03crwdne2935265:0
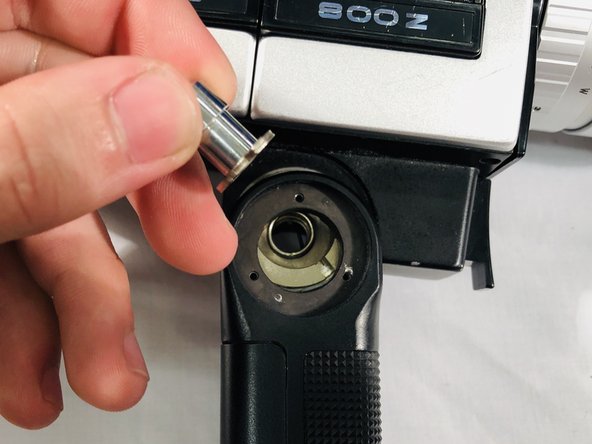
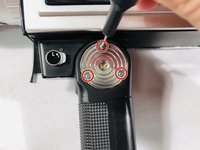
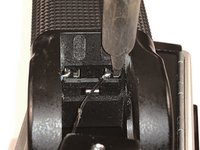
    • Flip the camera to the other side and remove the screws from the other round metal plate with a Phillips #000 screwdriver.

    • When replacing this plate, make sure the cutout in the plate surrounds the wiring in the handle. You may break the wiring if the plates are not seated well or if placed incorrectly.

  6. Ricoh Super 8 800z Handle Assembly Replacement: crwdns2935265:06crwdnd2935265:01crwdnd2935265:03crwdne2935265:0 Ricoh Super 8 800z Handle Assembly Replacement: crwdns2935265:06crwdnd2935265:02crwdnd2935265:03crwdne2935265:0 Ricoh Super 8 800z Handle Assembly Replacement: crwdns2935265:06crwdnd2935265:03crwdnd2935265:03crwdne2935265:0
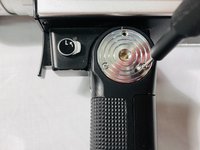
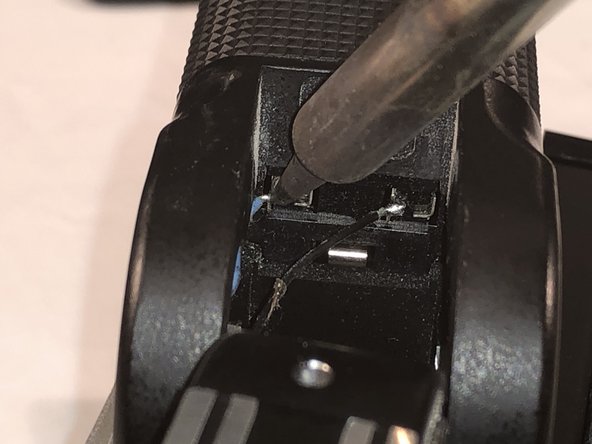
    • Pull the handle slowly away from the camera and shift the handle to allow access to the wire connections.

    • Desolder these wires carefully and you can now remove the handle.

    • For a informative guide on how to Solder/Desolder check out this guide.

crwdns2915888:0crwdne2915888:0

To reassemble your device, follow these instructions in reverse order.

Nicholas steven Thompson

crwdns2935283:001/26/20crwdne2935283:0

268 crwdns2915208:0crwdne2915208:0

crwdns2935297:02crwdne2935297:0

crwdns2915084:0crwdne2915084:0

Embry-Riddle Aeronautical University, Team S17-G10, Lamothe Spring 2020 crwdns2935289:0Embry-Riddle Aeronautical University, Team S17-G10, Lamothe Spring 2020crwdne2935289:0

ERAU-LAMOTHE-S20S17G10

crwdns2931471:04crwdne2931471:0

crwdns2935297:010crwdne2935297:0

crwdns2944067:00crwdne2944067:0

crwdns2917038:0crwdne2917038:0

crwdns2936625:0crwdne2936625:0:

crwdns2936751:024crwdne2936751:0 0

crwdns2936753:07crwdne2936753:0 2

crwdns2936753:030crwdne2936753:0 10

crwdns2942667:0crwdne2942667:0 284